
This is ONE OF THE MOST STUNNING heirloom crochet projects you will ever make. I am not exaggerating. When I finished this dress, I actually stepped back and stared at it for a solid five minutes.
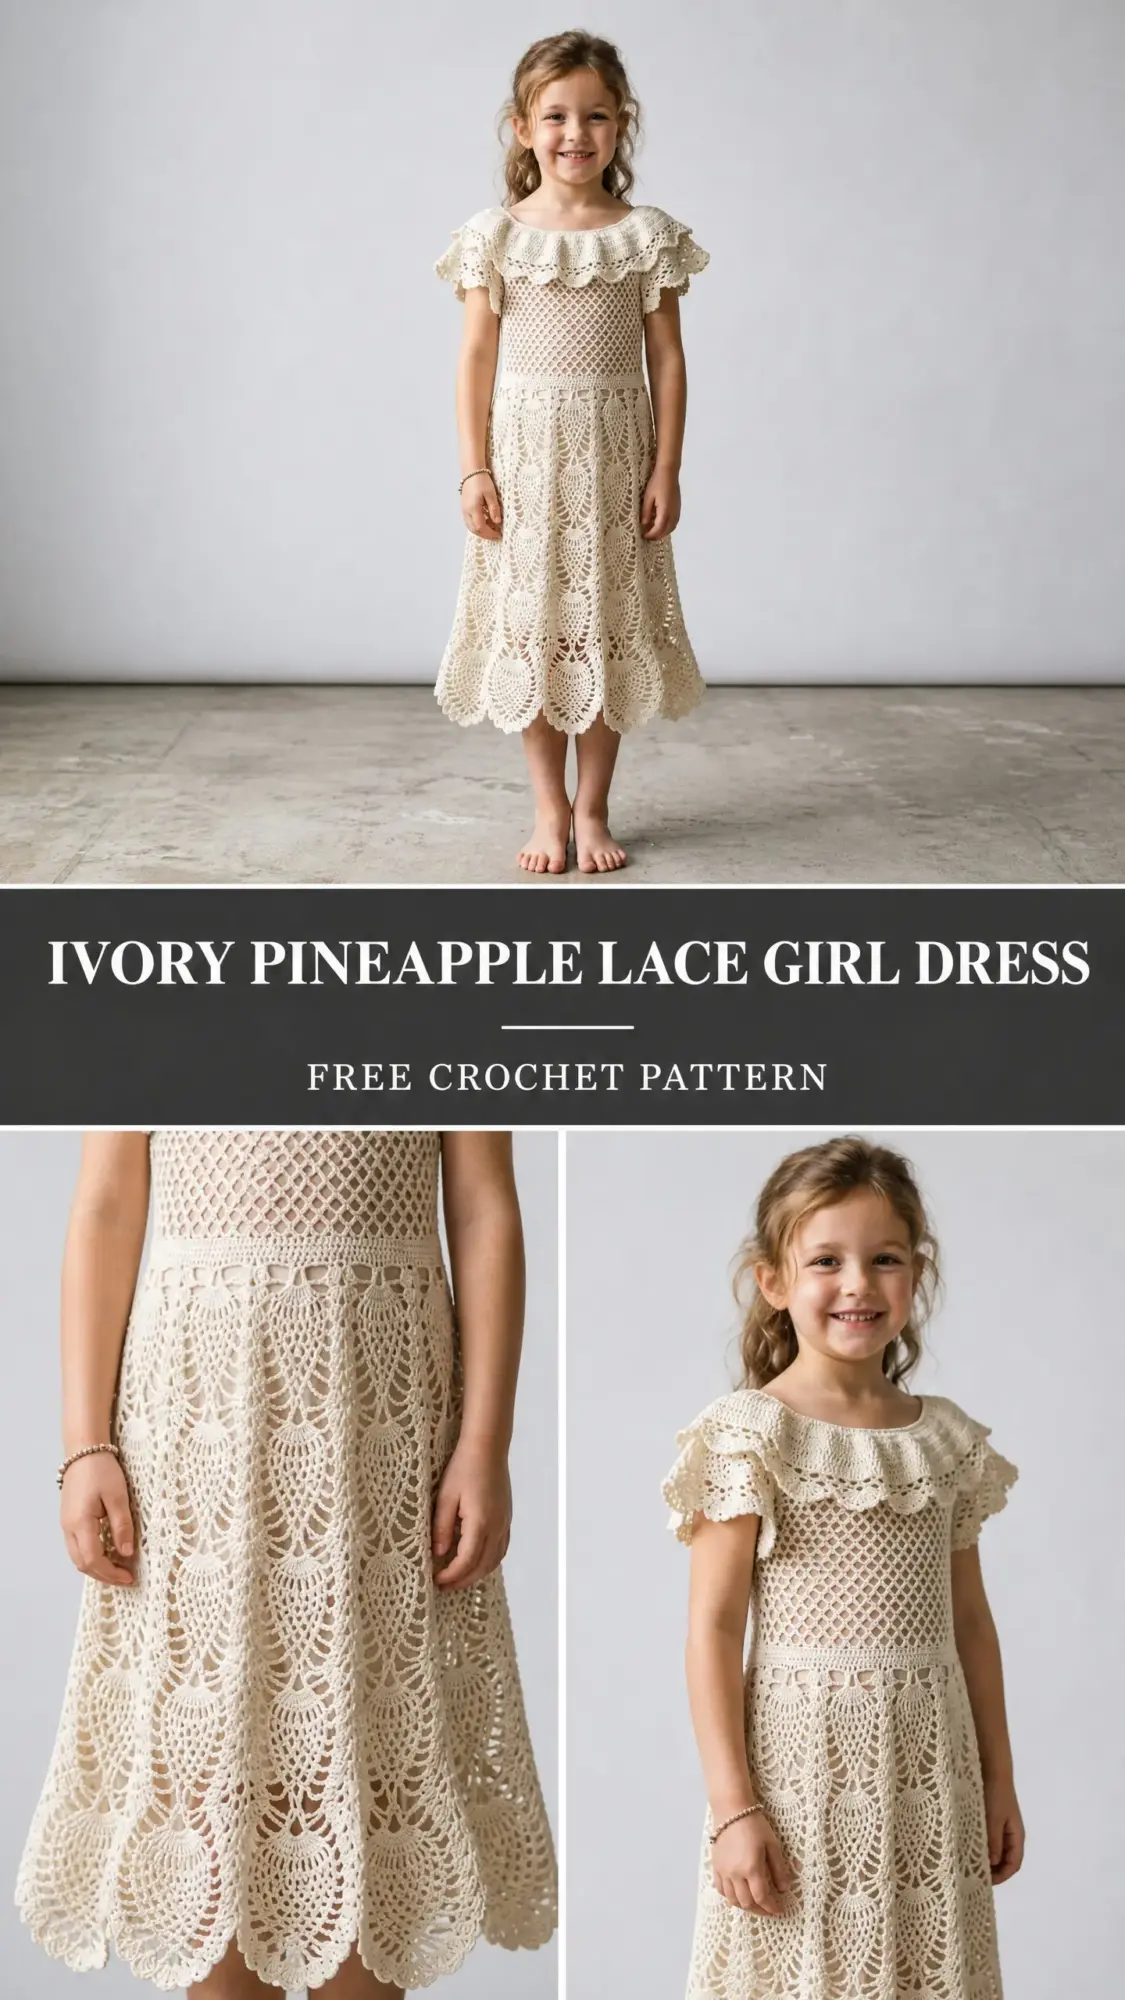
Yes, it takes time. We are talking 30 to 40 hours of work. But every single hour is worth it when you see those pineapple fans cascading down the skirt and that gorgeous ruffled collar framing a little one’s face. This is the kind of piece that gets passed down through generations.
If you have been wanting to level up your lace crochet skills and create something truly breathtaking, this ivory pineapple lace girl dress crochet pattern is calling your name. Let me walk you through everything you need to know to make it happen.
About This Crochet Pattern
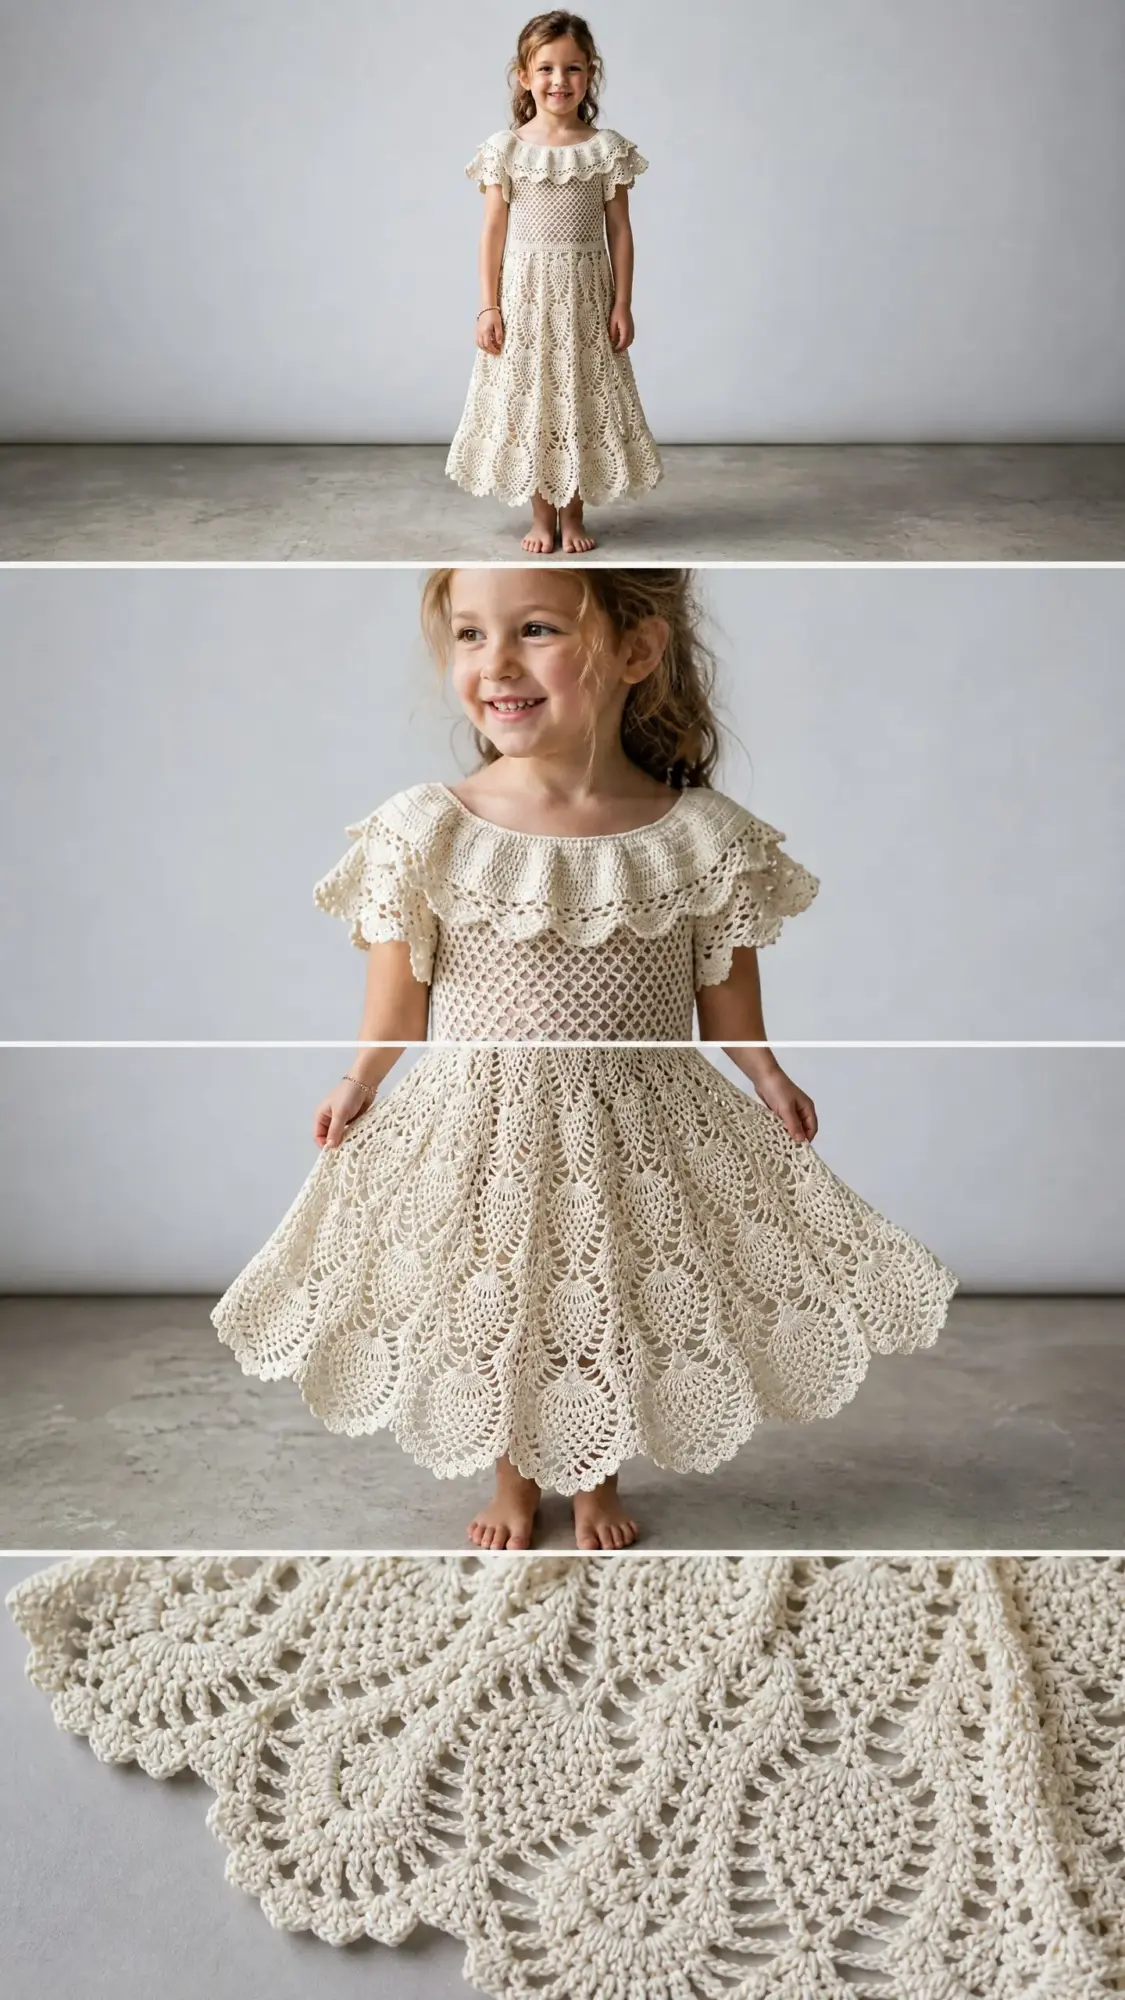
This dress features three distinct sections that come together beautifully. The bodice uses a delicate diamond mesh stitch worked in the round from the top down. The skirt transitions into classic pineapple fan motifs that flare out gracefully toward the hem. And that show-stopping collar? It is a double-layer ruffle with scalloped edging worked separately and attached at the neckline.
The finished dress fits a child approximately 5 to 6 years old, with a chest measurement of 22 to 23 inches. The total length from shoulder to hem is about 26 inches, hitting below the knee on most wearers. The silhouette is A-line, which means it is fitted through the bodice and gradually widens through the skirt for easy movement and a timeless look.
Skill level: Advanced. You will need to be comfortable with pineapple lace motifs, working in the round, shaping with increases and decreases, and constructing pieces separately before joining them.
Materials You Will Need
Yarn: Size 2 fine weight cotton or cotton-blend yarn in cream or natural ivory. You will need approximately 900 to 1000 yards total.
Here are three yarn options that work beautifully for this project:
Paintbox Yarns Cotton DK offers excellent stitch definition for lace work and washes beautifully. Its tight twist holds pineapple fans crisp after blocking. You will need approximately 7 skeins.
Scheepjes Catona is a premium mercerized cotton with a slight sheen that enhances the ivory color and shows off fine lace detail exceptionally well. You will need approximately 15 balls in shade 130 (Old Lace) or 105 (Bridal White).
Lion Brand 24/7 Cotton is a budget-friendly option with good drape and stitch definition. You will need approximately 5 skeins in cream.
Important substitution note: Choose a smooth, tightly plied cotton or cotton-blend. Avoid fuzzy or novelty yarns, which will obscure the lace pattern. Mercerized cotton is strongly preferred for its sheen and ability to hold a blocked shape.
Hook: US B-1 / 2.25 mm crochet hook for the main fabric. You may use a US C-2 / 2.75 mm for the collar ruffle if you want a slightly looser drape.
Notions:
Gauge
With your US B-1 / 2.25 mm hook, after blocking:
20 double crochet equals 4 inches (10 cm)
10 rows of double crochet equals 4 inches (10 cm)
Pineapple lace gauge: One complete pineapple fan motif measures approximately 2.5 inches wide at the widest point and 4 inches tall.
Mesh bodice gauge: One diamond mesh repeat (ch-3, dc, ch-3, dc) measures approximately 1 inch wide.
I cannot stress this enough: gauge is mandatory for a garment. Please do not skip your swatch. Block your swatch before measuring to ensure accuracy.
Abbreviations and Stitch Definitions
Let me walk you through every stitch you will use in this pattern.
beg = beginning
ch = chain (wrap yarn over hook and pull through the loop on hook)
ch-sp = chain space (the gap created by chains in previous rows)
dc = double crochet (yarn over, insert hook, pull up loop, yarn over and pull through 2 loops twice)
dc2tog = double crochet 2 together, a decrease that joins 2 stitches into 1
hdc = half double crochet
lp(s) = loop(s)
rem = remaining
rep = repeat
rnd = round
RS = right side
sc = single crochet (insert hook, pull up loop, yarn over and pull through both loops)
sk = skip
sl st = slip stitch (insert hook, pull loop through stitch and loop on hook)
sp = space
st(s) = stitch(es)
t-ch = turning chain
tog = together
tr = treble crochet (yarn over twice, insert hook, pull up loop, yarn over and pull through 2 loops three times)
WS = wrong side
yo = yarn over
Special Stitches Explained
Pineapple Fan Base Cluster: Into a single chain space, work (dc, ch 1) 7 times, dc. This creates 8 dc with 7 ch-1 spaces between them, forming the base of each pineapple fan. Each subsequent row decreases by 2 dc, narrowing the fan toward the tip.
Pineapple Decrease Row: Skip the first dc of the previous pineapple row. Slip stitch across to the first ch-1 space. Work sc into each ch-1 space across the pineapple, working sc, ch 1 between each sc, stopping before the last dc.
Shell Stitch: Work 5 dc into the same stitch or space.
Picot: Ch 3, sl st into the first ch of the ch-3. This creates a small decorative loop.
Mesh Stitch (Diamond Mesh): Work dc, ch 2, skip 2 stitches, dc across. On following rows, work dc into each dc with ch-2 over each ch-2 space below.
V-Stitch: Work (dc, ch 2, dc) all into the same stitch or space.
Section 1: Neckline Foundation and Bodice
The bodice begins at the neckline and is worked downward in the round.
Foundation chain: Ch 120. Sl st to first ch to form ring, being careful not to twist. (120 ch)
Round 1 (RS): Ch 3 (counts as first dc here and throughout), dc in each ch around. Sl st to top of beg ch-3 to join. (120 dc)
Round 2: Ch 5 (counts as dc + ch 2), sk 2 dc, dc in next dc, (ch 2, sk 2 dc, dc in next dc) around, end ch 2, sk 2 dc, sl st to 3rd ch of beg ch-5 to join. (40 dc, 40 ch-2 sps)
Round 3: Sl st into first ch-2 sp, ch 3, dc in same sp, ch 2, (2 dc in next ch-2 sp, ch 2) around, sl st to top of beg ch-3. (80 dc, 40 ch-2 sps)
Round 4: Ch 5 (counts as dc + ch 2), sk next dc, dc in ch-2 sp, ch 2, sk 1 dc, dc in next dc, (ch 2, sk 1 dc, dc in ch-2 sp, ch 2, sk 1 dc, dc in next dc) around, sl st to 3rd ch of beg ch-5. (80 dc, 80 ch-2 sps)
Checkpoint: After Round 4, the neckline ring should measure approximately 12 inches in circumference.
Rounds 5 through 14: Repeat the diamond mesh pattern as established in Round 4, working dc over dc and ch-2 over ch-2 space throughout. Maintain 80 dc and 80 ch-2 spaces each round.
Bodice checkpoint: Your piece should measure approximately 7 inches tall and 24 inches in circumference unstretched.
Section 2: Waistband
Round 15: Ch 1 (does not count as stitch), working into the top of each dc and into each ch-2 sp from the previous round, sc into every stitch and space around. Sl st to first sc to join. (160 sc)
Round 16: Ch 3, dc in each sc around, sl st to top of beg ch-3. (160 dc)
Round 17: Ch 1, sc in each dc around, sl st to first sc. (160 sc)
Optional ribbon tie: After Round 16, work a round of evenly spaced ch-2 eyelets by working (sc, ch 2, sk 2 sc) around for threading ribbon through later.
Waistband checkpoint: The waist circumference should be approximately 22 to 23 inches.
Section 3: Skirt Setup and Pineapple Lace
The skirt is worked flat in panels to allow for the back button placket. Cut yarn at end of Round 17. Turn the work so the wrong side faces you.
Skirt Row 1 (WS, setup): Attach yarn to first sc of Round 17. Ch 4 (counts as tr), tr in same st, ch 3, sk 3 sc, sc in next sc, ch 3, sk 3 sc, (2 tr in next sc, ch 3, sk 3 sc, sc in next sc, ch 3, sk 3 sc) across, end 2 tr in last sc. Turn. (16 pineapple base units)
Skirt Row 2 (RS): Ch 1, sc in first tr, ch 3, (dc, ch 1) 7 times into ch-3 sp, dc in same sp (pineapple fan base worked), ch 3, sc in sc below ch-3 sp, ch 3, (dc, ch 1) 7 times into next ch-3 sp, dc in same sp, ch 3. Rep across, end sc in top of t-ch. Turn. (16 pineapple fan bases, each with 8 dc and 7 ch-1 sps)
Skirt Row 3 (WS): Ch 5, sc in first ch-1 sp of pineapple, (ch 1, sc in next ch-1 sp) 6 times, ch 5, sc in sc between pineapples, ch 5, sc in first ch-1 sp of next pineapple, (ch 1, sc in next ch-1 sp) 6 times, ch 5. Rep across, end sc in last sc. Turn. (16 pineapples with 7 sc each)
Skirt Row 4 (RS): Ch 4, sc in first ch-1 sp of pineapple, (ch 1, sc in next ch-1 sp) 5 times, ch 4, dc in sc between pineapples, ch 4, sc in first ch-1 sp of next pineapple, (ch 1, sc in next ch-1 sp) 5 times, ch 4. Rep across, end dc in last sc. Turn. (16 pineapples with 6 sc each)
Skirt Row 5 (WS): Ch 4, sc in first ch-1 sp, (ch 1, sc in next ch-1 sp) 4 times, ch 4, (dc, ch 2, dc) in dc between pineapples (V-stitch made), ch 4, sc in first ch-1 sp of next pineapple, (ch 1, sc in next ch-1 sp) 4 times, ch 4. Rep across, end dc in last dc. Turn. (16 pineapples with 5 sc each)
Skirt Row 6 (RS): Ch 3, sc in first ch-1 sp, (ch 1, sc in next ch-1 sp) 3 times, ch 3, shell stitch (5 dc) into ch-2 sp of V-stitch, ch 3, sc in first ch-1 sp of next pineapple, (ch 1, sc in next ch-1 sp) 3 times, ch 3. Rep across, end sc in last dc. Turn. (16 pineapples with 4 sc each, 16 shell stitches)
Skirt Row 7 (WS): Ch 3, sc in first ch-1 sp, (ch 1, sc in next ch-1 sp) 2 times, ch 3, dc in first dc of shell, (ch 1, dc in next dc) 4 times, ch 3, sc in first ch-1 sp of next pineapple, (ch 1, sc in next ch-1 sp) 2 times, ch 3. Rep across, end sc in last sc. Turn. (16 pineapples with 3 sc each)
Skirt Row 8 (RS): Ch 2, sc in first ch-1 sp, ch 1, sc in next ch-1 sp, ch 2, (dc, ch 1) 7 times into center ch-1 sp of shell fan, dc in same sp (new pineapple base started), ch 2, sc in first ch-1 sp of next pineapple, ch 1, sc in next ch-1 sp, ch 2. Rep across, end sc in last sc. Turn. (16 new pineapple bases started)
Skirt Row 9 (WS): Ch 2, sc in ch-1 sp (final sp of old pineapple), ch 2, ch 5, sc in first ch-1 sp of new pineapple, (ch 1, sc in next ch-1 sp) 6 times, ch 5. Rep across. Turn. (16 new pineapples with 7 sc each)
Skirt Row 10 (RS): Sl st across old pineapple remains to first sc anchor. From each anchor, ch 4, sc in first ch-1 sp of new pineapple, (ch 1, sc in next ch-1 sp) 5 times, ch 4, dc in next anchor sc, ch 4. Rep across. Turn. (16 active pineapples with 6 sc each)
Tier 2 (Rows 11 through 20): Repeat the pineapple fan sequence from Row 2 through Row 10, working into the tops of existing pineapples.
Tier 3 (Rows 21 through 30): Repeat the sequence again.
Skirt checkpoint: After completing Tier 3, the skirt should measure 17 inches from the waistband.
Section 4: Hem Edging
Hem Row 1: Attach yarn to first stitch of last skirt row. Ch 1, sc evenly across the bottom of all pineapple loops, working approximately 3 sc into each ch-3 or ch-4 space and 1 sc into each dc or sc post. Aim for approximately 252 sc. (252 sc)
Hem Row 2: Ch 3, 2 dc in same sc, sk 2 sc, sc in next sc, sk 2 sc, (5 dc in next sc, sk 2 sc, sc in next sc, sk 2 sc) across, end 3 dc in last sc. Turn. (42 shells)
Hem Row 3: Ch 1, sc in first dc, (ch 3, sc in next sc, ch 3, sc in center dc of shell) across, end sc in top of t-ch. Turn.
Hem Row 4: Ch 1, sc in first sc, (5 dc in next sc, sc in next sc) across. Turn.
Hem Row 5 (picot scallop): Ch 1, sc in first sc, (sc in next dc, sc in next dc, picot, sc in next dc, sc in next dc, sc in next sc) across. Fasten off.
Section 5: Back Placket and Button Loops
Right back edge: Attach yarn to bottom right corner of back opening. Ch 1, sc evenly up the edge, working approximately 1 sc per row end, to the neckline. Fasten off.
Left back edge (with button loops): Attach yarn to top left corner of back opening. Ch 1, sc down the left edge, placing button loops as follows: Work 3 sc, (ch 3, sk 1 sc, work 5 sc) 5 times, continue sc to hem. Fasten off.
Sew 5 buttons to right back edge, aligned with button loops.
Section 6: Collar
Collar Base
Foundation: Ch 124.
Collar Row 1 (RS): Ch 3 (counts as dc), dc in each ch across. Turn. (124 dc)
Collar Row 2 (WS): Ch 3, dc in each dc across. Turn. (124 dc)
Collar Row 3 (RS): Ch 3, 2 dc in same st, sk 2 dc, sc in next dc, sk 2 dc, (5 dc in next dc, sk 2 dc, sc in next dc, sk 2 dc) across, end 3 dc in last dc. Turn. (20 full shells + 2 half shells)
Collar Row 4 (WS): Ch 1, sc in first dc, (ch 3, sc in sc, ch 3, sc in center of shell) across, end sc in top of t-ch. Turn.
Collar Row 5 (RS): Ch 3, 2 dc in first sc, (sc in next sc, 5 dc in next sc) across, end 3 dc in last sc. Turn.
Collar Row 6 (WS): Repeat Row 4.
Collar Row 7 (picot edging): Ch 1, sc in first sc, (sc, sc, picot, sc, sc into each shell; sc into each sc anchor) across. Fasten off.
Collar Ruffle Layer
Working back into Row 1 of the collar base (the foundation chain edge), attach yarn to first ch.
Ruffle Row 1: Ch 1, (sc, sc, sc) in each ch across. (372 sc)
Ruffle Row 2: Ch 3, 2 dc in same sc, sk 2 sc, sc in next sc, sk 2 sc, (5 dc in next sc, sk 2 sc, sc in next sc, sk 2 sc) across, end 3 dc in last sc. (62 shells)
Ruffle Row 3: Ch 1, sc in first dc, (ch 3, sc in sc, ch 3, sc in center of shell) across.
Ruffle Row 4 (picot): Ch 1, sc in first sc, (sc, sc, picot, sc, sc across each shell; sc at sc anchors) across. Fasten off.
Attaching the Collar
Align the straight top edge of the collar base with the neckline of the dress. The collar ruffle layer faces outward and downward. With yarn and needle, slip stitch or whip stitch the collar to the neckline, matching centers and easing evenly around. The collar ends meet at the back opening, where they fold back gracefully.
Collar checkpoint: The attached collar should sit smoothly without puckering, falling approximately 2.5 to 3 inches below the neckline.
Finishing and Blocking
Weave in all ends securely with a yarn needle, running the tail through at least 1 inch of stitches in two directions.
Wet block the completed dress. Submerge in cool to lukewarm water with gentle soap. Squeeze gently without wringing. Roll in a clean towel to remove excess water. Lay flat on blocking mats and pin to the finished measurements. Use T-pins to open and define each pineapple fan, pulling the individual dc spokes outward symmetrically. Allow to dry completely, which may take 12 to 24 hours.
Size Customization Tips
To size up or down, adjust the foundation chain in multiples of 10. A chain of 110 produces a smaller toddler size for ages 3 to 4. A chain of 130 produces a size 7 to 8. Each 10-stitch change adds or removes approximately 1.5 inches from the chest circumference.
To lengthen the skirt, add a fourth pineapple tier. To shorten, eliminate Tier 3 and work directly to the hem edging after Tier 2.
To adjust shoulder width, change the collar base foundation chain proportionally. The collar chain should equal the neckline circumference plus 4 stitches for ease.
Final Thoughts on This Ivory Pineapple Lace Girl Dress Crochet Pattern
This crochet tutorial is a labor of love. Every stitch builds toward something truly spectacular. When you hold the finished dress in your hands, you will understand why pineapple lace has been a beloved technique for generations. The way the fans flare, the delicate mesh bodice, that gorgeous ruffled collar. It all comes together into a piece that looks like it belongs in a museum.
Take your time. Block aggressively. Trust the process. And most importantly, enjoy the journey.
Thank you so much for choosing this pattern! I would absolutely love to see your finished dress. Tag me on Instagram or share your photos in my Facebook group. Seeing your creations makes my whole week.
If this pattern caught your eye, go ahead and pin it to your crochet board on Pinterest so you can find it when you are ready to start. And if you make this beautiful dress, please drop a comment below. I would love to hear how it turned out for you!
You Might Also Like
- Lavender Peony Bloom Crochet Dress Free Crochet Pattern
- Lavender Daisy Granny Square Backpack Free Crochet Pattern
- Sage Green Crochet Romper Free Pattern
- Terracotta Rust Textured Clutch Bag Free Crochet Pattern