
Go dig through your stash right now. I know you have that perfect golden yellow yarn sitting there, waiting for the right project. This sunflower tote is calling its name.
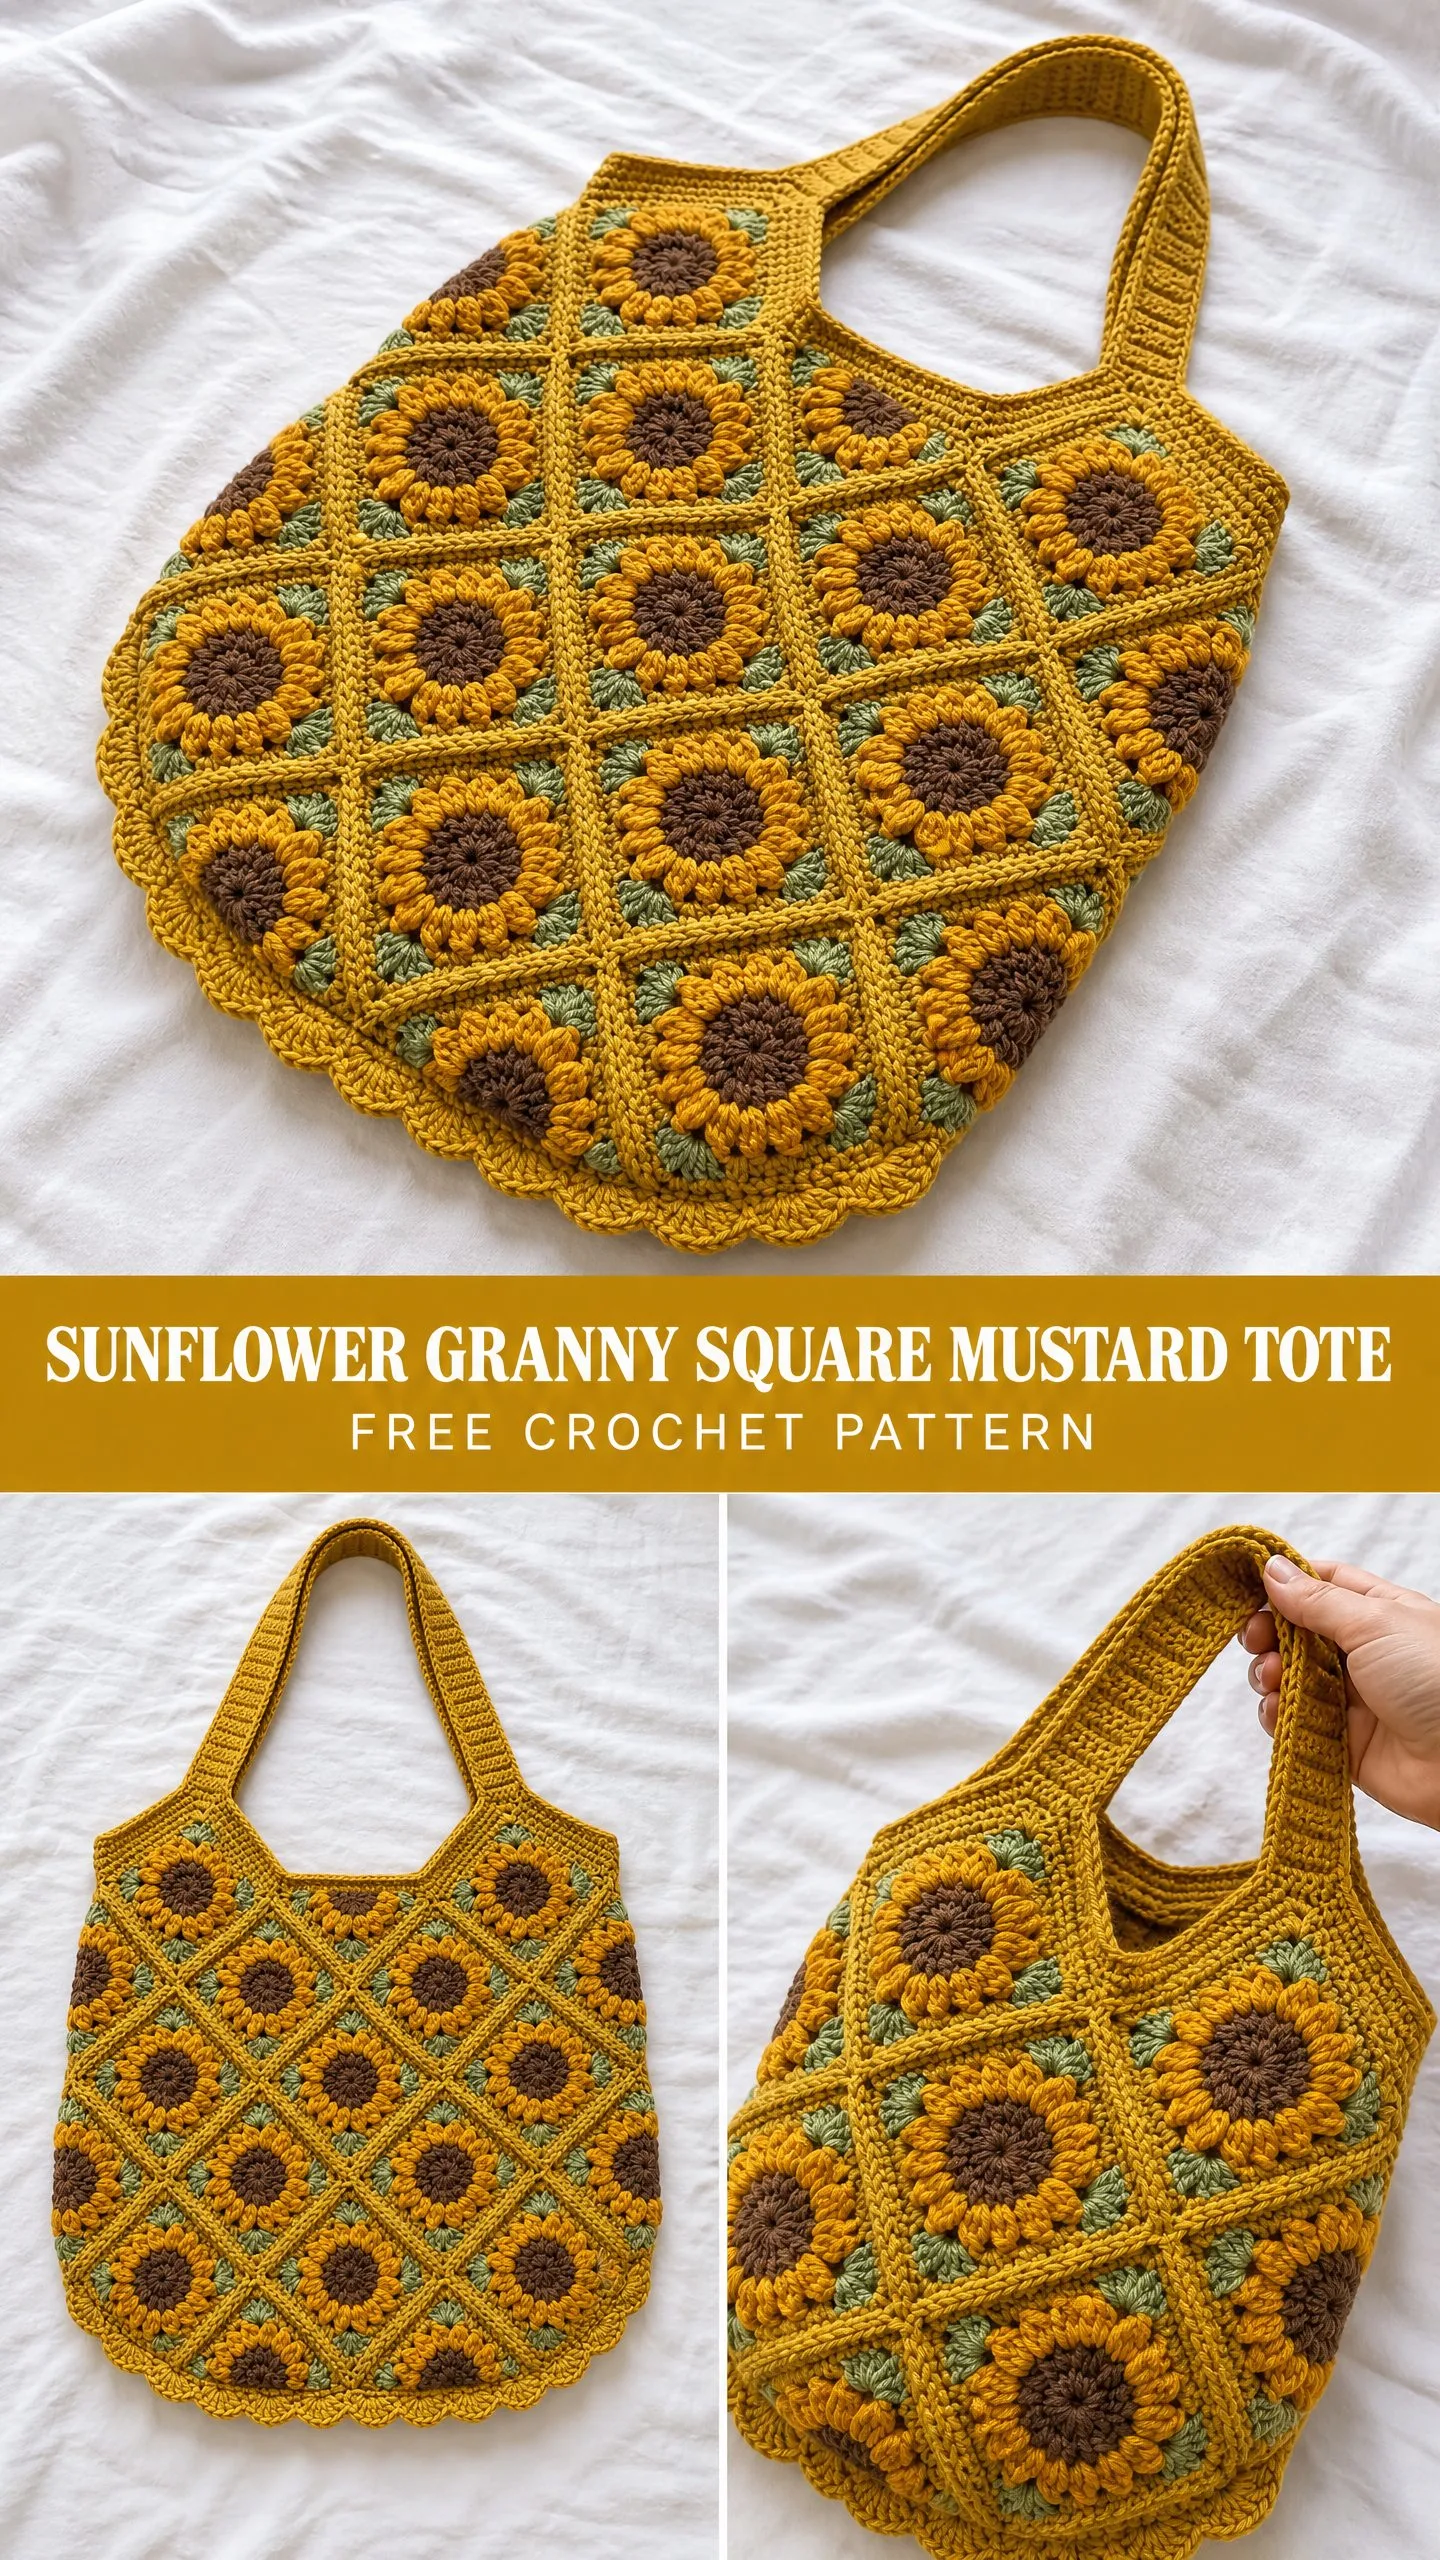
This bag combines the classic granny square technique with dimensional bobble petals that create actual sunflower texture you can feel. The construction is straightforward if you have made granny squares before. You will work 28 individual squares, join them using a clever join-as-you-go method, add sturdy slip stitch straps, and finish with a pretty scallop edge along the bottom.
I will be honest with you. This is an intermediate project that takes time, roughly 25 to 35 hours depending on your pace. But every single square is satisfying to complete, and watching those sunflowers stack up into a finished bag is genuinely rewarding. If you have never tried join-as-you-go before, this pattern walks you through it step by step.
Why This Sunflower Tote Works So Well
The diamond grid arrangement gives this bag its distinctive look. Each square sits rotated 45 degrees, so what looks like a diagonal pattern is actually a straightforward rectangular grid assembled on point. The three colors play together beautifully. Mustard yellow frames everything and forms those puffy petals. Brown anchors each flower center. Sage green fills the corners and creates those pretty triangle accents you see between the blooms.
The straps deserve special mention. They are worked in slip stitch ribbing through the back loops only, which creates a firm, non-stretchy strap that will not dig into your shoulder or sag under weight. Cotton yarn is strongly recommended here because it holds its shape and the bobble petals stay dimensional after washing.
Materials You Will Need
Yarn: Worsted weight, size 4, 100 percent cotton or cotton-acrylic blend
Hook: US size G-6 / 4.0 mm
Notions:
Yarn Suggestions
Lion Brand 24/7 Cotton in Goldenrod, Taupe, and Sage works beautifully. This mercerized cotton is machine washable and gives excellent stitch definition for the dimensional petals.
Paintbox Yarns Cotton DK in Buttercup Yellow, Coffee Bean, and Spearmint Green is another great match. WeCrochet Dishie in Canary, Almond, and Aloe also works well and comes in large skeins to minimize joins.
Avoid fuzzy or novelty yarns. The texture will hide your sunflower petal detail.
Finished Measurements
Gauge
One completed sunflower granny square, blocked, should measure 3.5 inches by 3.5 inches (9 cm by 9 cm), measured flat side to flat side.
In single crochet (sc) with Color A: 16 sc equals 4 inches / 10 cm; 18 rows equals 4 inches / 10 cm.
Gauge matters here. If your squares are larger than 3.5 inches, go down a hook size. If smaller, go up a hook size. The strap width and assembly math depend on consistent square sizing.
Abbreviations and Stitch Definitions
Special Stitches for This Pattern
Bobble Petal Stitch
This creates the dimensional sunflower petals that make each square pop. Here is how to work it:
1. Yarn over, insert hook into indicated stitch or space
2. Yarn over and pull up a loop (3 loops on hook)
3. Yarn over, insert hook into same stitch or space
4. Yarn over and pull up a loop (5 loops on hook)
5. Yarn over, insert hook into same stitch or space
6. Yarn over and pull up a loop (7 loops on hook)
7. Yarn over and draw through all 7 loops on hook
8. Chain 1 to close and secure the bobble (this chain does not count as a stitch)
The bobbles push toward you on the right side of the work. Do not flatten them.
Join-As-You-Go Method
When working the final round of a new square that joins to an existing neighbor, you replace certain chain spaces with slip stitches into the corresponding spaces of the neighboring square.
At a joining corner: Work (dc, ch 1, sl st into corner ch-2 sp of neighboring square, ch 1, dc) instead of (dc, ch 2, dc).
Along a joining side: Replace each ch-1 space with (ch 1, sl st into corresponding ch-1 sp of neighboring square, ch 1) as you progress across the side.
Slip Stitch Ribbing
Used for the straps. Work slip stitches through the back loop only of each stitch in the previous row. This creates a firm, non-stretching fabric perfect for bag handles.
Scallop Edging
Join yarn, chain 1, single crochet in same stitch. Skip 2 stitches, work 5 double crochet in next stitch (shell made). Skip 2 stitches, single crochet in next stitch. Repeat around.
Construction Overview
You will build this tote in this order:
1. Crochet all 28 individual sunflower granny squares
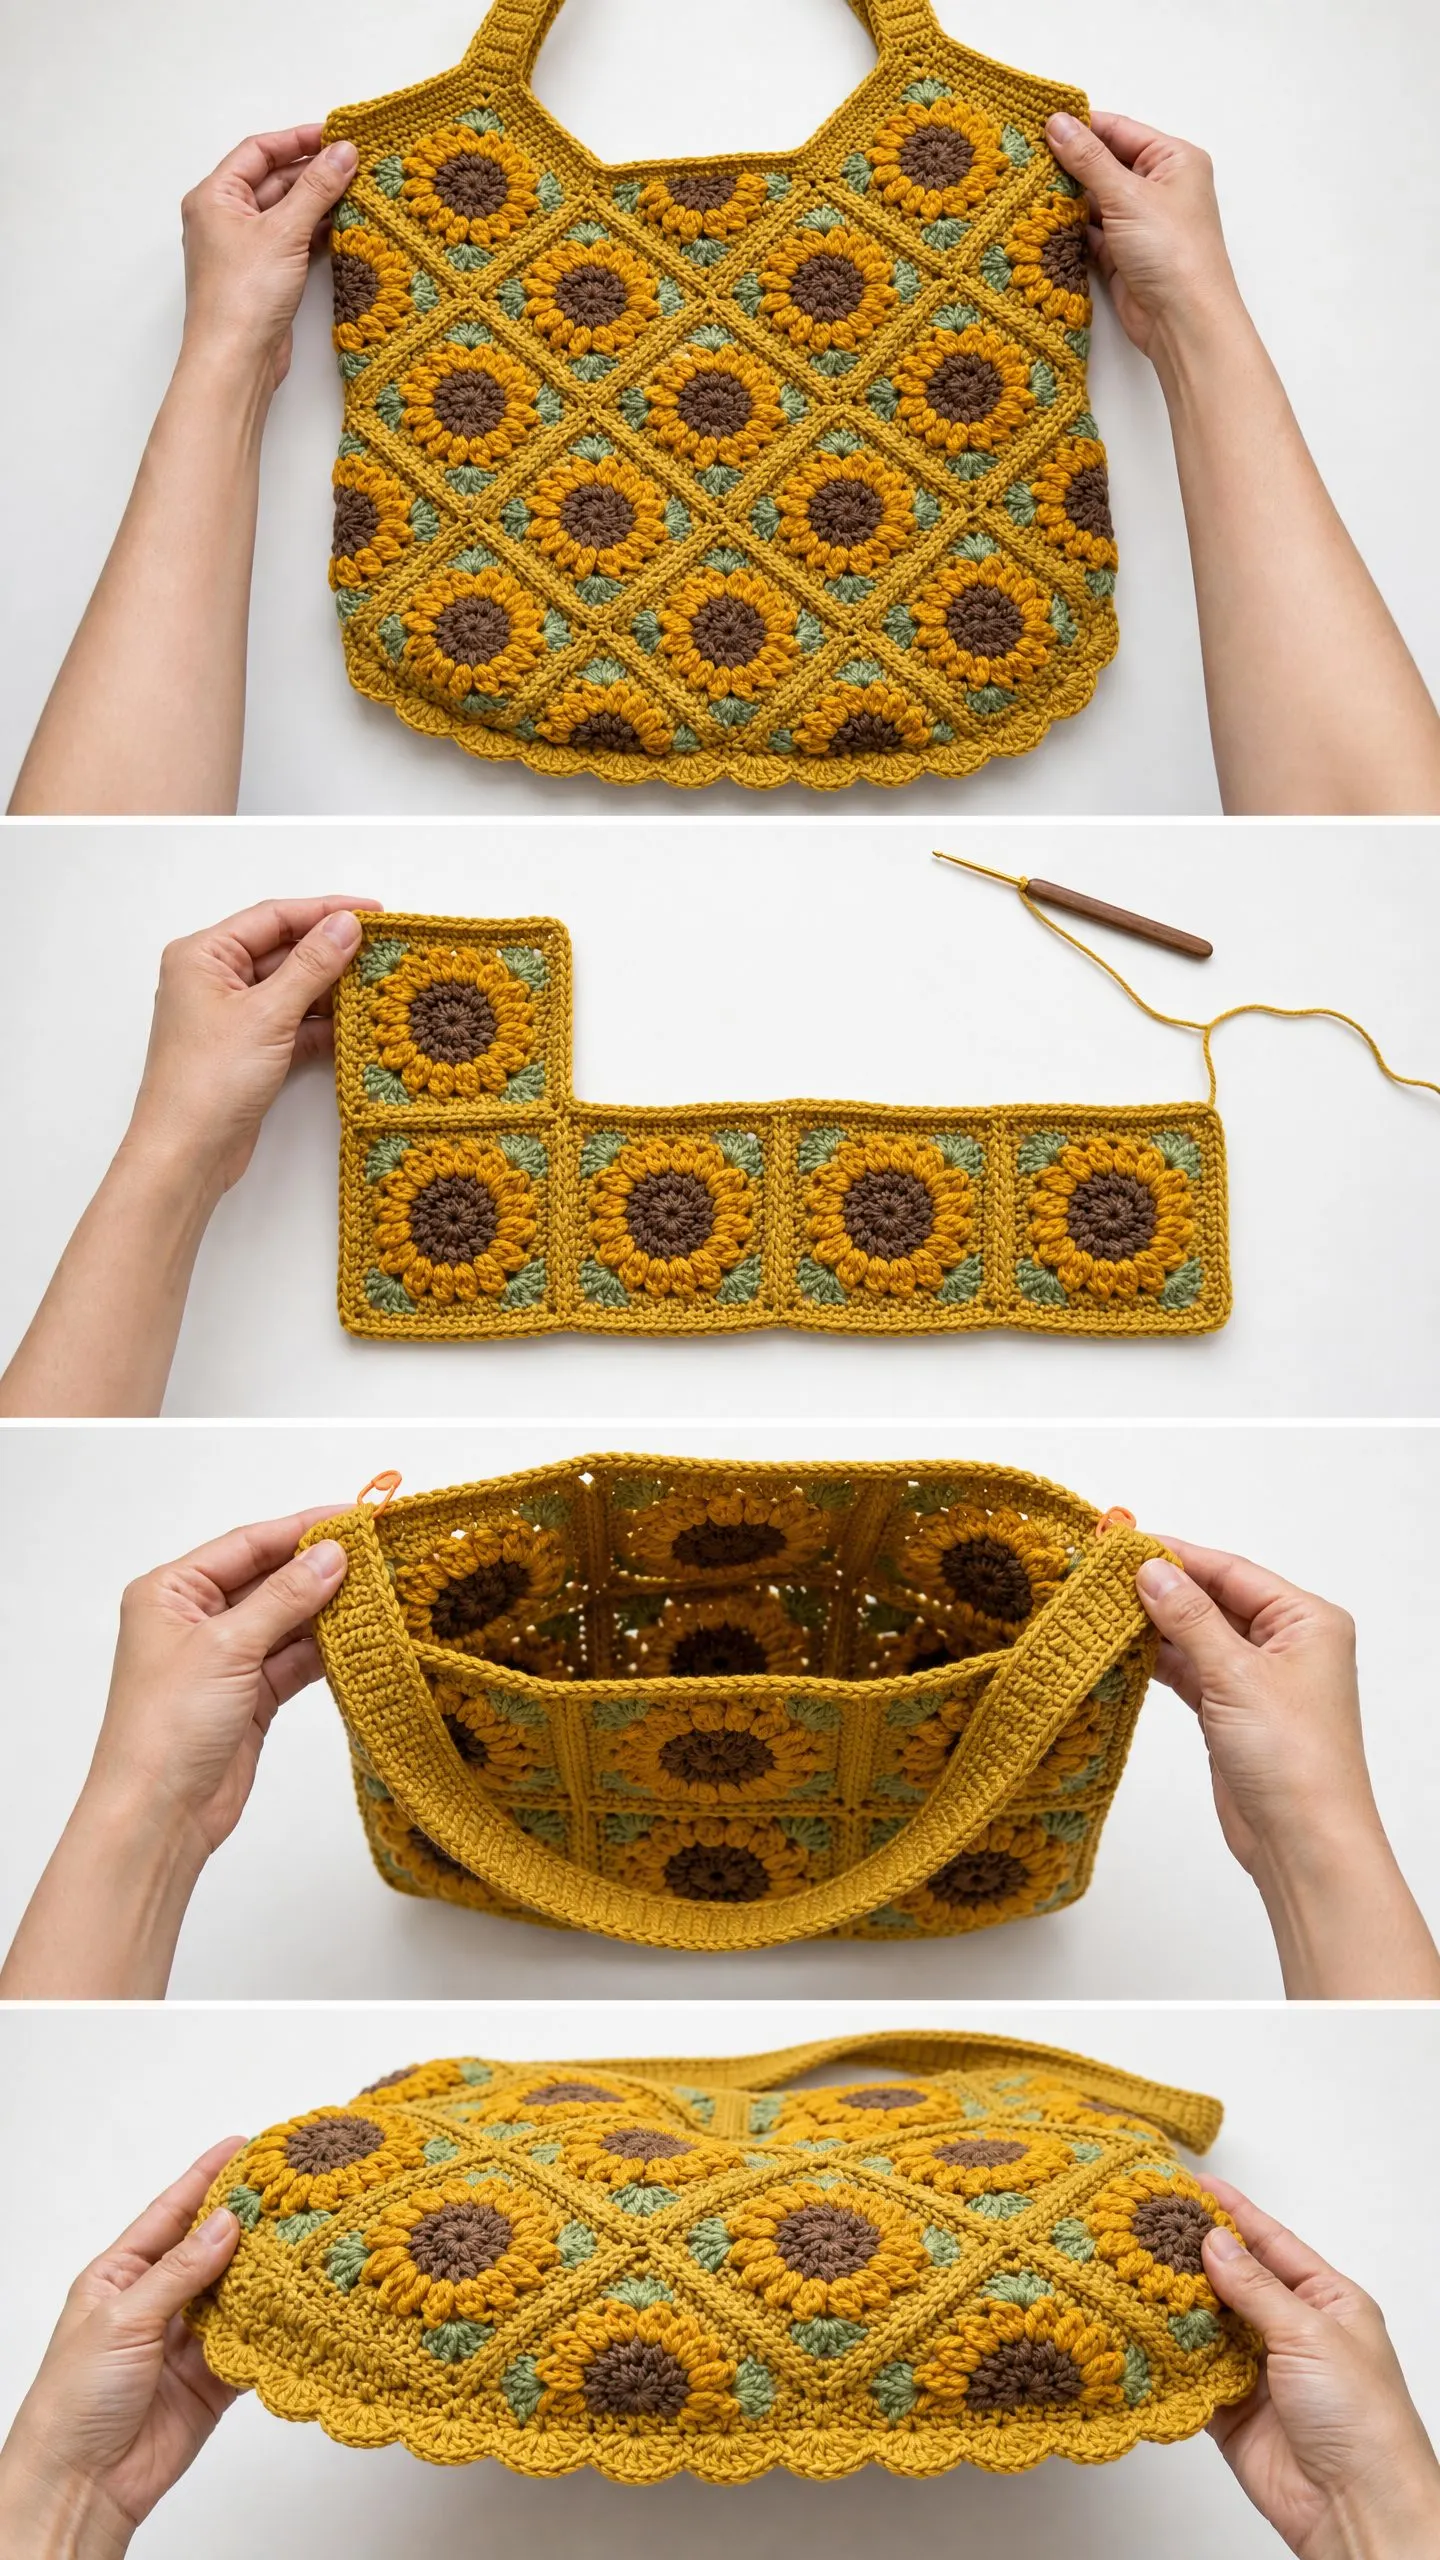
2. Join squares into front panel using JAYG (12 squares in a 4 by 3 grid)
3. Join squares into back panel using JAYG (12 squares in a 4 by 3 grid)
4. Join squares for two side gusset strips (2 squares each)
5. Join front panel to back panel via side gusset strips using slip stitch seam
6. Work top border and strap bases
7. Work straps
8. Work scallop edging along bottom
9. Weave ends and block
How to Crochet the Sunflower Granny Squares
Make 28 squares total.
Round 1 (Color B)
Starting with Color B, make a magic ring (adjustable loop).
Chain 3 (this counts as your first double crochet). Work 11 double crochet into the magic ring. Slip stitch to the top of your beginning chain 3 to join. Pull the magic ring tail to close the center hole.
(12 dc)
Round 2 (Color B)
Chain 1 (does not count as a stitch). Single crochet in the same stitch as the join. Chain 4. Skip 1 double crochet, single crochet in the next double crochet. Chain 4.
Repeat this sequence around, ending with a slip stitch into the first single crochet to join. You will have worked 6 single crochet stitches and 6 chain-4 spaces.
(6 sc, 6 ch-4 loops)
Fasten off Color B. Join Color A with a slip stitch into any chain-4 space.
Round 3 (Color A)
Chain 2 (does not count as a stitch). Work the Bobble Petal Stitch into the same chain-4 space as your join. Chain 1 to close the bobble.
Work (Bobble Petal Stitch, ch 1) two more times into the same chain-4 space. You now have 3 bobble petals in this arch.
Slip stitch into the next single crochet.
Repeat from the beginning of the round in each chain-4 arch around, ending with a slip stitch to the first bobble to join.
(18 bobble petals total, 6 sl-st connectors)
The bobbles push toward you on the right side. Do not flatten or compress them.
Round 4 (Color A)
This round creates the granny square frame, working behind the bobble petals.
Slip stitch to any slip stitch connector between two bobble groups. Chain 3 (counts as dc).
Work (2 dc, ch 2, 3 dc) all into the same slip stitch connector. This is corner 1.
Chain 1. Slip stitch into next slip stitch connector. Chain 1.
Work (3 dc, ch 2, 3 dc) into the next slip stitch connector. This is corner 2.
Chain 1. Slip stitch into next slip stitch connector. Chain 1.
Work (3 dc, ch 2, 3 dc) into the next slip stitch connector. This is corner 3.
Chain 1. Slip stitch into next slip stitch connector. Chain 1.
Work (3 dc, ch 2, 3 dc) into the next slip stitch connector. This is corner 4.
Chain 1. Slip stitch to top of beginning chain 3 to join.
(24 dc, 4 ch-2 corner spaces, 4 ch-1 side spaces)
Fasten off Color A. Join Color C with a slip stitch into any corner chain-2 space.
Round 5 (Color C)
Chain 3 (counts as first dc). Work (2 dc, ch 2, 3 dc) all into the same corner chain-2 space. Corner 1 complete.
Chain 1. Work 3 dc into the next chain-1 side space (side cluster). Chain 1.
Work (3 dc, ch 2, 3 dc) into the next corner chain-2 space. Corner 2 complete.
Chain 1. Work 3 dc into the next chain-1 side space. Chain 1.
Work (3 dc, ch 2, 3 dc) into the next corner chain-2 space. Corner 3 complete.
Chain 1. Work 3 dc into the next chain-1 side space. Chain 1.
Work (3 dc, ch 2, 3 dc) into the next corner chain-2 space. Corner 4 complete.
Chain 1. Work 3 dc into the next chain-1 side space. Chain 1.
Slip stitch to top of beginning chain 3 to join.
(48 dc, 4 ch-2 corner spaces, 8 ch-1 spaces)
Fasten off Color C. Weave in all ends on this square.
Checkpoint: Each completed square should measure 3.5 inches by 3.5 inches after a light wet block. The bobble petals should stand proud of the surface. The sage green corners should be clearly visible.
Assembling the Panels
Square Layout
Front and Back Panel Assembly
Lay out 12 squares for the front panel in a 4 by 3 grid on a flat surface.
Square 1 (top left): This is your anchor square. Work Round 5 as written with no joining modifications.
Square 2 (top row, second from left): Work Rounds 1 through 4 as written. On Round 5, when you reach the left side of Square 2, use the JAYG method to join it to the right side of Square 1.
Continue across the row, joining each new square to its left neighbor along one edge.
For Row 2 squares: Each square joins to its left neighbor (horizontal join) and to the square above it (vertical join). At corners where 4 squares meet, slip stitch into the shared corner joining point.
Complete all 12 squares for the front panel. Repeat to assemble the back panel. Complete the two side gusset strips from the remaining 4 squares.
Checkpoint: Each panel should measure approximately 14 inches wide by 10.5 inches tall before the top border is added.
Joining Panels and Gussets
With Color A and yarn needle, or using a slip stitch seam with hook, join one gusset strip to the right side edge of the front panel with right sides facing together.
Repeat to join the second gusset strip to the left side edge of the front panel.
Join the back panel to the open sides of both gusset strips in the same manner to form a rectangular tube open at top and bottom.
With Color A, work a slip stitch seam along the bottom edge, joining the front panel bottom edge to the back panel bottom edge. Leave the top open.
Turn the bag right side out.
Top Border and Strap Base
With right side facing, join Color A with a slip stitch at the right side seam of the bag top opening.
Border Round 1: Chain 1 (does not count as stitch). Work single crochet evenly around the entire top opening. Place 1 sc per dc, 1 sc per ch-1 space, and 2 sc per ch-2 corner space. Join with slip stitch to first sc. (approximately 100 sc)
Border Round 2: Chain 1, single crochet in each single crochet around. Slip stitch to first sc to join. (100 sc)
Border Round 3: Chain 1, single crochet in each single crochet around. Slip stitch to first sc. Fasten off Color A. (100 sc)
Working the Straps
The bag has a single continuous strap that attaches at two points on the front panel top and two points on the back panel top.
Strap Attachment Points
Mark 4 positions on the top border. On the front top edge, place markers at approximately 3.5 inches from the left gusset seam and 3.5 inches from the right gusset seam. Repeat on the back top edge.
Strap Instructions (Make 2)
With Color A, chain 8.
Row 1: Slip stitch in 2nd chain from hook and in each chain across. Turn. (7 sl sts)
Row 2: Chain 1. Working in back loops only, slip stitch in each stitch across. Turn. (7 sl sts)
Repeat Row 2 until the strap measures 24 inches / 61 cm (approximately 108 rows).
Fasten off, leaving a 12-inch tail for sewing.
Sew one strap end to the front panel at the left marker and the other end to the back panel at the corresponding left-back marker. Repeat with the second strap for the right side.
Checkpoint: Each attached strap should have a drop of approximately 10 inches from the top of the bag.
Bottom Scallop Edging
With right side facing, join Color A at the center bottom edge.
Foundation Round: Work single crochet around the entire bottom edge, placing 1 sc per dc and 1 sc per ch-space. (96 sc)
Scallop Round: Slip stitch to first sc. Chain 1.
Single crochet in first stitch. Skip 2 stitches. Work 5 double crochet in next stitch (shell made). Skip 2 stitches. Single crochet in next stitch.
Repeat (skip 2 sts, 5 dc in next st, skip 2 sts, sc in next st) around.
(16 shells of 5 dc, 16 sc)
Fasten off and weave in ends.
Finishing and Blocking
Weave in all remaining yarn ends, working through stitches in multiple directions to prevent them from pulling loose.
Wet blocking: Submerge the bag in cool water. Gently press out excess water by rolling in a towel. Do not wring. Pin to a blocking mat, squaring the corners and pulling to the finished dimensions. Pin each scallop into an even curve. Allow to dry completely, which may take 24 hours.
Optional lining: Cut fabric to 15 by 32 inches. Fold in half with right sides together to create a 15 by 16-inch rectangle. Sew side seams, leaving the top open. Fold the top edge over by 0.5 inch and press. Insert lining into the bag and hand stitch to the top interior edge.
Optional closure: Attach a magnetic snap to the interior of the top border, centering one piece on the front and one on the back.
Care Instructions
Machine wash on gentle cycle in cold water if your yarn is machine-washable cotton. Use a mesh laundry bag. Do not wash on hot.
Lay flat to dry after washing. Do not hang dry, as a wet loaded tote can stretch the strap attachment points.
Do not iron directly over the bobble petal details. If pressing is needed, lay the bag face down on a thick towel and press gently from the wrong side only.
Size Customization Options
For a smaller bag: Use a 3 by 3 grid of squares per panel (9 squares each) for a body of approximately 10.5 inches by 10.5 inches. Reduce gusset strips to 1 square each.
For a larger bag: Use a 4 by 4 grid per panel (16 squares each). Add 3-square gusset strips for more depth.
To adjust square size: Go up to a US I-9 / 5.5 mm hook for roughly 4.5-inch squares using the same yarn.
To adjust strap length: Add or remove rows of slip stitch ribbing. Each 2 rows adds approximately 0.25 inches to strap length.
Thank you so much for choosing this sunflower tote pattern. I hope it brings you as much joy to make as it brings me to see those dimensional petals come together. If you make one, I would absolutely love to see it. Tag me on Instagram or share in my Facebook group so I can admire your work.
If this pattern is calling your name, go ahead and pin it to your crochet board on Pinterest so you can find it when you are ready to start. And please drop a comment below if you make one. I read every single comment and love hearing which colors you chose.
You Might Also Like
- Terracotta Earth Tone Backpack Free Crochet Pattern
- Mint Daisy Spring Barrel Handbag Free Crochet Pattern
- Lavender Daisy Wrist Cuff Free Crochet Pattern
- Pastel Pink Dragon Amigurumi Plush Free Crochet Pattern