
When I sat down to design this layette set, I had three goals in mind. I wanted something delicate enough to feel heirloom-worthy, practical enough for everyday baby wear, and cohesive enough that all three pieces would look like they truly belonged together.
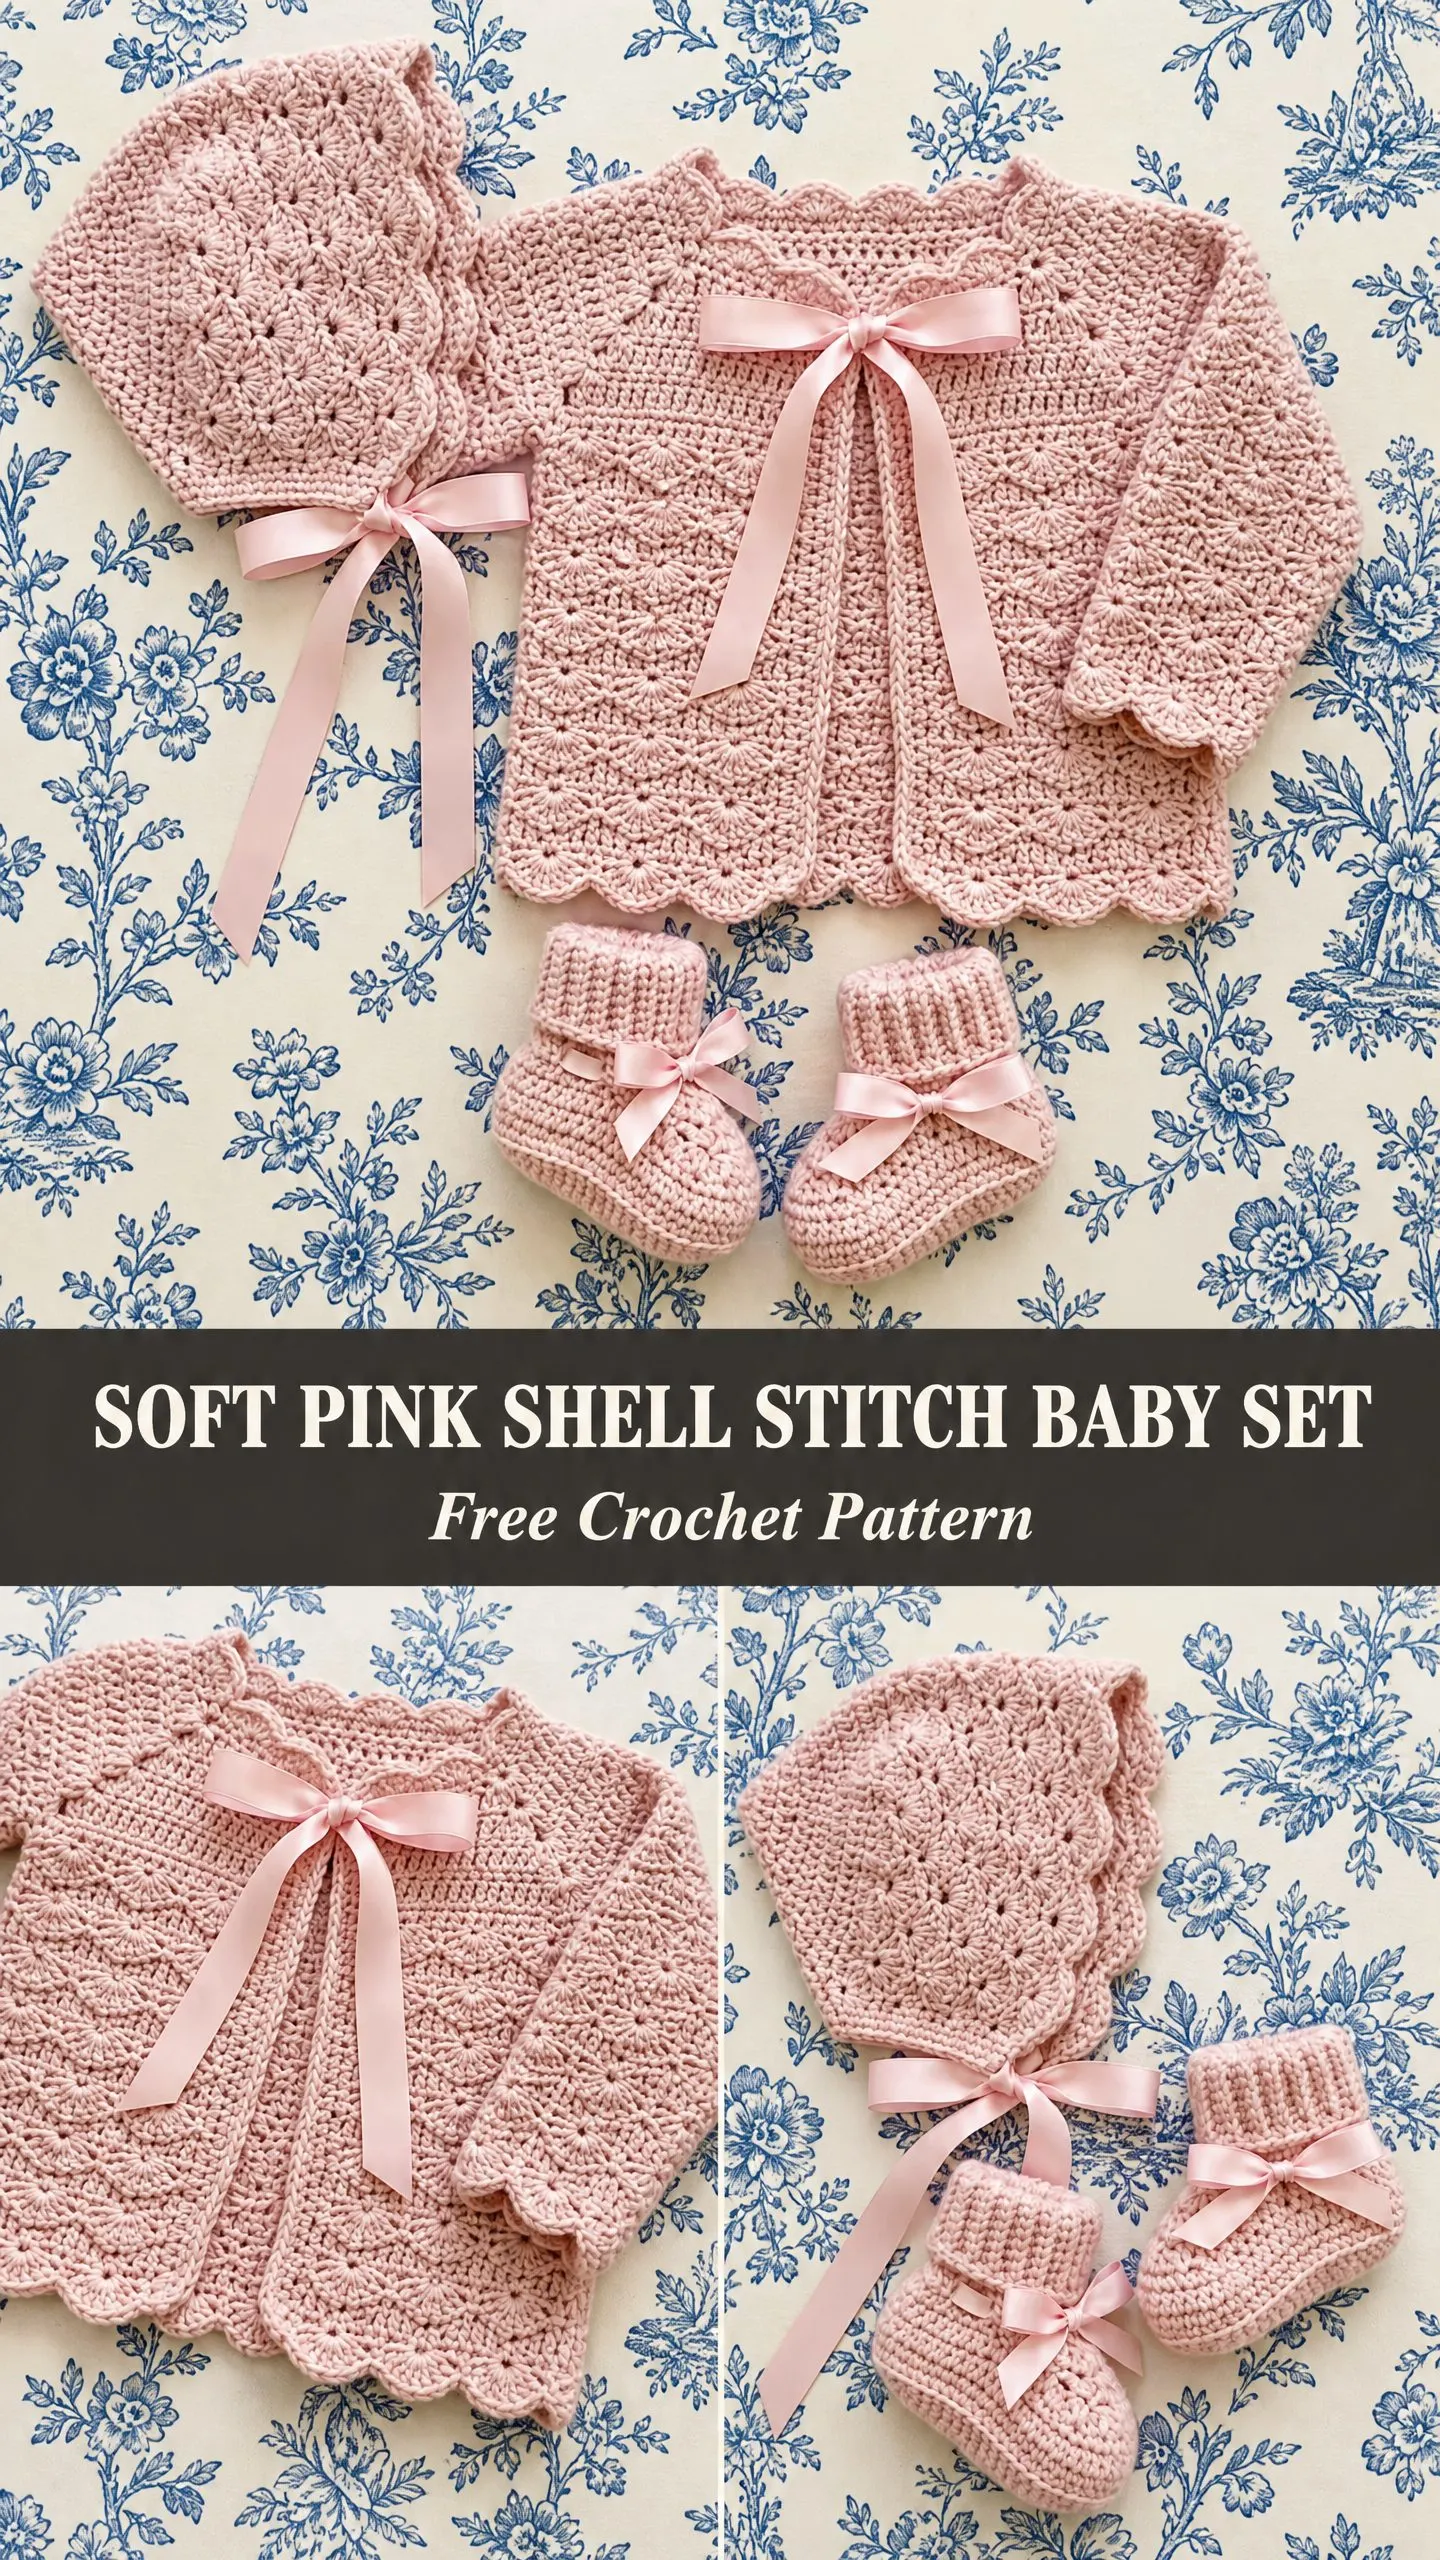
The shell stitch was an obvious choice. It creates that beautiful scalloped texture that looks intricate but works up in a satisfying rhythm once you get going. I decided on a top-down construction for the cardigan so there would be minimal seaming, and I built in ribbon threading at the neckline for that sweet vintage touch.
I am SO pleased with how this turned out. The matching bonnet and booties complete the picture perfectly, and the whole set makes an unforgettable baby shower gift.
About This Baby Layette Pattern
This three-piece set includes a shell stitch cardigan, a coordinating bonnet, and a pair of tiny booties. Everything is worked in a soft blush pink DK weight yarn and finished with pale pink satin ribbon bows.
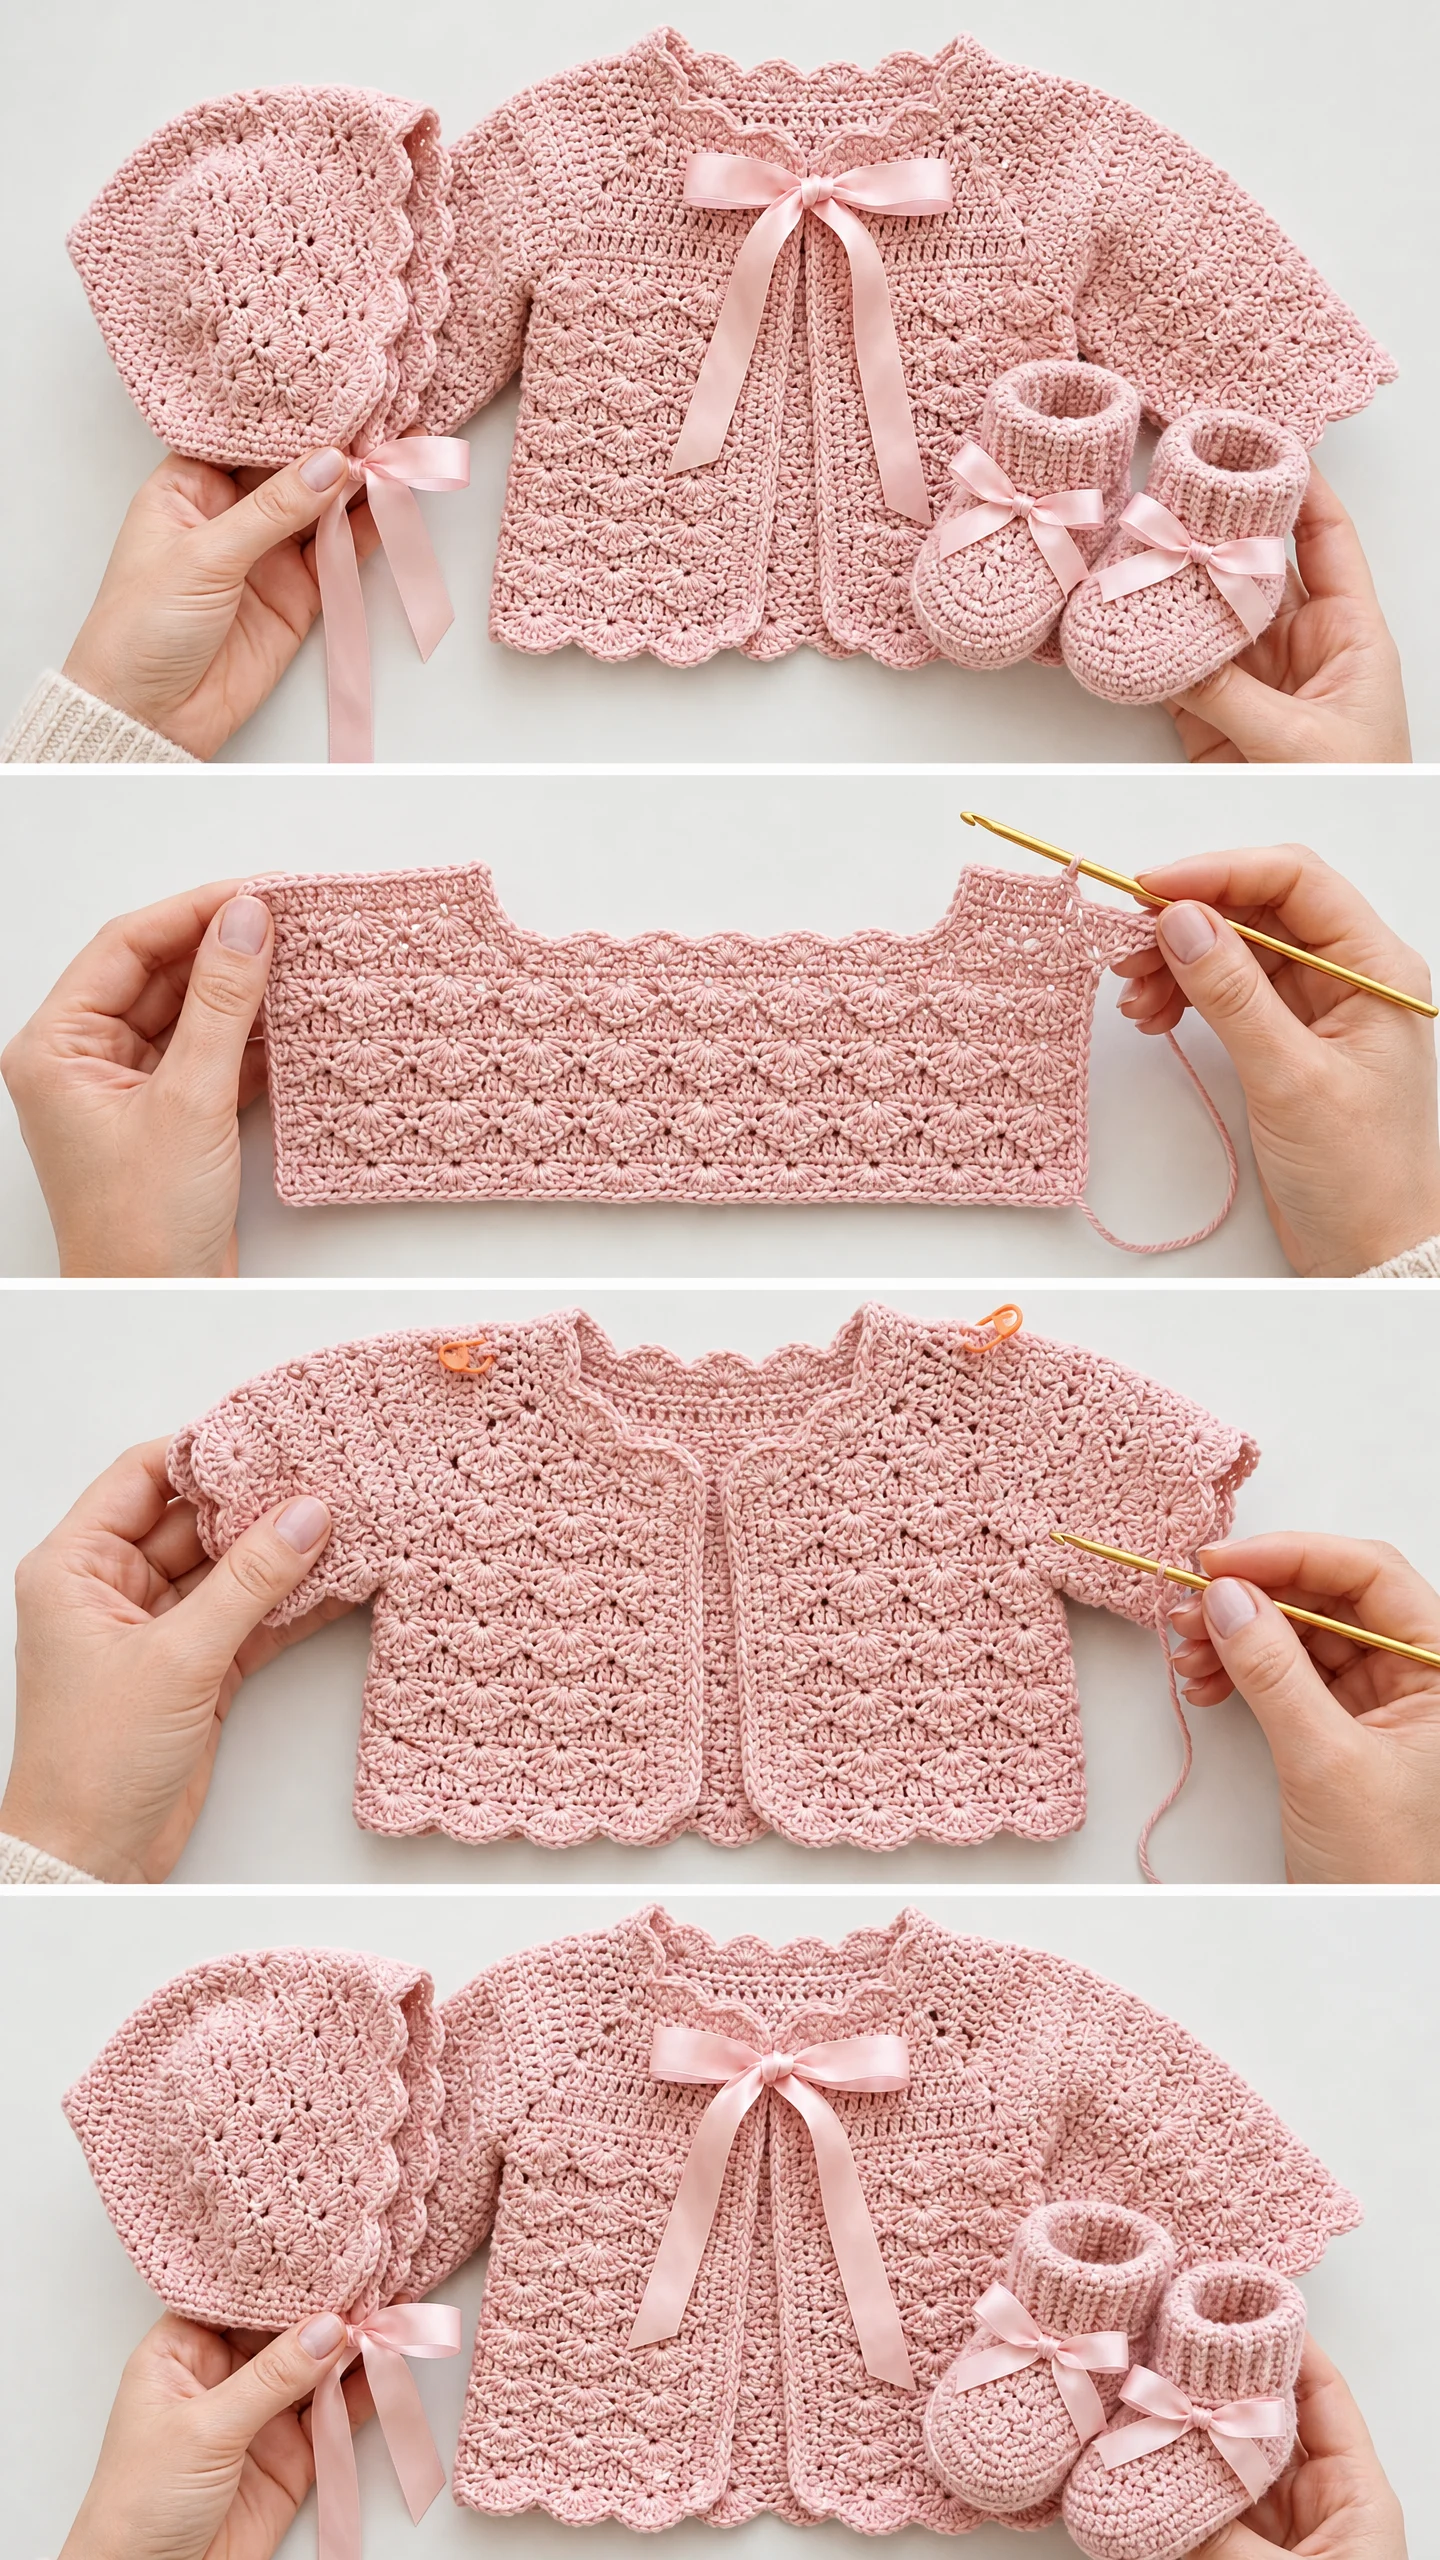
The cardigan uses a top-down raglan construction, which means you start at the neckline and work your way down to the hem. No shoulder seams to sew, no pieces to join. The sleeves are set aside temporarily, then worked in the round after the body is complete.
The bonnet begins as a flat hexagonal medallion (similar to a granny square, but with six sides) and transitions to rows for the brim. The booties are worked from the toe up with shaping at the instep.
All three pieces feature the same shell stitch pattern throughout the main sections, with a pretty scallop edging to finish. This creates that unified look that makes handmade baby sets so special.
Skill Level
This pattern is rated intermediate. You should be comfortable with working in the round, increasing and decreasing, and following a stitch pattern that alternates between rows.
If you have completed at least two garment projects before, you can absolutely tackle this set. The individual techniques are not complicated. What makes it intermediate is the combination of skills and the attention to stitch counts throughout the yoke shaping.
Take your time with the cardigan yoke. Count your stitches at every checkpoint. The rest flows smoothly once you get past that section.
Finished Measurements
Size: Newborn to 3 months
Cardigan:
Bonnet:
Booties:
Time Estimate
Plan for approximately 15 to 21 hours total for the complete set.
The cardigan takes the longest because of the yoke construction and the separate sleeve rounds. The bonnet and booties work up surprisingly quickly once you understand the shell pattern rhythm.
Materials Needed
Yarn:
DK weight yarn (CYCA 3), approximately 400 yards / 366 m total
Hooks:
Notions:
Yarn Suggestions
Paintbox Yarns Simply DK (100% acrylic, 276 yards / 252 m per 100 g skein) is my top recommendation. The smooth, consistent twist showcases the shell stitch beautifully, and it is machine washable. Two skeins will complete the full set.
Drops Safran (100% Egyptian cotton, 175 yards / 160 m per 50 g ball) works well for warmer weather layettes. Cotton gives crisp stitch definition with a slightly heavier drape. Check your gauge carefully since cotton has less stretch. Three balls needed.
BC Garn Semilla Fino (100% organic wool, 223 yards / 204 m per 50 g ball) creates an especially soft fabric perfect for newborn skin. The slight halo softens the shell stitch a bit, but the texture stays visible. Two balls recommended.
Avoid highly textured, fuzzy, or thick-and-thin yarns. They will hide the pretty shell pattern you are working so hard to create.
Gauge
Using US E-4 / 3.5 mm hook in shell stitch pattern:
Make a gauge swatch at least 5 in / 13 cm wide. Block it before measuring. Gauge matters for a fitted garment like this cardigan.
Abbreviations
Special Stitches for This Pattern
Shell Stitch (shell): Work 5 dc all into the same stitch or space. This counts as one shell unit. The shells create that beautiful fan-like texture you see in the photos.
V-stitch (V-st): Work (dc, ch 1, dc) all into the same stitch or space.
Single Crochet 2 Together (sc2tog): Insert hook into next stitch, yarn over and pull up a loop. Insert hook into following stitch, yarn over and pull up a loop. Yarn over and draw through all three loops on hook. This decreases by one stitch.
Double Crochet 2 Together (dc2tog): Yarn over, insert hook into next stitch, yarn over and pull up a loop, yarn over and draw through two loops. Yarn over, insert hook into the following stitch, yarn over and pull up a loop, yarn over and draw through two loops. Yarn over and draw through all three loops. This decreases by one stitch.
Scallop Edging: Skip 2 stitches, work 5 dc into the next stitch, skip 2 stitches, slip stitch into the next stitch. Repeat across. This creates the decorative scalloped border on the hem, cuffs, and bonnet brim.
Joining with a Standing dc: Make a slip knot, place on hook. Yarn over, insert hook into the designated stitch, yarn over and pull up a loop, yarn over and draw through two loops, yarn over and draw through remaining two loops. This gives you a neat join without a visible slip stitch.
Pattern Notes Before You Begin
1. The cardigan is worked flat from the neck down. The front opening stays open throughout with no center front seaming.
2. The right side (RS) is the knit-like face of the single crochet yoke rows and the raised face of the shell pattern rows.
3. Stop and count at every checkpoint before continuing. This will save you from frogging later.
4. Ribbon threads through the eyelet row at the neckline and ties in a bow. It is not sewn in place so you can remove it for washing.
5. The bonnet crown is worked in continuous rounds unless noted otherwise.
6. Chain 3 counts as the first dc throughout unless specified.
7. Shell pattern rows begin and end with a partial shell or single dc to keep edges neat and straight.
8. Use the smaller hook for foundation chains to prevent flaring, then switch to the pattern hook for Row 1.
9. Turning chains are noted explicitly in each row and included in or excluded from the stitch count as specified.
10. Work the scallop edging after all main sections are complete.
Cardigan Instructions
Yoke
The yoke is worked flat from the neck edge downward in rows. The raglan-style shaping creates all four sections (two fronts, two sleeves, one back) at the same time.
Foundation chain: Using smaller hook, ch 51. Switch to pattern hook for Row 1.
Row 1 (RS): Sc in 2nd ch from hook and in each ch across. Turn. (50 sc)
Row 2 (WS): Ch 1, sc in first st. Place marker in this st for right front corner. Sc in next 6 sts. Pm in next st for right raglan point. Sc in next 10 sts. Pm in next st for left raglan point. Sc in next 18 sts. Pm in next st for right raglan point (back left). Sc in next 10 sts. Pm in next st for left raglan point. Sc in next 6 sts. Sc in last st. Pm in last st for left front corner. Turn. (50 sc)
Stitch distribution after Row 2:
Row 3 (RS, increase row): Ch 1, sc in each st to 1 st before first raglan marker. Work (sc, ch 1, sc) into marked st. Sc in each st to 1 st before next raglan marker. Work (sc, ch 1, sc) into marked st. Rep across all 4 raglan points. Sc in last st. Turn.
Move markers to the ch-1 sp just created at each raglan point after turning.
Total after Row 3: 58 sts (counting ch-1 spaces as sts)
Row 4 (WS, plain row): Ch 1, sc in each st and each ch-1 sp across. Turn. (58 sc)
Rows 5 through 16: Repeat Rows 3 and 4 alternately six more times. Each pair of rows adds 8 sts total.
After Row 16: 106 sc
Section counts after Row 16:
Row 17 (RS, eyelet row for ribbon): Ch 3 (counts as dc), dc in next 2 sts, (ch 1, sk 1 st, dc in next st) across to last 2 sts, dc in last 2 sts. Turn.
This row creates the ribbon channel at the neckline. Do not break yarn.
CHECKPOINT: After Row 17, the yoke should measure approximately 2.5 in / 6.5 cm from the foundation chain edge.
Dividing for Body and Sleeves
Row 18 (WS, division row): Ch 1, sc in first 14 sts (right front). Ch 4 (underarm bridge). Skip 22 sleeve sts. Sc in next 32 sts (back). Ch 4 (underarm bridge). Skip 22 sleeve sts. Sc in last 14 sts (left front). Turn.
Working stitch count: 14 right front + 4 ch + 32 back + 4 ch + 14 left front = 64 working sts and chains.
Row 19 (RS): Ch 1, sc in each st and ch across. Turn. (64 sc)
CHECKPOINT: You should have 64 sc across the row after Row 19, and the piece should feel symmetrical.
Cardigan Body Shell Stitch Section
The body uses the shell stitch pattern. Because the body opens at the front, each row is turned.
Row 20 (WS, setup): Ch 3 (counts as dc), dc in same st (half shell at edge), sk 2 sts, sc in next st, sk 2 sts, (5 dc in next st, sk 2 sts, sc in next st, sk 2 sts) across to last st, 2 dc in last st (half shell at edge). Turn. (10 full shells + 2 half shells)
Row 21 (RS): Ch 1, sc in first st (top of half shell), (5 dc in next sc, sc in center dc of next shell) across, ending 5 dc in last sc, sc in top of t-ch. Turn.
Row 22 (WS): Ch 3, dc in same st, sk 2 sts, sc in center dc of first shell, (sk 2 sts, 5 dc in next sc, sk 2 sts, sc in center dc of next shell) across to last sc, sk 2 sts, 2 dc in last sc. Turn.
Rows 21 and 22 form the shell stitch pattern. Repeat Rows 21 and 22 alternately until body measures 6.5 in / 16.5 cm from the underarm division, ending with a WS row.
Approximately 18 to 20 additional rows total of shell pattern needed.
CHECKPOINT: After completing the body shell section, the cardigan should measure approximately 9 in / 23 cm from the foundation chain to the last row before edging.
Cardigan Scallop Hem Edging
With RS facing, do not turn after the last body row.
Edging Row: Ch 1, work along the lower edge of the body: sl st in first edge st, (sk 2 sts, 5 dc in next st, sk 2 sts, sl st in next st) across. Fasten off.
You should have 10 scallops across the lower hem.
Sleeve Instructions (Make 2)
Return to the held sleeve stitches. With RS facing, join yarn with a standing dc to the first held sleeve st at the underarm.
Round 1 (revised): Join yarn to center of underarm bridge. Work 2 sc into the bridge, sc in first held sleeve st, sc2tog over next 2 sts, work in shell pattern (5 dc into next st, sk 2, sc into next st) four times across 20 sts, sc2tog over next 2 sts, sc in last sleeve st, work 2 sc into remaining bridge. Join with sl st. (24 sts)
Round 2: Ch 3, dc in same st. Continue in shell pattern as established around. Join. (24 sts, 4 shells)
Work sleeve in shell stitch rounds for 14 more rounds (approximately 16 rounds total), maintaining 4 shell repeats throughout.
CHECKPOINT: Sleeve should measure approximately 5 in / 12.7 cm before edging.
Sleeve Scallop Edging: Ch 1, sl st in first st, (sk 2, 5 dc in next st, sk 2, sl st in next st) around. Join. Fasten off.
Cardigan Front and Neck Edging
With RS facing, starting at lower right front corner, join yarn.
Row 1: Ch 1, work sc evenly up the right front edge, across the back neck (working into the foundation chain), and down the left front edge. Work approximately 2 sc per row end on front edges and 1 sc per chain across back neck. The fabric must lie flat.
After Row 1, do not turn.
Row 2 (scallop trim): Along each front edge only, work the scallop edging (sk 2 sc, 5 dc in next sc, sk 2 sc, sl st in next sc) across. Across the back neck edge, work 1 sc in each st to keep the neck smooth. Fasten off.
Ribbon Trim for Cardigan
Cut one 28 in / 71 cm length of satin ribbon. Beginning at the center front right side, weave the ribbon in and out through the eyelet row (Row 17) across the neckline, ending at the center front left side. Tie in a bow at center front. Trim ends neatly on a diagonal.
Bonnet Instructions
The bonnet crown is worked in the round from a central ring outward using a granny-hexagon style, then transitions to shell stitch rows for the brim.
Crown
Foundation ring: Ch 6, join with sl st to form a ring.
Round 1: Ch 3 (counts as dc), 2 dc into ring, (ch 2, 3 dc into ring) 5 times, ch 2, join with sl st to top of beg ch-3. (6 clusters of 3 dc, 6 ch-2 corner sps)
Round 2: Sl st to first ch-2 sp. Ch 3, (2 dc, ch 2, 3 dc) into same ch-2 sp. Ch 1. (3 dc, ch 2, 3 dc) into next ch-2 sp, ch 1. Rep around. Join. (12 clusters of 3 dc, 6 ch-2 corner sps, 6 ch-1 sps between)
Round 3: Sl st to first ch-2 sp. Ch 3, (2 dc, ch 2, 3 dc) in same sp. Ch 1, 3 dc in ch-1 sp, ch 1. (3 dc, ch 2, 3 dc) in next ch-2 corner sp. Rep around. Join. (18 clusters, 6 ch-2 corner sps, 12 ch-1 sps)
Round 4: Sl st to first ch-2 sp. Ch 3, (2 dc, ch 2, 3 dc) in same sp. (Ch 1, 3 dc in next ch-1 sp) twice, ch 1. (3 dc, ch 2, 3 dc) in next ch-2 corner sp. Rep around. Join. (24 clusters, 6 corner sps, 18 intermediate sps)
Round 5: Sl st to first ch-2 sp. Ch 3, (2 dc, ch 2, 3 dc) in same sp. (Ch 1, 3 dc in next ch-1 sp) 3 times, ch 1. (3 dc, ch 2, 3 dc) in next ch-2 corner sp. Rep around. Join. (30 clusters, 6 corner sps, 24 intermediate sps)
CHECKPOINT: After Round 5, the crown medallion should measure approximately 4.5 in / 11.5 cm across its widest point. It should lie flat.
Brim Transition
The bonnet transitions from rounds to rows for the straight brim that frames the face. You will work the brim along roughly 3/4 of the circumference (the front arc), leaving the back quarter free.
Setup row for brim: With RS facing, ch 1, work 62 sc evenly across the front 5 panel groups of the crown edge. Turn. (62 sc)
Brim shell row 1 (WS): Ch 3, dc in same st, (sk 2 sts, sc in next st, sk 2 sts, 5 dc in next st) 9 times, sk 2, sc in next st, sk 2, 2 dc in last st. Turn. (10 shell units)
Brim shell row 2: Ch 1, sc in first st, (5 dc in next sc, sc in center dc of shell) 9 times, 5 dc in next sc, sc in top of t-ch. Turn.
Brim shell row 3: Ch 3, dc in same st, sk 2, sc in center dc of first shell, (sk 2, 5 dc in next sc, sk 2, sc in center dc of next shell) 9 times, 2 dc in last sc. Turn.
Repeat Brim Rows 2 and 3 two more times for a total of 6 brim rows. The brim should measure approximately 1.75 in / 4.5 cm deep.
Brim scallop edging: With RS facing, work along the front open edge of the brim. Sl st in first st, (sk 2, 5 dc in next st, sk 2, sl st in next st) across. Fasten off.
Bonnet Back Neck Edging
With RS facing, join yarn at the left back neck corner. Work 1 row of sc evenly across the back neck edge of the crown (approximately 30 sc). Fasten off.
Bonnet Ribbon Ties
Cut two 18 in / 46 cm lengths of satin ribbon. Sew or loop one piece securely to each lower corner of the brim scallop edge. Tie under the chin in a bow.
Bootie Instructions (Make 2)
The booties are worked from the toe upward. The sole and upper use sc, then the ankle cuff transitions to shell stitch with a scallop edge finish.
Toe
Foundation chain: Ch 8 with smaller hook. Switch to pattern hook.
Round 1: Sc in 2nd ch from hook, sc in next 5 ch, 3 sc in last ch. Working along opposite side of foundation chain, sc in next 5 ch, 2 sc in last ch. Join. (16 sc)
Round 2: Ch 1, 2 sc in first st, sc in next 5 sts, 2 sc in each of next 2 sts, sc in next 5 sts, 2 sc in last st. Join. (20 sc)
Round 3: Ch 1, sc in each st around. Join. (20 sc)
Round 4: Ch 1, sc in each st around. Join. (20 sc)
Sole
Rounds 5 through 8: Ch 1, sc in each st around. Join. (20 sc each round)
Instep Shaping
Round 9: Ch 1, sc in first 6 sts. Sc2tog, sc in next 4 sts, sc2tog, sc in last 6 sts. Join. (18 sc)
Round 10: Ch 1, sc in first 6 sts. Sc2tog, sc in next 2 sts, sc2tog, sc in last 6 sts. Join. (16 sc)
Round 11: Ch 1, sc in each st around. Join. (16 sc)
CHECKPOINT: After Round 11, the bootie should be approximately 2.75 in / 7 cm from the toe. You should see the basic slipper shape forming.
Ankle Cuff
Round 12 (setup): Ch 3, dc in next 2 sts, (2 dc in next st, dc in next st) 4 times, dc in last 4 sts. Join. (20 dc)
Round 13 (shell round): Ch 1, sc in first st, sk 2 sts, (5 dc in next st, sk 2 sts, sc in next st, sk 2 sts) 3 times, 5 dc in next st, sk 2 sts, join with sl st to first sc. (4 shells)
Round 14: Sl st to center dc of first shell, ch 1, sc in same st, 5 dc in next sc, (sc in center dc of next shell, 5 dc in next sc) 3 times. Join. (4 shells)
Round 15: Sl st to center dc of first shell, ch 1, sc in same st, 5 dc in next sc, (sc in center dc of next shell, 5 dc in next sc) 3 times. Join. (4 shells)
Work Rounds 14 and 15 one more time for a slightly taller cuff (optional).
Cuff scallop edging: Ch 1, sl st in first sc, (sk 2, 5 dc in next st, sk 2, sl st in next st) 4 times around. Join. Fasten off. (4 scallops)
Bootie Ribbon
Cut one 9 in / 23 cm length of satin ribbon per bootie. Thread the ribbon through the gap between the instep and the cuff (approximately Round 12) and tie in a bow at the front center.
Finishing and Blocking
For all three pieces:
1. Weave in all ends using a tapestry needle. Work the tail through at least 1 in / 2.5 cm of stitches in two different directions before trimming close.
2. Wet block each piece. Submerge in cool water with gentle wool wash or baby-safe soap. Gently press out water without wringing. Roll in a clean towel and press to remove excess moisture.
3. Pin to a blocking mat at the finished dimensions. For the cardigan, pin the body flat, pin sleeves to their measured length, and gently stretch scallop edges to open the shell pattern fully.
4. For the bonnet, pin the crown flat and shape the brim gently forward.
5. For the booties, stuff loosely with a rolled-up towel or tissue paper and pin the cuff upright.
6. Allow to dry completely before removing pins. This may take 12 to 24 hours.
7. Do not press with an iron directly on crochet lace. If using wool, a damp pressing cloth held just above the surface with a steam iron (not touching) can help set stitch definition.
8. Thread all ribbons after blocking to keep them crisp and prevent any color transfer during wet blocking.
Size Customization Tips
To make the cardigan larger (3 to 6 months):
1. Add 2 more increase rows to the yoke. This adds 16 more sts to the yoke.
2. After dividing, the body will have 72 sc instead of 64. This gives 12 shell repeats.
3. Extend the body shell section by 3 to 4 additional rows.
4. Work sleeves for 18 to 20 rounds instead of 16.
For 6 to 9 months: Add 4 total extra increase rows to the yoke and extend both body and sleeves proportionally.
To adjust the bonnet: Work one additional granny round (Round 6) and add one additional pair of brim shell rows.
To adjust the booties: Work 2 additional sc rounds in the sole section (Rounds 5 through 10 instead of 5 through 8).
You Did It!
Thank you so much for choosing this pattern for your next baby project. There is something really special about creating a coordinated set like this, and I hope you enjoy every stitch. If you make this sweet layette, I would absolutely love to see it! Tag me on Instagram or share a photo in my Facebook group.
If this pattern made your day a little brighter, save it to your Pinterest boards so you can find it again when the next baby shower invitation lands in your mailbox. And please drop a comment below if you give it a try. I read every single one, and hearing about your finished projects genuinely makes my week.
You Might Also Like
- Ocean Blues Beaded Sea Creature Anklet Free Crochet Pattern
- Lavender Fields Flower Bracelet Free Crochet Pattern
- Blush Pink Ruffle Baby Romper Free Crochet Pattern
- Pastel Rainbow Granny Square Hoodie Free Crochet Pattern