
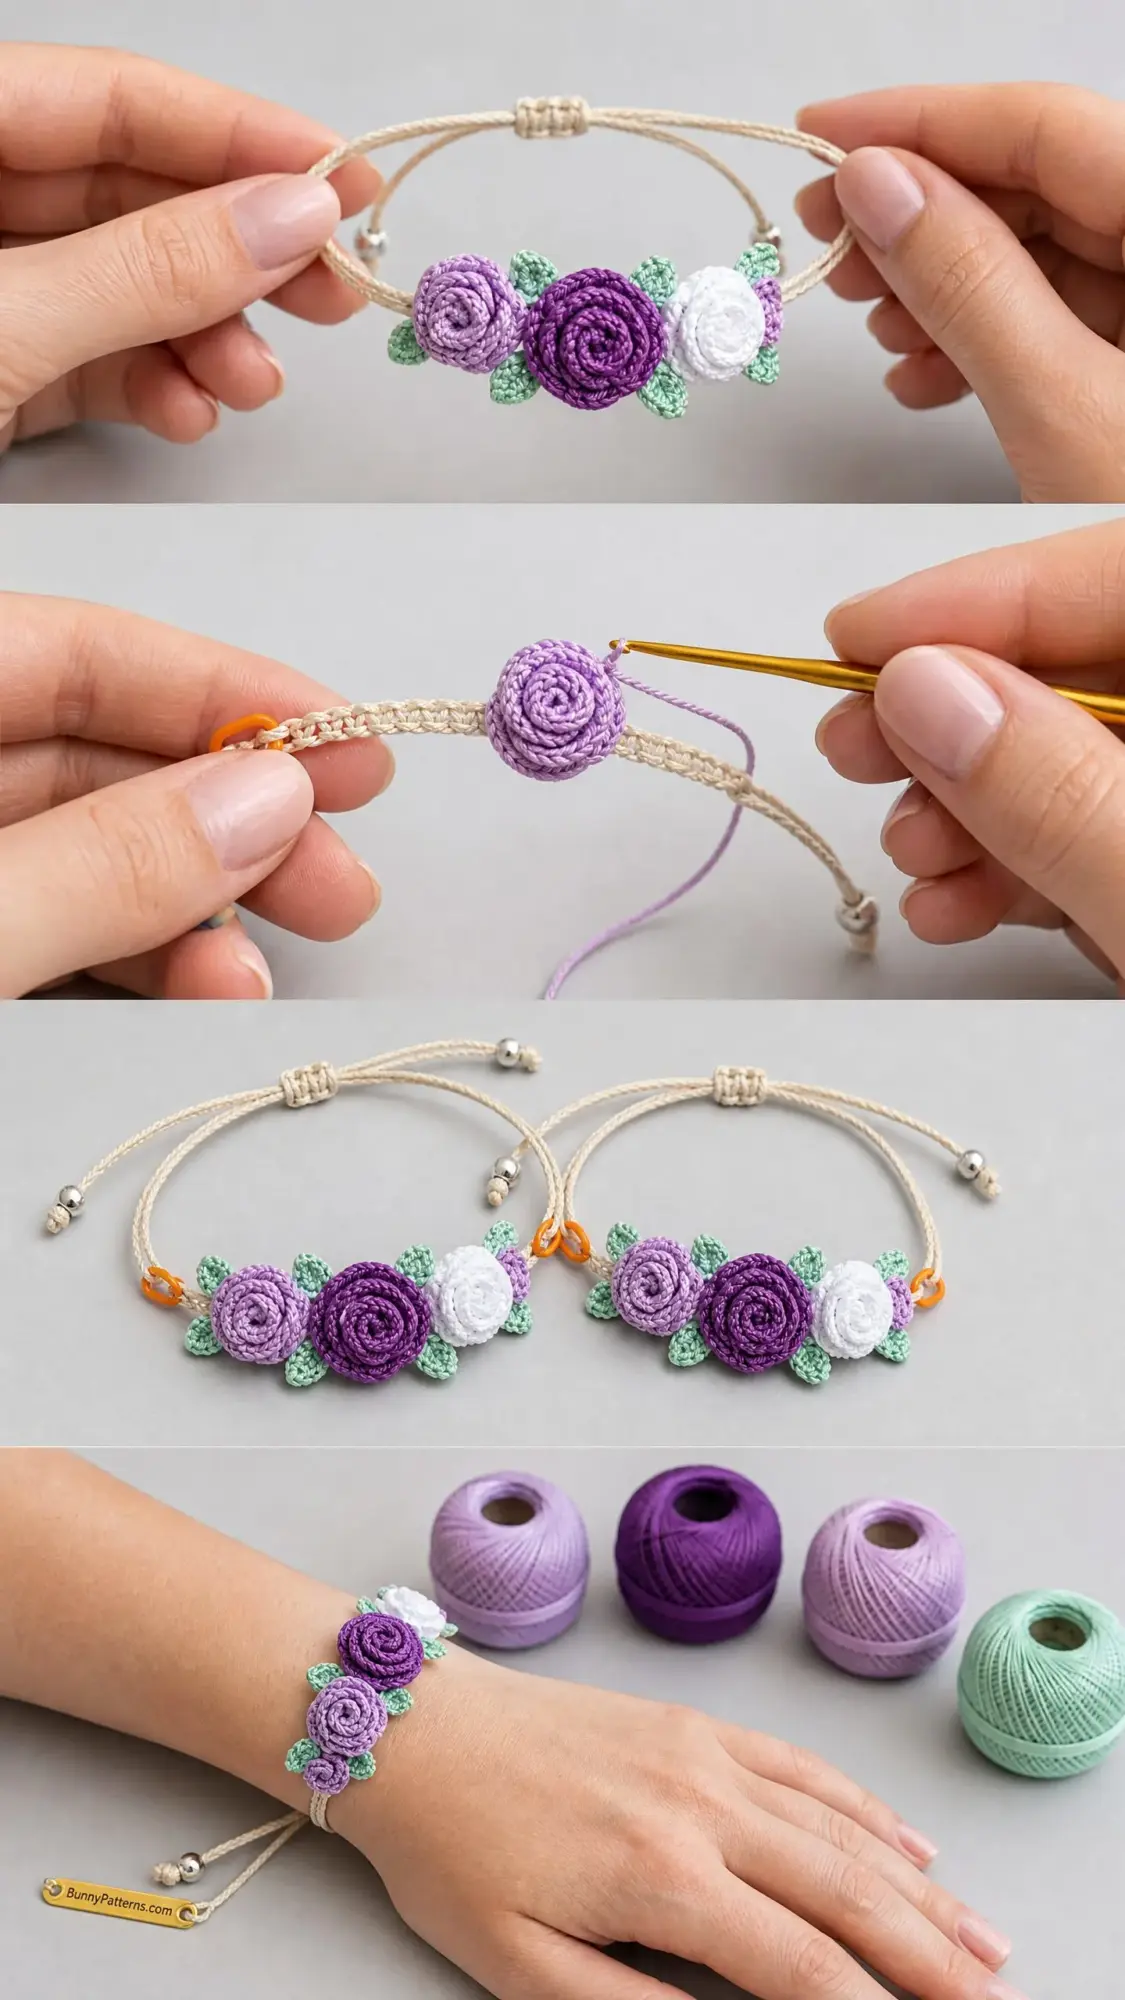
This delicate adjustable bracelet features five crocheted roses in purple, lavender, and white arranged along a macrame cord base. The construction uses basic stitches worked into coiled strips. You will need size 10 cotton crochet thread and a steel hook.
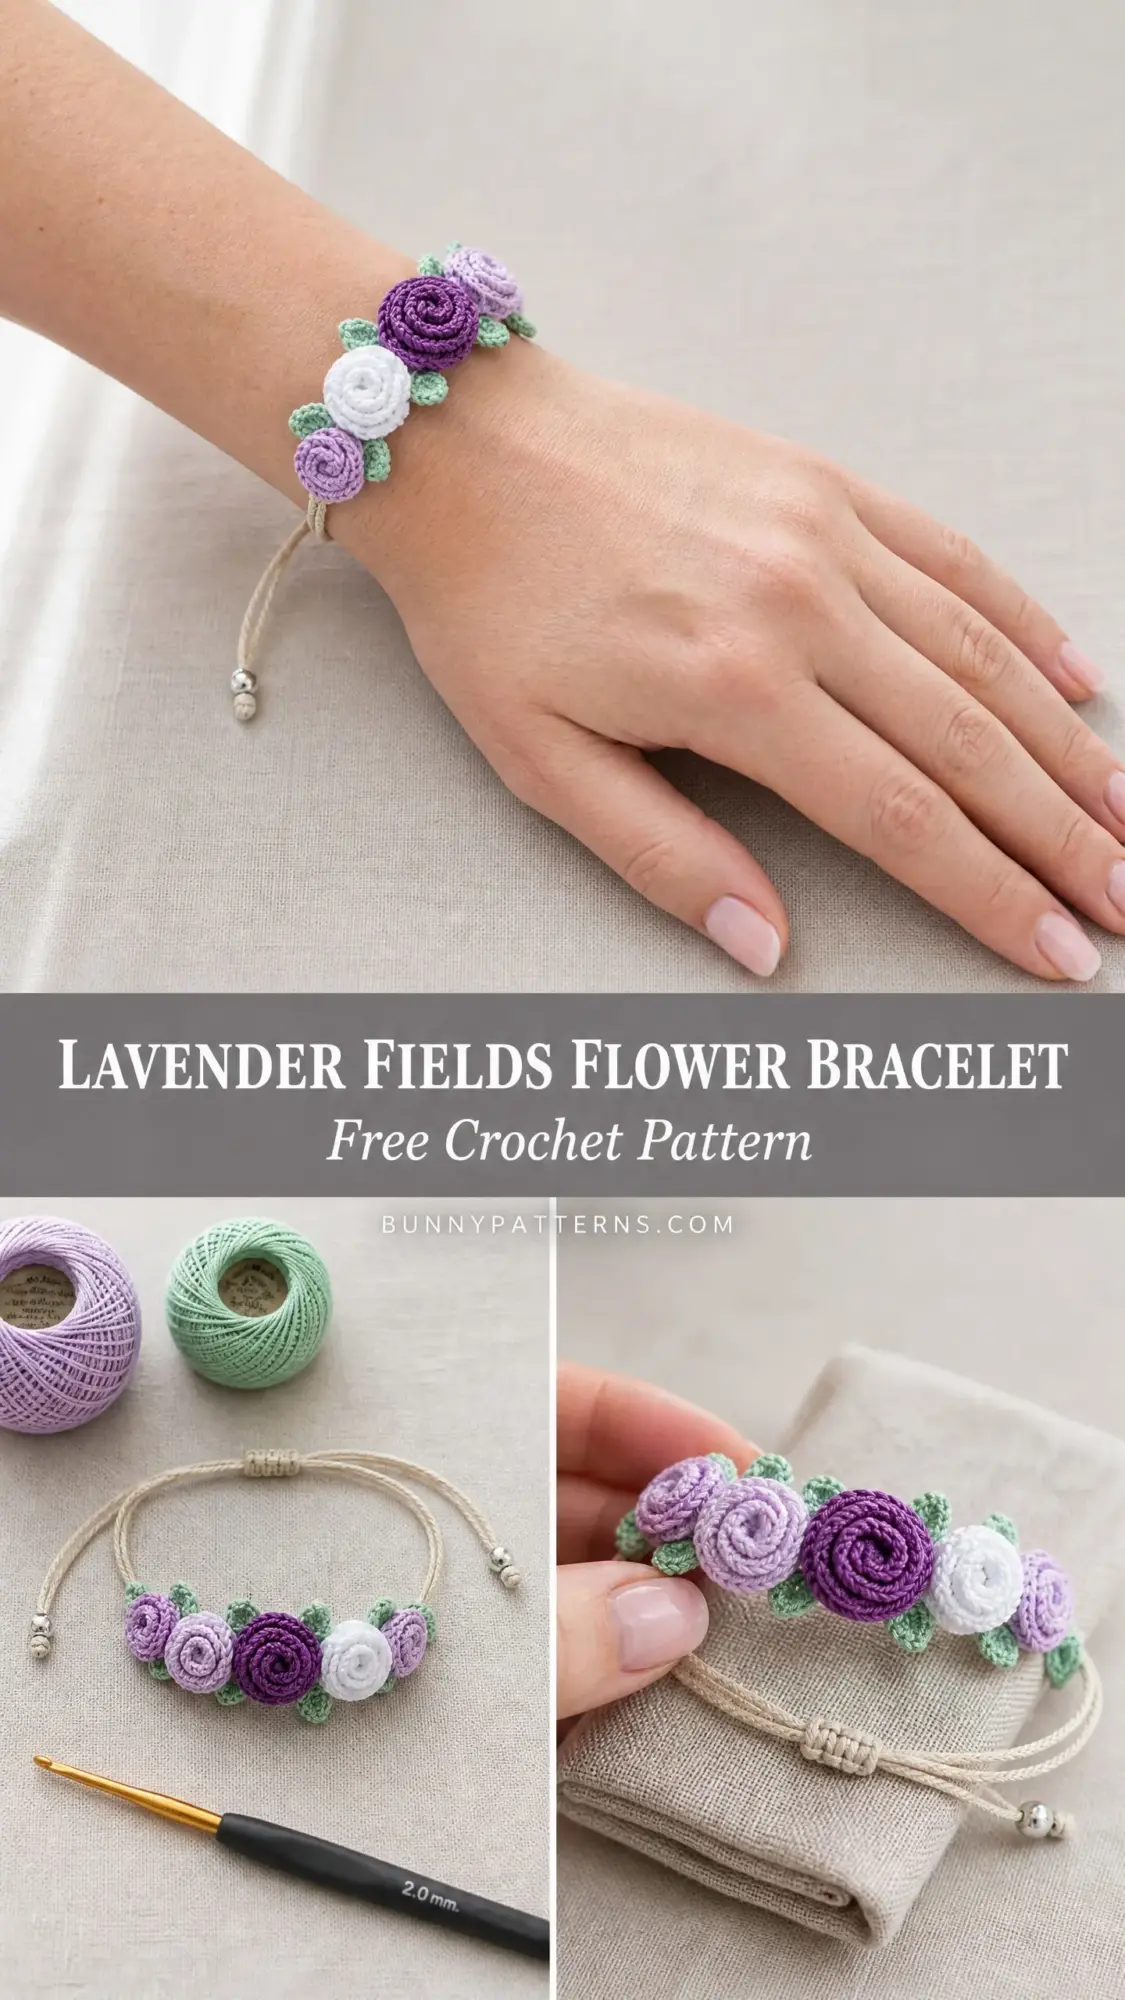
The finished piece is lightweight and adjustable to fit wrists between 6 and 8 inches. Each flower is worked separately, then assembled into a cluster with pointed leaves tucked between. A sliding square knot closure with silver beads completes the design.
If you have worked with crochet thread before, this project will feel familiar. If thread crochet is new to you, this is a great introduction because each flower component is small and quick to finish.
Why You Will Love This Crochet Bracelet Pattern
I designed this bracelet to showcase the beauty of miniature crochet flowers without overwhelming complexity. The roses look intricate, but they are actually flat strips that you coil and stitch into shape. No working in tiny rounds, no complicated petal shaping. Just rows of single crochet, half double crochet, and double crochet that create natural petal curves when rolled.
The adjustable sliding closure means you do not need to worry about exact wrist measurements. The macrame-style cord slides smoothly through the square knot barrel, letting you customize the fit on the fly. This makes the bracelet perfect for gifting because it fits almost any adult wrist.
The color palette of deep purple, light lavender, white, and sage green creates a romantic garden aesthetic. But you can absolutely swap in your favorite colors. The technique works with any combination.
Materials You Will Need
Yarn and Thread
Size 10 cotton crochet thread in four colors:
Natural or beige waxed cotton macrame cord, 1 mm diameter, approximately 60 inches total
Hook
US Steel Hook Size 7 (1.65 mm) for all crochet elements
Notions
Recommended Thread Brands
Aunt Lydia’s Classic Crochet Thread Size 10 offers excellent stitch definition and comes in many colors. Look for Purple, Soft Violet, White, and Sage.
DMC Traditions Crochet Thread Size 10 has a slightly tighter twist that gives crisp petal edges.
Coats and Clark South Maid Crochet Thread Size 10 is budget-friendly with consistent tension.
Any Size 10 cotton crochet thread will work for this pattern. Do not substitute larger yarn weights because the flower motifs will become too bulky to lie flat against a bracelet.
Gauge
Gauge is not critical for this project but is provided for reference.
Working in single crochet (sc) in the round with Size 10 thread and a 1.65 mm steel hook:
The large rose should measure approximately 0.75 inch in diameter when complete. The medium roses should measure approximately 0.6 inch. The small buds should measure approximately 0.35 inch.
If your roses are larger, go down one hook size. If smaller, go up one hook size.
Abbreviations and Stitch Definitions
Let me walk you through each stitch you will use. I have included plain-English explanations so you know exactly what to do.
ch, chain: Yarn over, pull through the loop on your hook. This creates the foundation for your work.
sl st, slip stitch: Insert hook into stitch, yarn over, pull through both the stitch and the loop on your hook in one motion. Used for joining or creating a flat edge.
sc, single crochet: Insert hook into stitch, yarn over and pull up a loop (2 loops on hook), yarn over and pull through both loops. The shortest standard stitch.
hdc, half double crochet: Yarn over, insert hook into stitch, yarn over and pull up a loop (3 loops on hook), yarn over and pull through all 3 loops. Medium height stitch.
dc, double crochet: Yarn over, insert hook into stitch, yarn over and pull up a loop (3 loops on hook), yarn over and pull through 2 loops (2 loops remain), yarn over and pull through remaining 2 loops. Taller stitch that creates the petal height variation.
sc3tog, single crochet 3 together: Insert hook into next stitch and pull up a loop, repeat in next 2 stitches (4 loops on hook), yarn over and pull through all 4 loops. This decreases 3 stitches into 1.
st(s): stitch or stitches
RS: right side, the side that faces outward on the finished bracelet
WS: wrong side
Understanding the Construction
Each rose is worked as a flat petal strip, not in the round. You crochet a long strip with curved petal sections created by varying stitch heights. Then you coil the strip tightly from one end and stitch through the base to hold the coil in place.
This method is much easier than crocheting tiny spirals. The petal shape comes from the height differences between single crochet, half double crochet, and double crochet stitches in each row.
The leaves are worked flat with increases at the tip and decreases on the return. They are stitched behind the flowers after assembly.
Pattern Instructions
Large Rose (make 1 in Color A)
The large rose has 5 petals.
Foundation: Ch 6.
Row 1 (RS): Sc in second ch from hook, sc in next 4 ch. Turn. (5 sc)
Row 2 (WS): Ch 1, sc in first st, hdc in next st, dc in next st, hdc in next st, sc in last st. Turn. (5 sts)
Row 3 (RS): Ch 1, sc in first st, hdc in next st, dc in next 3 sts. Turn. (5 sts)
Row 4 (WS): Ch 1, dc in first 3 sts, hdc in next st, sc in last st. Turn. (5 sts)
Row 5 (RS): Ch 1, sc in first st, hdc in next st, dc in next st, hdc in next st, sc in last st. Turn. (5 sts)
Repeat Rows 2 through 5 four more times for a total of 5 petal units (20 rows worked after the foundation row).
After Row 5 of the 5th petal: Ch 1, sl st in each st across. Fasten off leaving a 10-inch tail for coiling.
To coil and secure: Hold the strip with WS facing up. Roll the strip tightly from the cast-on end. Thread the starting yarn tail onto a tapestry needle and stitch back and forth through the base of the coil several times. Do not stitch through the RS petals. The finished rose should measure approximately 0.75 inch in diameter.
Medium Rose (make 1 in Color B, make 1 in Color C)
The medium rose has 4 petals.
Foundation: Ch 6.
Row 1 (RS): Sc in second ch from hook, sc in next 4 ch. Turn. (5 sc)
Row 2 (WS): Ch 1, sc in first st, hdc in next st, dc in next st, hdc in next st, sc in last st. Turn. (5 sts)
Row 3 (RS): Ch 1, sc in first st, hdc in next st, dc in next 3 sts. Turn. (5 sts)
Row 4 (WS): Ch 1, dc in first 3 sts, hdc in next st, sc in last st. Turn. (5 sts)
Row 5 (RS): Ch 1, sc in first st, hdc in next st, dc in next st, hdc in next st, sc in last st. Turn. (5 sts)
Repeat Rows 2 through 5 three more times for a total of 4 petal units (16 rows worked after the foundation row).
After Row 5 of the 4th petal: Ch 1, sl st in each st across. Fasten off leaving a 10-inch tail for coiling.
Coil and secure. The medium rose should measure approximately 0.6 inch in diameter. Make two total, one in each color.
Small Bud (make 1 in Color B, make 1 in Color A)
The small bud has 3 petals and uses a narrower 4-stitch base.
Foundation: Ch 5.
Row 1 (RS): Sc in second ch from hook, sc in next 3 ch. Turn. (4 sc)
Row 2 (WS): Ch 1, sc in first st, hdc in next 2 sts, sc in last st. Turn. (4 sts)
Row 3 (RS): Ch 1, sc in first st, dc in next 2 sts, sc in last st. Turn. (4 sts)
Row 4 (WS): Ch 1, sc in first st, hdc in next 2 sts, sc in last st. Turn. (4 sts)
Repeat Rows 3 and 4 two more times for a total of 3 petal units.
After the final WS row: Ch 1, sl st in each st across. Fasten off leaving an 8-inch tail for coiling.
Coil and secure. The small bud should measure approximately 0.35 inch in diameter. Make two total.
Checkpoint
You should now have 5 finished flower coils: 1 large in Color A, 1 medium in Color B, 1 medium in Color C, 1 small bud in Color B, and 1 small bud in Color A. Weave in all ends except the coiling tails, which should be hidden within the coil base.
Leaf (make 6 in Color D)
Foundation: Ch 7.
Row 1 (RS): Sc in second ch from hook, sc in next 4 ch, 3 sc in last ch (this creates the leaf tip). Now working back along the other side of the foundation chain: sc in next 5 ch. Do not join. Turn. (13 sc)
Row 2 (WS): Ch 1, sc in first 5 sts, sc3tog over next 3 sts (this is the tip decrease), sc in last 5 sts. Turn. (11 sts)
Row 3 (RS): Ch 1, sl st in first 4 sts, sl st in center st of the tip, sl st in last 4 sts. Fasten off leaving a 6-inch tail for sewing.
Each leaf should measure approximately 0.5 inch long and 0.25 inch wide. Make 6 leaves total.
Assembly of Flower Cluster
Step 1: Arrange the flowers in order from left to right: small bud (Color B), medium rose (Color B), large rose (Color A, center), medium rose (Color C), small bud (Color A).
Step 2: Lay the flowers face up on a flat surface, slightly overlapping each other. The large center rose should sit slightly forward compared to the medium roses. The small buds sit slightly behind and beside the medium roses.
Step 3: Using a tapestry needle and a length of Color D thread, stitch the flowers together through their bases. Take several stitches between each pair of adjacent flowers. Do not stitch through the RS petals. Knot securely and hide the tail between the layers.
Step 4: Place two leaves at the top of the cluster, peeking out behind the large center rose and medium roses. Place two leaves at the lower sides. Position the remaining two leaves partially between the buds and medium roses. Pin to check placement.
Step 5: Stitch each leaf in place through the WS of the leaf and the back base of the nearest flower. Use 3 to 4 stitches per leaf. Fasten off and hide tails.
The cluster should measure approximately 2.75 inches wide and 1.25 inches tall.
Macrame Cord Base and Sliding Closure
Step 1: Fold the 50-inch cord in half to find the center point. Mark with a pin.
Step 2: Thread both ends of the cord through the back of the flower cluster from left to right. The center point should sit at the back center of the cluster.
Step 3: On the left end of the cord, thread 2 silver beads onto both strands together. Slide the beads up to about 0.5 inch from the cluster edge. Tie a simple overhand knot immediately above the beads, then another below the beads. Trim cord ends to 0.25 inch below the final knot. Seal with fabric glue if desired.
Step 4: Repeat Step 3 on the right end.
Step 5: Lay both ends of the bracelet cord parallel to each other, overlapping in the center by about 2 inches. The bracelet forms a loop shape.
Step 6: Take the 10-inch knotting cord. Position it perpendicular to the two parallel bracelet cord strands. Work a square knot:
Row 1: Bring the left end of the knotting cord over both parallel bracelet cords and under the right end. Bring the right end under both parallel bracelet cords and up through the loop formed by the left end. Pull snug.
Row 2: Bring the right end over both parallel bracelet cords and under the left end. Bring the left end under both parallel bracelet cords and up through the loop formed by the right end. Pull snug.
Repeat these two rows 3 to 4 more times until the knot column is approximately 0.5 inch long.
Step 7: Tie the knotting cord ends in a secure double knot against the back of the square knot barrel. Trim ends and seal with fabric glue.
Step 8: Test the closure by sliding the square knot barrel along the two parallel cords. The bracelet should adjust from approximately 6 to 8 inches.
Finishing Tips
Before assembly, lightly mist all crocheted pieces with water and pin flat on a blocking board. Allow to dry completely before assembling. This is especially important for the leaves, which can curl.
Trim all cord and thread ends cleanly. A small drop of clear-drying fabric glue on each cord knot adds durability.
Care Instructions
Hand wash only in cool water with mild soap. Do not wring or twist. Roll in a clean towel to remove excess water. Reshape and dry flat away from direct sunlight. Store flat or loosely coiled to prevent crushing the flower petals.
Final Thoughts on This Crochet Flower Bracelet Pattern
This Lavender Fields Flower Bracelet makes a beautiful handmade gift or a sweet treat for yourself. The coiled rose technique is satisfying once you get the hang of it, and the sliding closure adds a professional finish. I hope you enjoy making this as much as I enjoyed designing it.
Thank you so much for choosing this pattern. If you make one, I would love to see it! Tag me on Instagram or share a photo in my Facebook group.
If you loved this crochet bracelet pattern, go ahead and save it to your Pinterest boards so you can find it when you are ready to start. And if you give it a try, please drop a comment below. I read every single one and it truly makes my day to see your finished projects.
You Might Also Like
- Sunflower Granny Square Bucket Bag Free Crochet Pattern
- Lavender Dream Mesh Crochet High Tops Free Pattern
- Mint Green Shell Stitch Baby Dress Free Crochet Pattern
- Dusty Rose Pineapple Lace Halter Free Crochet Pattern