
This pattern has a name that stuck the moment I sketched it out. I was flipping through an old notebook filled with half-finished ideas when I found a rough drawing of a lace-up back with cascading flowers draping down from the shoulders. Underneath, I had scribbled "wisteria corset thing?" with a question mark.
Get the Ad-Free PDF Pattern
You can find the free pattern below, or you can purchase the ad-free printable PDF from my shop.
Get the Printable PDF →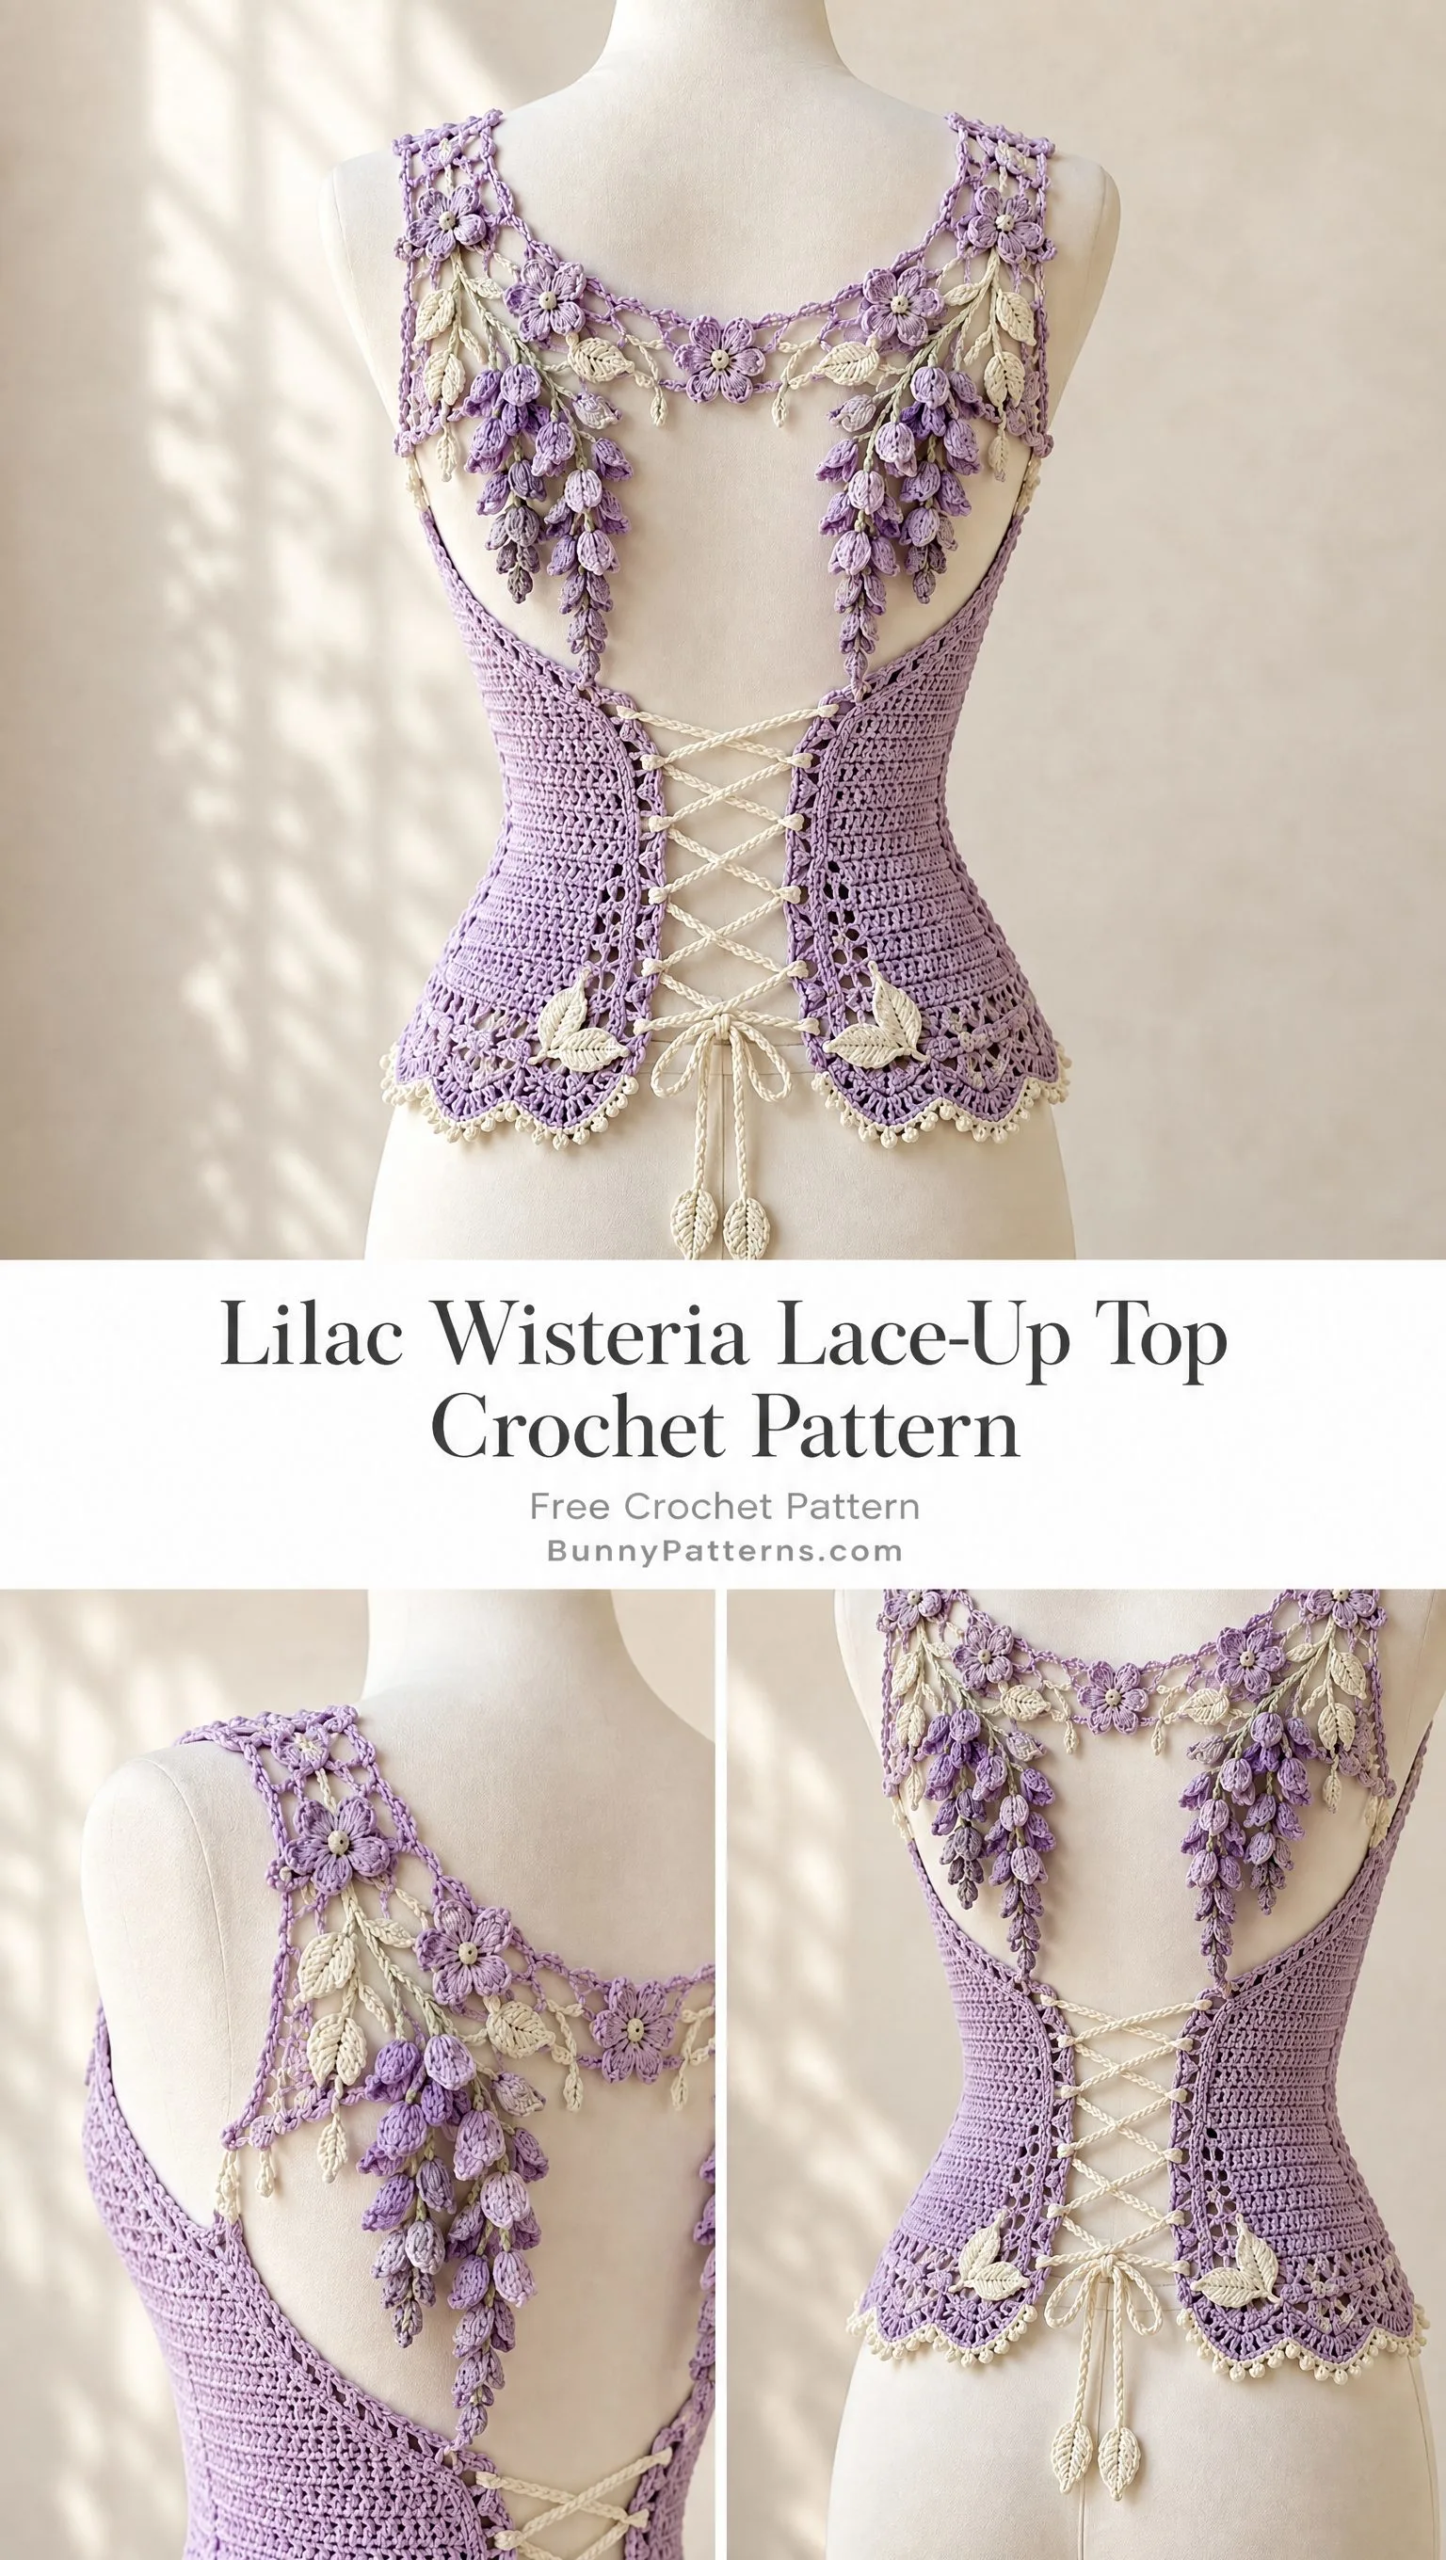
That little sketch sat untouched for nearly two years. Then last spring, I walked past a garden absolutely dripping with purple wisteria blooms, and I knew exactly what that design was supposed to become. I rushed home, pulled out my lilac cotton stash, and finally brought this top to life.
I named it the Lilac Wisteria Lace-Up Top because those drooping flower clusters really do look like wisteria cascading down your shoulder blades. The open back, the corset lacing, the delicate floral yoke. This is the kind of statement piece that makes people stop and ask, "Wait, you MADE that?" And honestly, that is exactly the reaction I was hoping for.
About This Crochet Pattern
The Lilac Wisteria Lace-Up Top is a fitted open-back crochet top featuring a floral shoulder yoke, cascading wisteria sprays, corset-style lacing, and a scalloped waist. It is built in five coordinated parts: two dense lilac side and back panels, an airy floral shoulder yoke, wide scalloped straps integrated into the yoke, two mirror-image wisteria sprays appliqued across the shoulder blades, and a long center-back opening finished with ivory lacing. The lower edge gets completed with lavender fan scallops, ivory picots, and two ivory leaf appliques anchoring the bottom corners.
This is an intermediate to advanced level project. The construction method is modular and made-to-measure, meaning you will work separate pieces and join them together while customizing the fit to your body. The pattern uses US crochet terminology throughout.
The fit concept is close-fitting through the waist with negative ease of about 2.5 to 5 cm (1 to 2 inches). The center-back opening supplies additional adjustment, so the finished garment is forgiving if the side panels end up slightly narrow.
Materials You Will Need
Main Yarn: Sport weight or fine DK cotton in lilac. You will need 250 (280, 310, 350, 390, 430, 475) meters or 275 (305, 340, 385, 425, 470, 520) yards depending on your size.
Contrast Yarn: Sport cotton in ivory. You will need 65 to 110 meters (70 to 120 yards).
Accent Yarn: A small amount of lavender in 1 to 2 nearby shades for wisteria depth. This creates that beautiful gradient effect in the cascading flower clusters.
Hooks: Use a 3.0 mm hook for the body. For flowers and leaves, you may want to drop down to a 2.5 to 2.75 mm hook if you prefer firmer definition on your motifs.
Notions: Tapestry needle, removable stitch markers, pins, scissors, blocking mat, and optionally 6 to 8 mm pearl or matte beads for flower centers.
Gauge
Body gauge after light blocking: 18 double crochet (dc) stitches by 10 rows equals 10 cm or 4 inches using a 3.0 mm hook.
Yoke gauge: 7 chain spaces or 4 small flower motifs across approximately 10 cm (4 inches). The exact yoke gauge is less critical than symmetry and fit.
Make a swatch at least 14 cm (5.5 inches) square before starting. If you have more stitches than stated, use a larger hook. If fewer, use a smaller hook. The dense side panels carry most of the fit, so body gauge really matters here.
Finished Sizing
This pattern includes seven sizes ranging from XS to 3XL:
Panel heights range from 30 cm for XS up to 36 cm for 3XL. Back opening widths range from 10 to 12 cm for XS up to 16 to 18 cm for 3XL.
Abbreviations and Special Stitches
Let me walk you through all the stitches and abbreviations used in this pattern:
ch = chain
sl st = slip stitch
sc = single crochet (insert hook, yarn over, pull up a loop, yarn over, pull through both loops)
hdc = half double crochet
dc = double crochet (yarn over, insert hook, pull up loop, yarn over and pull through 2 loops twice)
tr = treble crochet
sp = space
sk = skip
st(s) = stitch(es)
RS/WS = right side/wrong side
rep = repeat
dc2tog (double crochet two together, a decrease): Yarn over, insert hook in next stitch, pull up loop, yarn over and draw through 2 loops. Repeat in next stitch. Yarn over and draw through all 3 loops on hook.
V-st (V-stitch): Work (dc, ch 2, dc) all in the same stitch or space. This creates a little V shape.
Fan: Work 5 dc in the same stitch or space unless otherwise noted.
Picot: Chain 3, then slip stitch in the first chain. This creates a tiny decorative bump.
3-dc cluster: Work 3 incomplete dc into the same stitch or space (stop before the final yarn over on each), then yarn over and draw through all 4 loops on hook.
Petal: Chain 3, work 3 tr in designated ring or space, chain 3, slip stitch into same ring or space.
Construction Overview
Before diving into the instructions, understanding how this top comes together will help everything make sense.
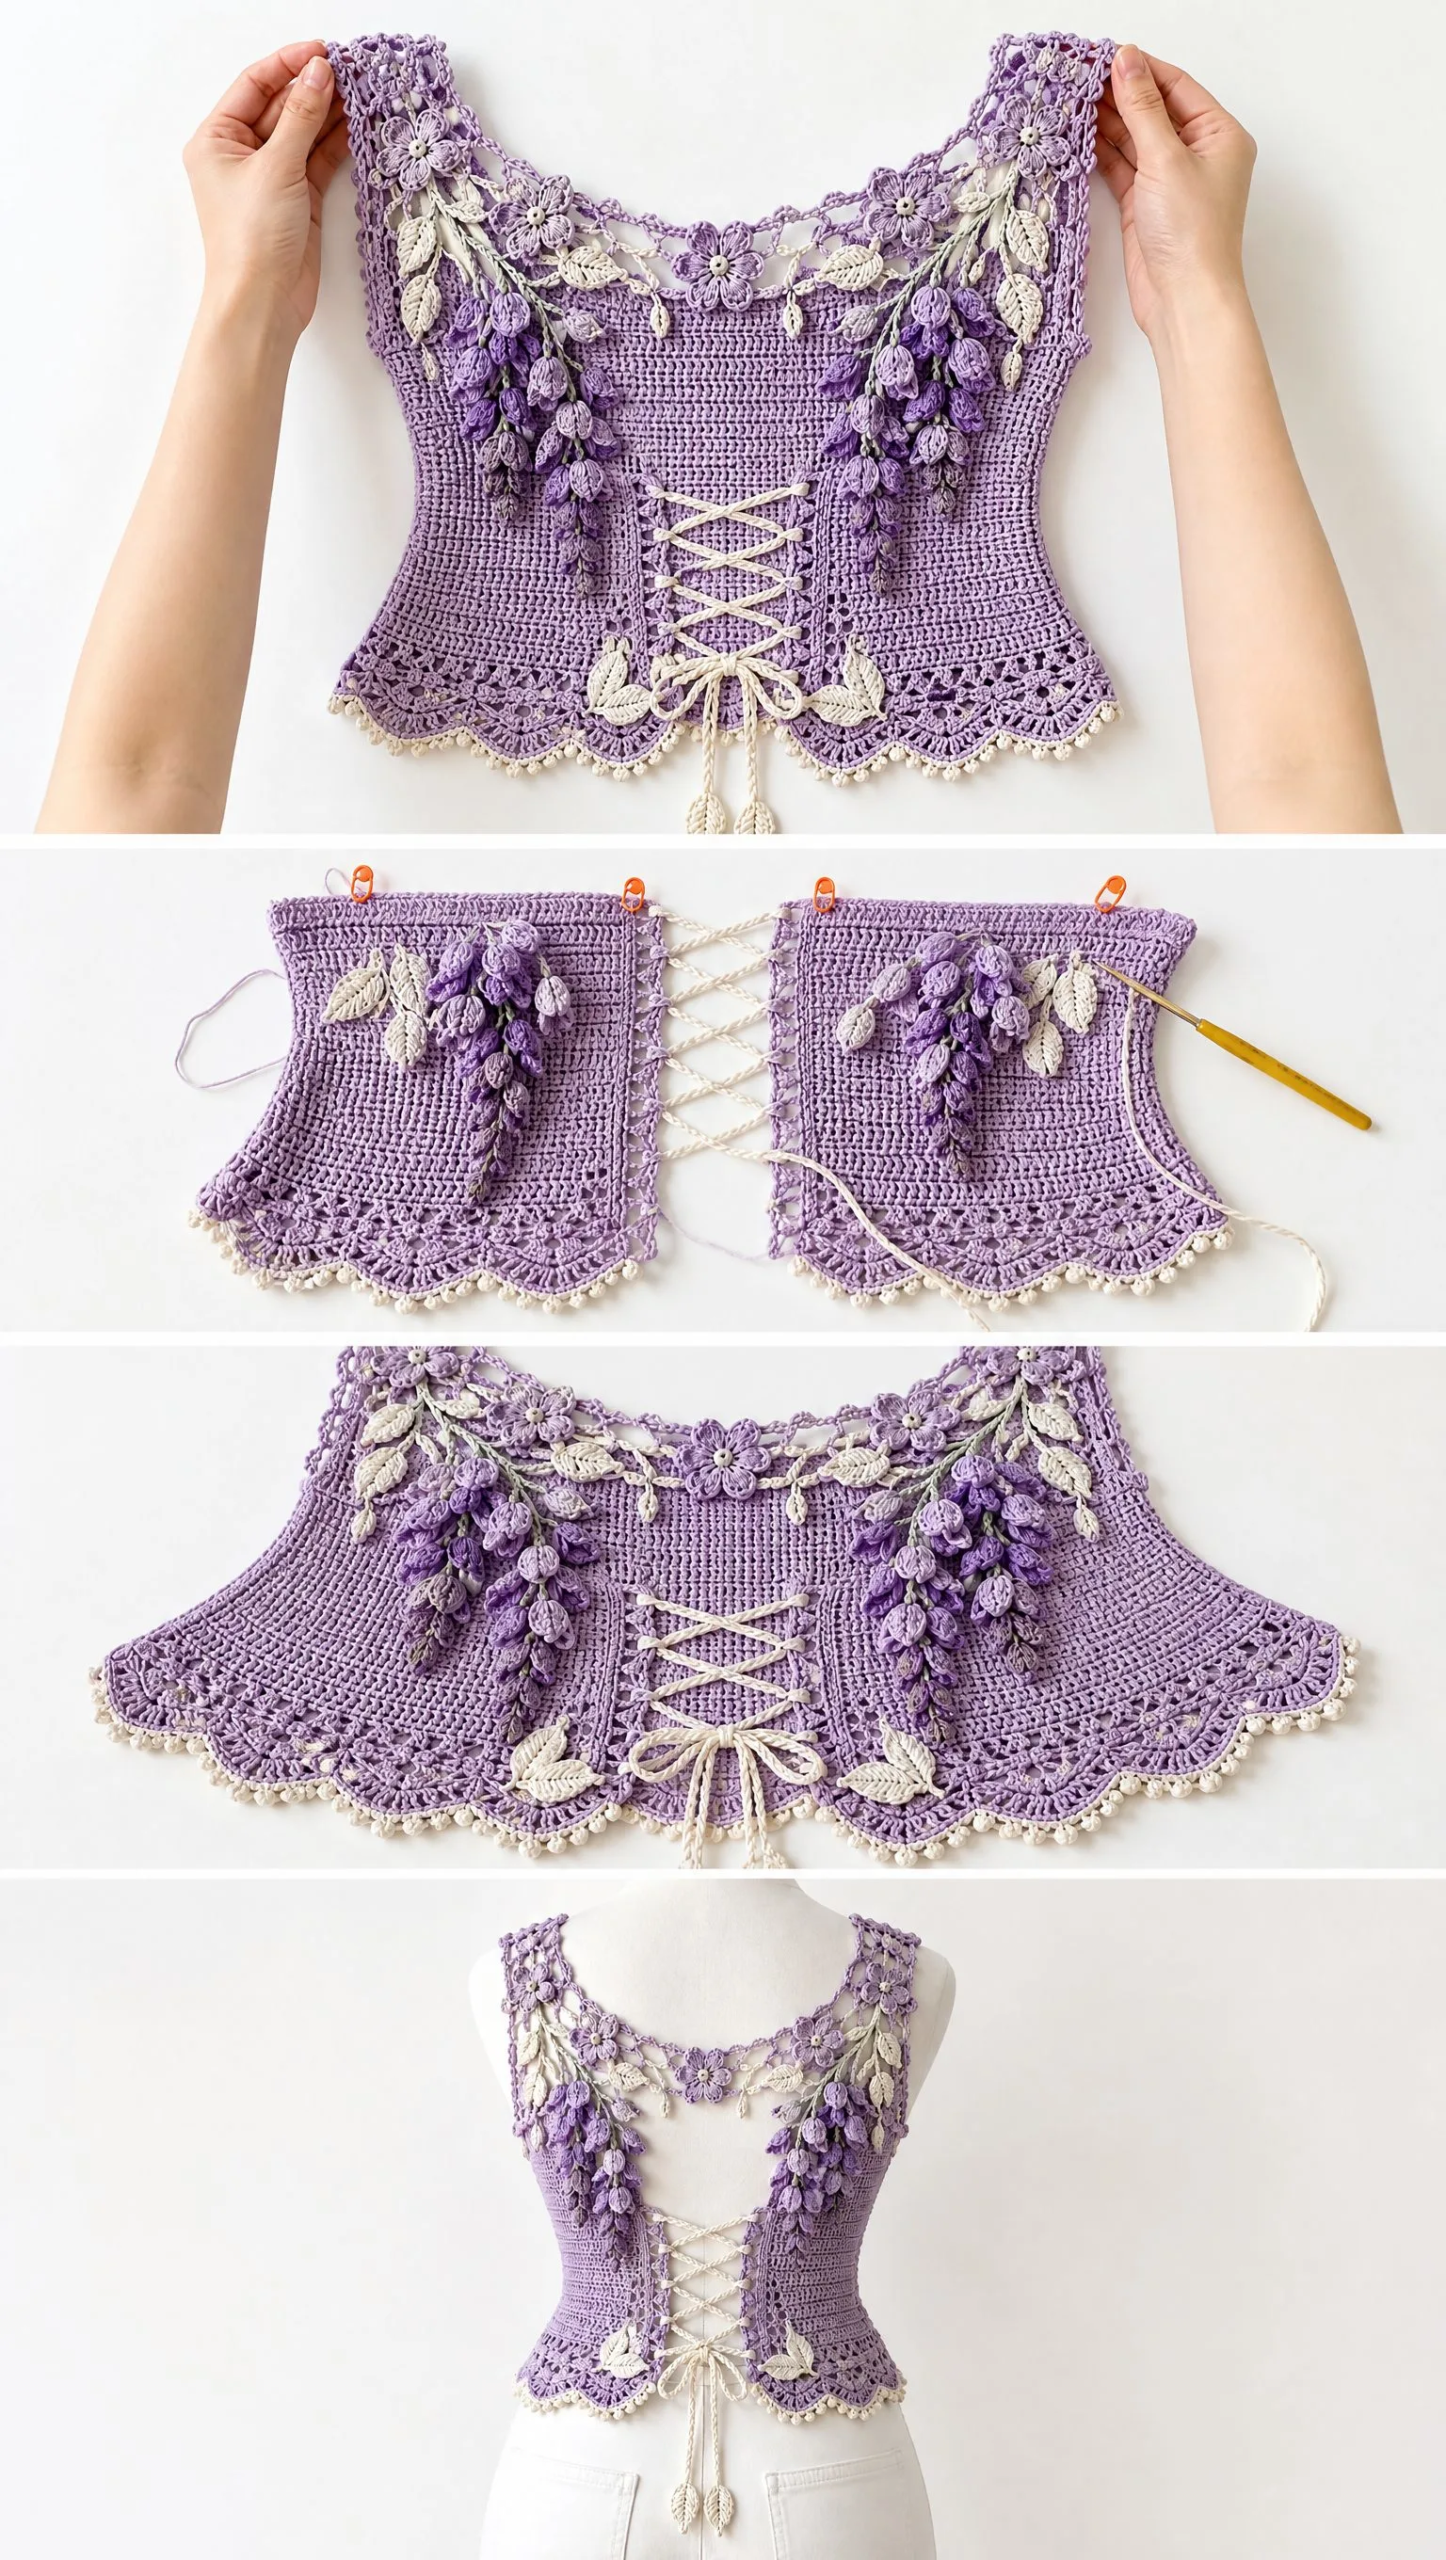
You will work the two lilac lower panels from the waist upward. Shape each panel at the inner edge so a long center-back opening remains. Join or seam the outer side edges to the front or underarm portion if making this as a wearable top. The airy yoke is then worked separately as a shallow upper-back frame and joined to the panel tops. Wisteria sprays are made as appliques and stitched to the yoke. The lacing edge, corset cord, leaf appliques, and lower scalloped border are added last.
Important note: The photograph shows only the back of this design. This pattern provides a simple matching front option so the project can actually be worn. If you are recreating the back panel only for display on a mannequin or as wall art, you can omit the front section and side seams.
Step 1: Measure Before You Begin
This step is crucial for getting a great fit:
1. Measure your full bust, natural waist, vertical distance from waist to underarm, and back-neck width.
2. Choose the closest size from the chart. If you fall between sizes, choose by waist measurement because the back lacing can compensate at the bust.
3. Plan for the two back panels together to cover roughly 48 to 52 percent of your body circumference at the waist, leaving the center opening stated in the size chart.
4. For a longer or shorter top, add or remove dc rows evenly before beginning upper shaping.
Step 2: Back Side Panels (Make 2, Mirrored)
These panels form the main body of the top. You will make two that mirror each other.
Foundation width per panel: 24 (27, 30, 33, 36, 39, 42) dc, approximately 13.5 (15, 16.5, 18.5, 20, 21.5, 23.5) cm or 5.25 (6, 6.5, 7.25, 7.75, 8.5, 9.25) inches at gauge.
Row 1: With lilac and 3.0 mm hook, chain 26 (29, 32, 35, 38, 41, 44). Dc in 3rd chain from hook and in each chain across. You should have 24 (27, 30, 33, 36, 39, 42) dc. Turn.
Rows 2 through 8: Chain 2 (does not count as a stitch), dc in each stitch across. Turn. This forms the dense waist section.
Waist shaping: On the outer side edge only, increase 1 stitch every 3rd row by working 2 dc in the first or last stitch (depending on which panel you are making). Repeat 4 (4, 5, 5, 6, 6, 7) times. Keep the center-back edge straight.
Continue even in dc until the panel measures 23 (24, 25, 26, 27, 28, 29) cm or 9 (9.5, 10, 10.25, 10.5, 11, 11.5) inches from foundation.
Upper shaping: Over the next 6 rows, decrease 1 stitch at the outer underarm edge on every other row using dc2tog. At the same time, on the center-back edge decrease 1 stitch on Rows 2 and 5 only. This creates a subtle inward slope beneath the yoke.
Continue even until total panel height is 30 (31, 32, 33, 34, 35, 36) cm or 11.75 (12.25, 12.5, 13, 13.5, 13.75, 14.25) inches. Fasten off, leaving a long tail for joining.
Mirroring the second panel: All shaping that was placed at the beginning of a row on Panel 1 is placed at the end of a row on Panel 2. Lay the two pieces side by side frequently to confirm they mirror each other correctly.
Step 3: Optional Matching Front
For a wearable top, work a front rectangle in lilac using the same body gauge.
Start with 48 (54, 60, 66, 72, 78, 84) dc and work upward to the underarm height. Shape 3 stitches away at each armhole over 4 rows, then continue even to the desired neckline.
For a modest straight neckline, stop 7 to 10 cm (2.75 to 4 inches) below the back shoulder line and finish the top edge with one row of sc plus one row of reverse sc.
Seam front to back panels at the side edges from waist to underarm. Leave the upper back open for the lace yoke.
Step 4: Airy Floral Back Yoke
The yoke is a shallow openwork crescent built from chain arches, small flowers, and two wide shoulder straps. It is intentionally more visual than mathematical. Use the counts as a framework, then adjust the final arch lengths so the yoke fits your back-neck width without puckering.
Small 5-Petal Flower Motif
1. With lilac or lavender, make a magic ring. Chain 1, work 10 sc into ring, join with slip stitch.
2. Slip stitch in next sc, chain 2, 2 dc in same sc, chain 2, slip stitch in same sc; slip stitch in next sc. Repeat from to 5 times total, using 2 sc per petal. Fasten off, leaving a 12 cm (5 inch) tail.
3. Optional: Sew one tiny ivory knot or bead at center for extra detail.
Yoke Base
1. Make 5 (5, 5, 7, 7, 7, 9) small flower motifs. Block lightly so petals open.
2. Lay the back panels on a flat surface with the intended center-back opening between them. Mark the desired strap attachment point on each upper outer corner.
3. With lilac, join yarn to the upper inside corner of the left panel. Chain 8, sc into one petal tip of Flower 1, chain 6, sc into next flower, continuing across all flowers. Use slightly longer chains at center if necessary so the motif line forms a gentle shallow curve.
4. After the final flower, chain 8 and join to the upper inside corner of the right panel. This is the lower yoke bridge.
5. Work a second arch row above it: Join at left outer upper panel corner, chain 7, sc around the next arch or flower petal tip across, spacing 7 to 9 arches evenly. Mirror the placement so the center is balanced.
6. Work a third row of smaller arches: chain 5, sc in next chain-7 arch across. Fasten off.
Wide Scalloped Shoulder Straps (Make 2)
1. At each outer yoke edge, join lilac. Chain 28 (30, 32, 34, 36, 38, 40), or enough to reach comfortably over the shoulder to the front neckline. Turn.
2. Row 1: Sc in 2nd chain from hook and across.
3. Row 2: Chain 3, skip 2 stitches, V-st in next stitch, skip 2 stitches, sc in next stitch across, adjusting the last repeat as needed.
4. Row 3: Chain 1, 5 dc in each chain-2 V-st space, sc in each intervening sc across to create scallops.
5. Fasten off. Join the free strap end securely to the front neckline. For a display-only back piece, tack it invisibly to the mannequin shoulder line.
Step 5: Wisteria Sprays (Make 2, Mirror Image)
Each spray contains one central stem and 3 to 4 descending branches with graduated flower clusters. The finished spray should be about 16 to 20 cm (6.25 to 8 inches) long. Keep visible spaces between flower clusters so the silhouette stays delicate.
Wisteria Bud and Petal Cluster
1. With lavender, chain 4 and join to form a ring.
2. Into ring work: chain 3, 2 tr, chain 3, slip stitch into ring; repeat 3 times for a 3-petal bud. For a fuller flower, repeat 4 times.
3. Tug the ring closed enough to cup the petals but do not flatten. Leave a long sewing tail.
Spray Assembly
1. Make 10 to 14 buds per spray, mixing 3-petal and 4-petal versions. Use lighter lavender toward the branch tips and slightly deeper lilac near the top for natural graduation.
2. Central stem: With lilac, chain 34. Slip stitch back along 30 chains, leaving the last few chains free as a soft tip. Fasten off.
3. Branch A: Chain 18, slip stitch back 16. Branch B: Chain 14, slip stitch back 12. Branch C: Chain 10, slip stitch back 8. Optional Branch D: Chain 8, slip stitch back 6.
4. Sew the branches to the central stem at staggered positions, angled downward. On the second spray, reverse the branch angles.
5. Sew buds along each branch, placing the smallest at the end and the fuller flowers nearer the stem. Leave 0.5 to 1 cm (1/4 to 3/8 inch) of visible chain between most buds.
6. Pin the completed spray diagonally from upper outer shoulder toward center-lower yoke. Stitch only the stems and the bases of selected buds so petals remain dimensional. Repeat on the opposite side as a mirror image.
Design check: The two wisteria sprays should droop rather than lie horizontal. Their lowest points may reach slightly below the lowest yoke arch, but they should not cover the corset opening.
Step 6: Center-Back Lacing Edges
1. With RS facing and lilac, join yarn at the lower inside corner of one back panel. Work sc evenly up the center-back edge at a rate of about 2 sc per 3 dc-row ends. Turn.
2. Next row: Chain 1, sc in first 2 stitches, chain 3, skip 2 stitches, sc in next 3 stitches; repeat to the top, adjusting spacing so 6 to 10 eyelets are distributed evenly. Fasten off.
3. Repeat on the other panel, making sure each eyelet is directly opposite its mate.
4. Optional reinforcement: Work one more row of sc along the outer side of each eyelet band if your cotton is especially soft.
Ivory Corset Cord
1. With ivory and 2.5 to 3.0 mm hook, chain approximately 150 to 190 cm (60 to 75 inches), depending on size and desired tails.
2. Slip stitch in the back bump of every chain for a flat, firm cord. Fasten off and weave both ends securely.
3. Beginning at the top, lace through the eyelets in an X pattern. Keep the crosses flat and untwisted.
4. At the hem, tie a small centered bow. Trim cord length only after trying on the garment and confirming that the back can open wide enough to dress comfortably.
Step 7: Lower Fan Scallop Border
1. With lavender, join at one lower side seam. Work 1 row sc evenly around the entire lower edge of the front and back body, making sure the fabric lies flat.
2. Next round: Skip 2 stitches, 5 dc in next stitch, skip 2 stitches, sc in next stitch; repeat around, adjusting spacing by 1 stitch if necessary near the side seams. Join.
3. Change to ivory. Sc in each of the first 2 dc of fan, picot, sc in center dc, picot, sc in each of next 2 dc; slip stitch in intervening sc. Repeat around.
4. Fasten off and weave ends to the WS.
Step 8: Ivory Leaf Appliques (Make 2)
These elegant leaves frame the bottom corners of the lacing.
1. With ivory, chain 9. Working down one side of the foundation chain: sc in 2nd chain, hdc, dc, tr, tr, dc, hdc, 3 sc in final chain.
2. Rotate to work up the opposite side of the chain: hdc, dc, tr, tr, dc, hdc, sc. Join to first sc.
3. For a center vein, slip stitch loosely along the starting chain from base to tip. Fasten off, leaving a 20 cm (8 inch) sewing tail.
4. Pin one leaf at each lower inside corner of the back panels, angled slightly outward. Sew around the center vein and base only so the edges remain softly raised.
Step 9: Joining and Finishing
1. If using the optional front, block all body pieces to measurements before seaming. With RS together, mattress stitch or whipstitch the side seams from waist to underarm.
2. Attach shoulder straps to the front neckline, checking strap length on the body before sewing permanently. The straps should lie flat and broad, not dig into the shoulder.
3. Use remaining yarn tails to reinforce the junctions where the yoke meets the dense lilac panels. These points carry tension when lacing is tightened.
4. Weave every end through at least 4 to 5 cm (1.5 to 2 inches) of matching-color stitches, changing direction once.
5. Steam lightly or wet block. Pin the body to measurements, open the flower petals by hand, and shape the wisteria sprays into smooth drooping arcs. Allow to dry completely.
Fit and Adjustment Guide
Here are solutions for common fitting issues:
Back opening too wide: Add 1 to 2 dc columns to the center edge of each panel, or use a wider eyelet band.
Back opening too narrow: Remove 1 to 2 dc columns per panel or lace more loosely.
Waist rides up: Add 2 to 4 straight dc rows before the upper shaping, then re-block lengthwise.
Yoke gapes: Shorten chain arches by 1 to 2 chains or add one extra anchoring sc at each side.
Yoke feels tight: Lengthen the two widest arches and/or add one extra small flower at center.
Straps stretch: Work strap foundation with a smaller hook or surface-slip-stitch along the strap edge.
Wisteria looks bulky: Use fewer buds, a smaller hook, or sew only 2 to 3 petals per branch position.
Care Instructions
Hand wash cool with mild detergent. Do not wring. Roll in a towel to remove moisture, reshape the yoke and floral sprays, and dry flat. Cotton can lengthen when wet, so support the garment fully while washing. Store folded rather than hanging to protect the lace and shoulder straps.
Final Thoughts on the Lilac Wisteria Lace-Up Top Crochet Pattern
The visual character of this top comes from contrast. Dense lilac body panels against open chain spaces through the upper back. Three-dimensional floral clusters cascading down. A clean ivory lace-up line drawing the eye to that beautiful open back. Keep the appliques light, the lacing flat, and the body fabric firm enough to support the flowers. Small differences in flower placement make each finished top completely unique.
This is definitely a project that requires patience and attention to detail, but the result is absolutely worth every single stitch. When you slip this on and catch a glimpse of that wisteria-draped back in the mirror, you will understand why that little notebook sketch haunted me for two years until I finally made it real.
Thank you so much for choosing this pattern! I would absolutely love to see your finished Lilac Wisteria Lace-Up Top. If you save this pattern to your Pinterest boards, you will always have it ready when you are ready to start. And please drop a comment below if you make this top. Seeing your creations genuinely makes my day!
Want a Quick & Easy Printable Version?
Get a clean, beautifully formatted PDF of this pattern — easy to follow step by step, ready to print or save on any device. No scrolling, no distractions, just the pattern.
Get the Printable PDF →You Might Also Like
- Pink Gingham Crochet Summer Dress Free Crochet Pattern
- Sage Green Textured Clutch Bag Free Crochet Pattern
- Daisy Meadow Crochet Tote Free Pattern
- Unicorn Rainbow Hooded Baby Poncho Free Crochet Pattern