
I don’t know about you, but I have been searching for the perfect summer crochet dress for years. Something feminine without being fussy. Something that looks like it belongs on a picnic blanket in the south of France but actually works for real life.
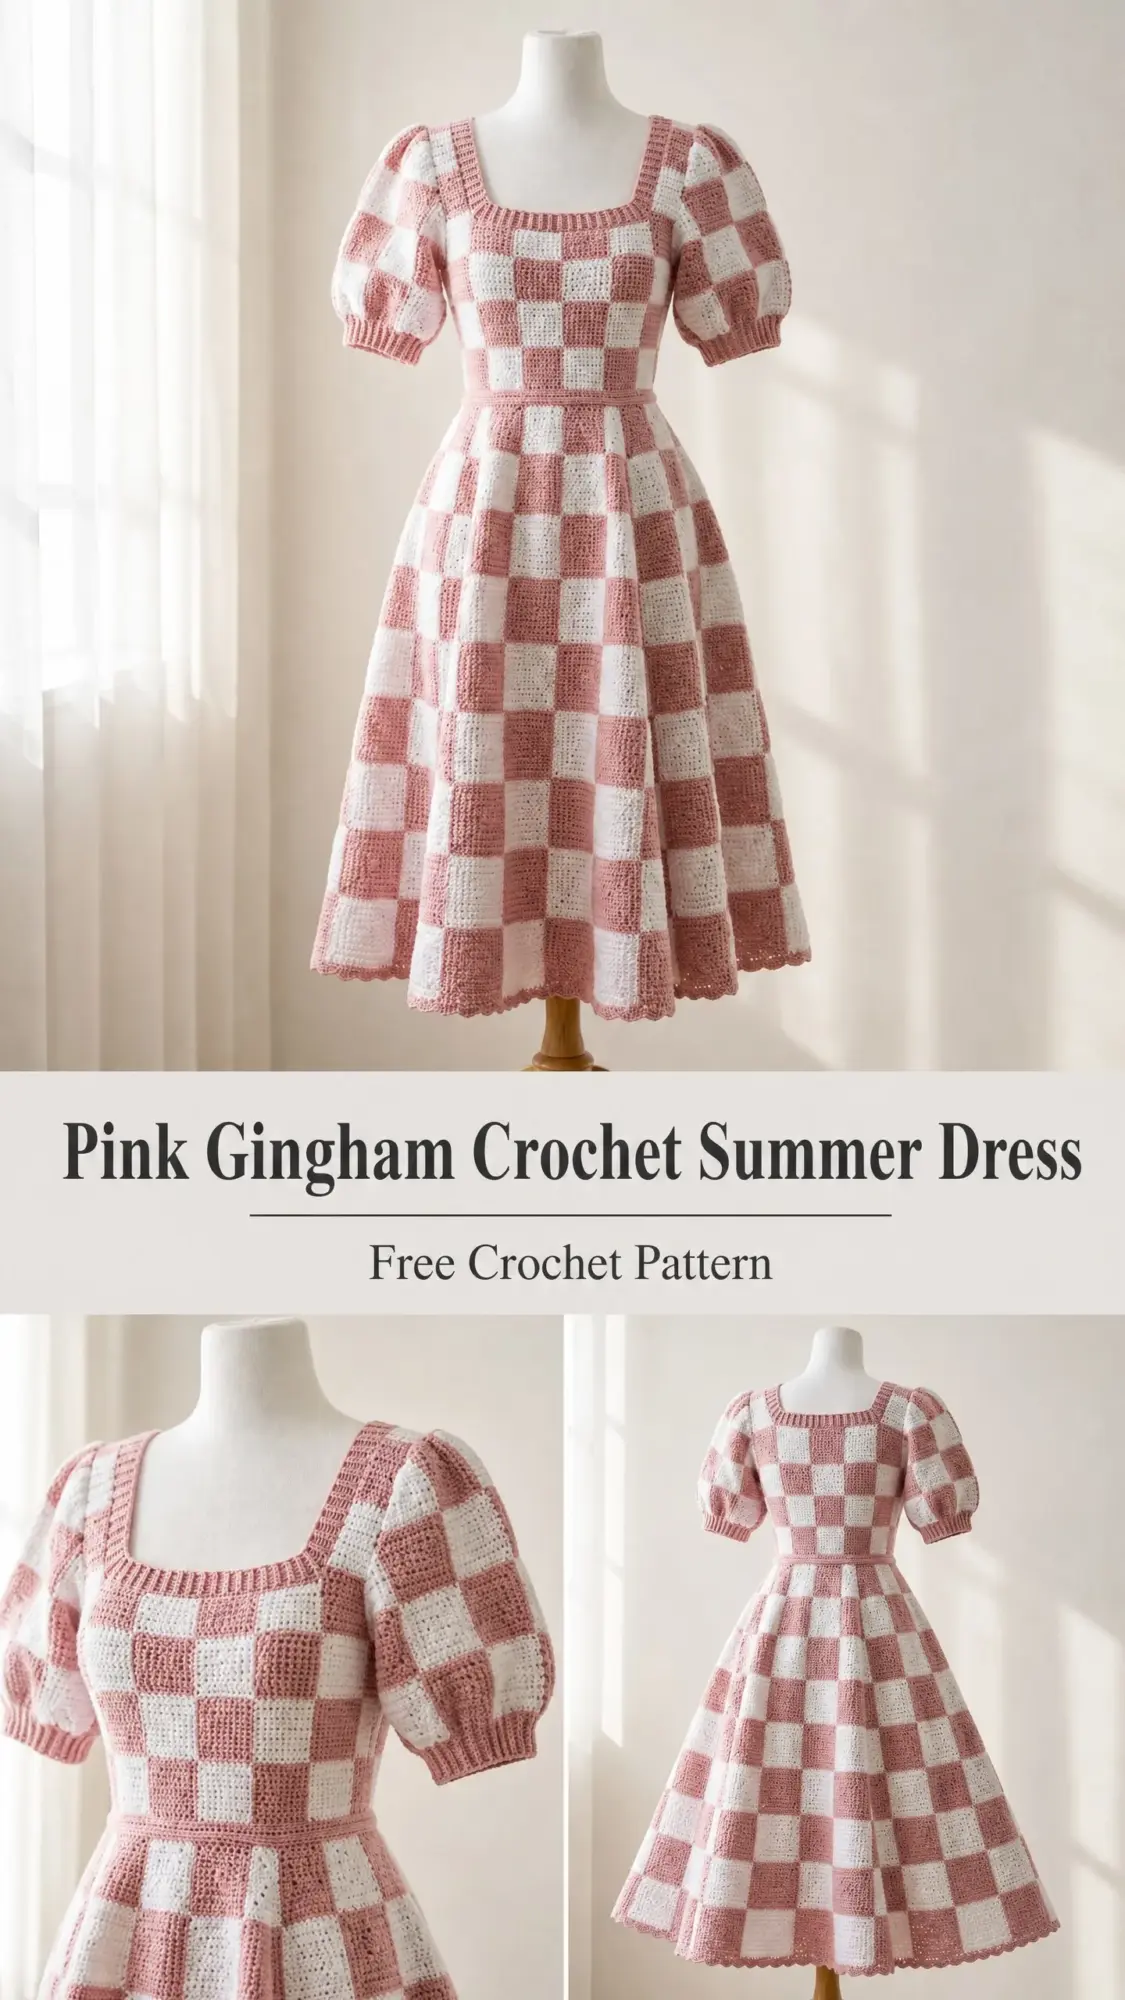
This pink gingham crochet dress is exactly that. All the vintage charm with none of the guesswork. The checkerboard pattern looks intricate, but it’s really just solid squares joined together. If you can crochet a granny square and follow a color chart, you can absolutely make this dress.
The puff sleeves give it that romantic silhouette everyone loves right now, and the A-line skirt is forgiving in all the right places. Let me walk you through everything you need to bring this beauty to life.
About This Pink Gingham Crochet Dress Pattern
This midi-length dress features a fitted bodice with a square neckline, dreamy puff sleeves with ribbed cuffs, a defined waist seam, and a full A-line skirt finished with a delicate scallop hem. The entire garment is constructed from solid crochet squares arranged in a classic checkerboard pattern using dusty rose and off-white yarn.
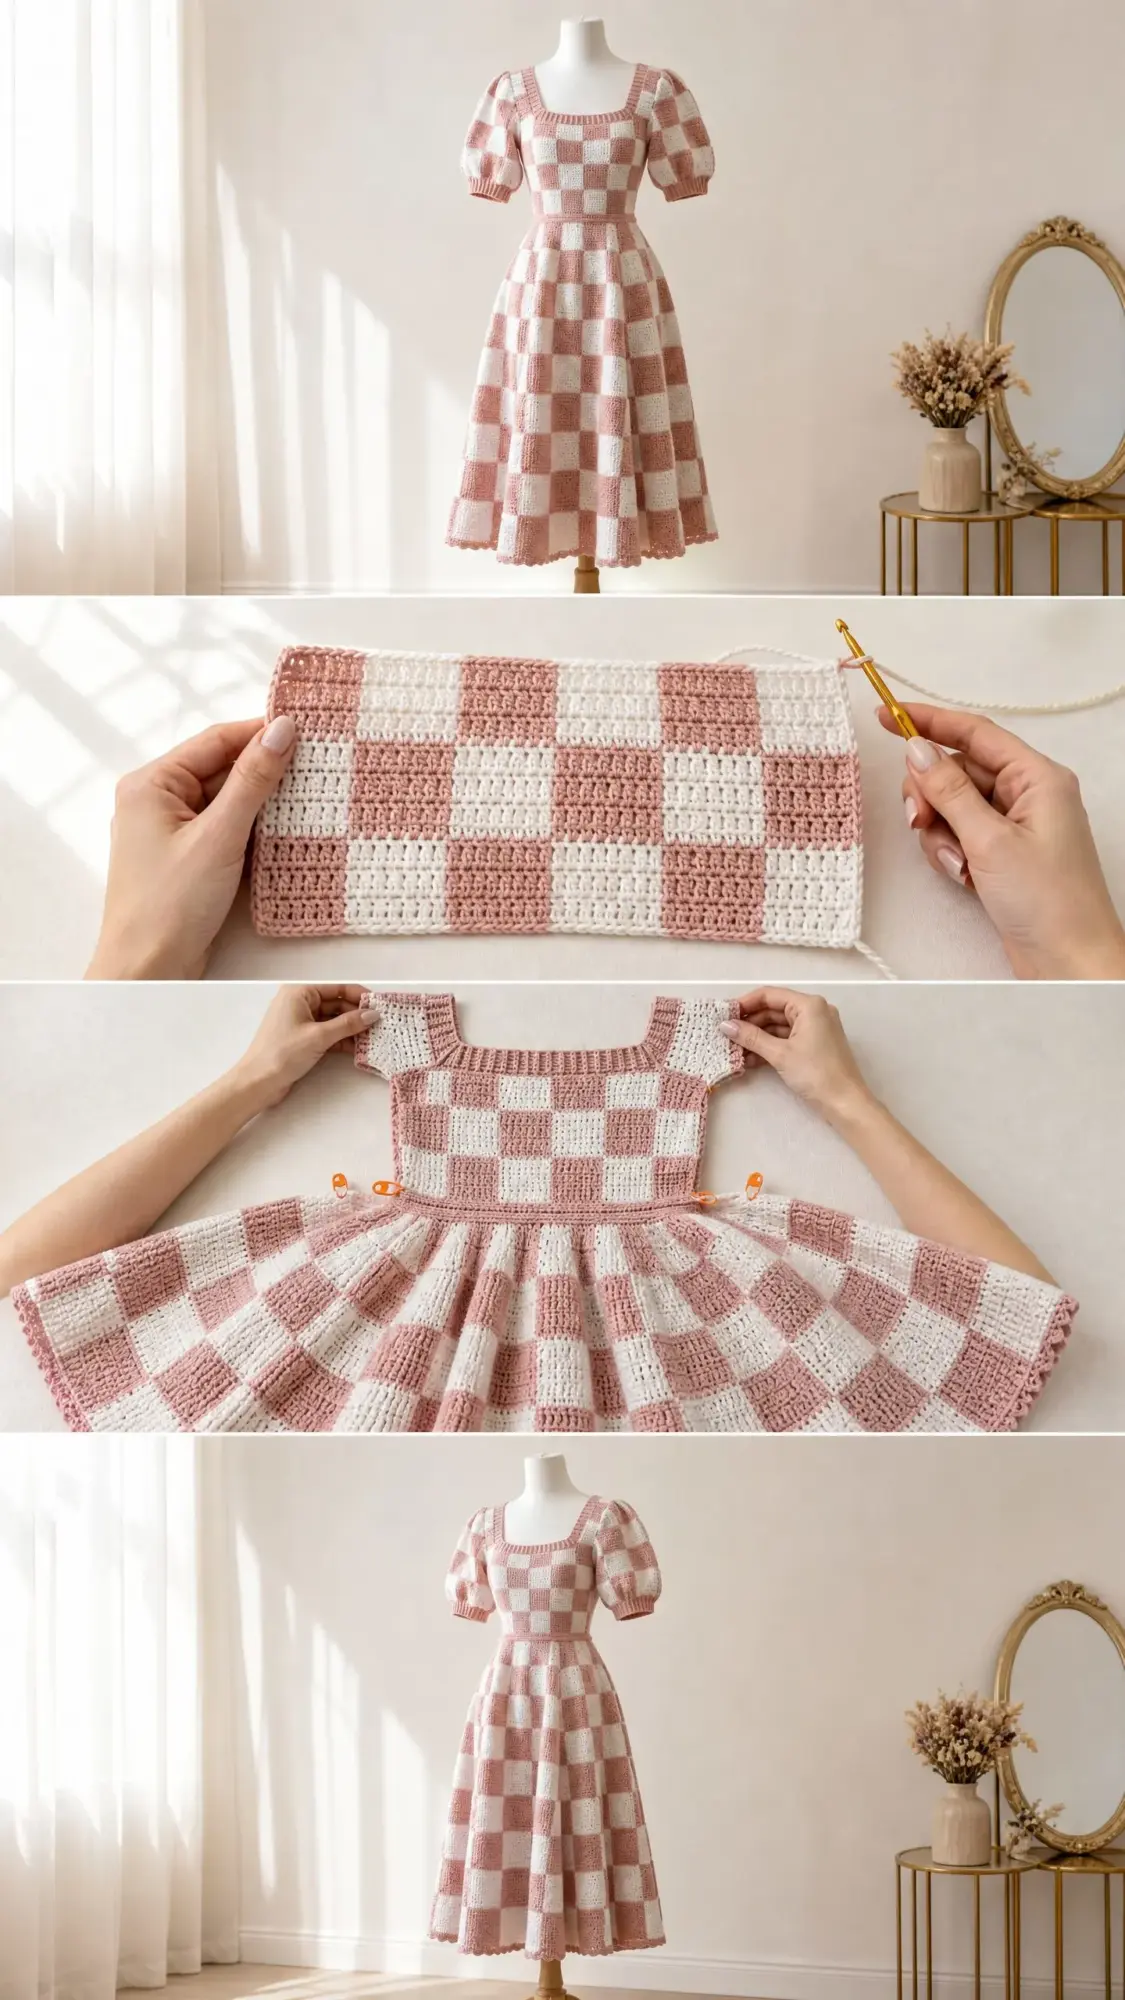
The construction method is called join as you go (JAYG), which means you connect your squares as you complete them rather than sewing hundreds of pieces together at the end. Trust me, your future self will thank you for learning this technique.
I would rate this pattern as advanced intermediate. Each individual skill is accessible on its own. You need comfort with colorwork across squares, JAYG techniques, basic garment shaping, and working in the round. Managing all of these together in a fitted garment is what bumps up the difficulty. But if you take it section by section, you will be just fine.
Time estimate: Approximately 80 to 120 hours for a size Medium, depending on your working speed and experience. This is a project to savor, not rush.
Finished Measurements
This pattern is written for size Small (S), with changes for Medium (M), Large (L), and Extra Large (XL) shown in parentheses throughout.
Materials Needed
Yarn
Color A (Dusty Rose/Mauve Pink): approximately 800 (900, 1000, 1100) yards / 731 (823, 914, 1006) meters of worsted weight yarn
Color B (Off-White/Cream): approximately 800 (900, 1000, 1100) yards / 731 (823, 914, 1006) meters of worsted weight yarn
Recommended yarns:
Substitution note: Choose a smooth worsted weight yarn (Craft Yarn Council weight 4) with low halo and good stitch definition. Avoid fuzzy or bouclé fibers, which will obscure the checkerboard pattern. Cotton or cotton-blend yarns work beautifully for a cooler summer weight. If substituting cotton, reduce hook size by half a millimeter.
Hooks
Notions
Gauge
With J-10 / 6.0 mm hook and worsted weight yarn:
Each completed 4-round square motif measures 3.5 x 3.5 inches / 9 x 9 cm blocked.
16 sc x 18 rows = 4 x 4 inches / 10 x 10 cm in single crochet fabric.
Gauge is critical for a fitted garment. Please make at least two complete square motifs and measure after blocking before proceeding. Adjust hook size up or down as needed to match motif dimensions.
Abbreviations
Before we dive into the pattern, let me define every abbreviation you will encounter:
Special Stitches and Techniques
Solid Square Motif
Each square is worked in a single color and measures 3.5 inches square when blocked. This is the building block of your entire dress.
Round 1: Using color of choice, make a magic ring. Ch 3 (counts as first dc), work 2 dc in ring, ch 2, (3 dc in ring, ch 2) 3 times, join with sl st to top of beg ch-3. (4 groups of 3 dc, 4 ch-2 corner spaces)
Round 2: Sl st into next 2 dc and into ch-2 corner sp. Ch 3 (counts as dc), 2 dc in same sp, ch 2, 3 dc in same sp (corner made), ch 1, (3 dc, ch 2, 3 dc) in next ch-2 sp (corner), ch 1. Rep from ( to ) around all 4 corners. Join with sl st to top of beg ch-3. (4 corner groups of 6 dc, 4 ch-1 side spaces)
Round 3: Sl st to corner ch-2 sp. Ch 3, 2 dc in same sp, ch 2, 3 dc in same sp (corner), ch 1, 3 dc in next ch-1 side sp, ch 1, (corner), ch 1, 3 dc in next ch-1 side sp, ch 1. Rep around all 4 corners. Join with sl st to top of ch-3. (4 corner groups, 2 side groups of 3 dc per side)
Round 4 (Closing Round with sc): Join with sc in any corner ch-2 sp, 2 more sc in same sp (corner), sc across all dc and ch-1 spaces along each side working 1 sc per dc and 1 sc per ch-1 sp, work 3 sc in each corner ch-2 sp. Join with sl st to beg sc. Fasten off leaving a tail for seaming or JAYG.
Final count: Each side of the finished square has 13 sc (including 1 corner sc at each end shared with corners). Corner stitch count: 3 sc at each corner. Total sc around square: 52 sts.
Join As You Go (JAYG) Method
When attaching a new square to an existing square along one or more edges, work Round 4 normally on the free sides. On any side that joins to an adjacent completed square, replace each sc with the following joining technique:
Insert hook in corresponding sc on existing square, yo, pull up lp, yo, pull through 2 lps. This completes a sc that simultaneously joins both squares.
For corners where joined edges meet: sc in corner sp of new square AND sl st into the corner sc of existing square simultaneously.
Scallop Edge Stitch
Worked along the hem after the skirt is assembled.
Skip 2 sts, 5 dc in next st, skip 2 sts, sl st in next st. Rep from beginning around.
Each scallop consumes 6 sts. Your total hem stitches must be divisible by 6 before working this edging.
Ribbed Cuff and Neckline Band
Worked in BLO sc for the ribbed texture.
Foundation: Ch 8.
Row 1: Sc in 2nd ch from hook and each ch across. (7 sc)
Row 2 and all following rows: Ch 1, turn, sc BLO across. (7 sc)
Work rows until the band fits the cuff or neckline circumference when slightly stretched. Seam short ends together.
Total Squares Needed
Before you begin, here is your complete square count by section:
Bodice Front
Bodice Back
Same counts as Bodice Front.
Skirt Front and Skirt Back (each panel)
Sleeve Squares (each sleeve)
2 squares wide x 3 squares tall = 6 squares per sleeve
2 sleeves = 12 squares total
Grand Total (size S)
Approximately 128 squares for size S. Larger sizes require approximately 152 to 184 squares depending on size.
Pattern Instructions
Section 1: Square Motifs
Make each square following the Solid Square Motif instructions above. Alternate colors in a strict checkerboard arrangement. Wherever you have a Color A square, the square immediately to its right, left, above, and below is Color B.
Always start a new square motif with a magic ring rather than a starting chain for the cleanest center.
I highly recommend blocking all individual squares before assembling. This gives you the most accurate finished dimensions and makes joining much easier.
Section 2: Bodice Front Assembly
Lay out squares in a grid, 4 wide x 4 tall (size S), alternating Color A and Color B in checkerboard pattern. Begin with Color A at top-left corner position.
Row 1 of grid (top row, neckline row): Join 4 squares (5 for M, 6 for L and XL) side by side using JAYG along their shared edges as you complete Round 4 of each square.
For JAYG along a side edge: when working the second and subsequent squares in a row, work Round 4 normally on three free sides. On the left edge (the side that joins to the previous square), replace each sc with the joining sc as described in Special Stitches.
At each corner where 4 squares meet: work the corner sc into the shared corner space, sl st-joining to the corresponding corner of all neighboring completed squares.
Complete all 4 rows of the bodice front grid.
Assembled panel measurements:
The square neckline is a natural result of the square grid construction. The top edge of the bodice front panel IS the neckline. No additional shaping is needed.
Checkpoint: After completing and assembling the bodice front panel, it should measure approximately 14 inches / 35.5 cm tall (size S) and your panel edges should be clean and even. Count your squares: you should have 16 (S), 20 (M), 24 (L), 24 (XL).
Section 3: Bodice Back Assembly
Work identically to Bodice Front, assembling the same number and arrangement of squares.
Section 4: Bodice Seaming
With RS facing, align Bodice Front and Bodice Back panels along their side edges. Using a yarn needle and a length of Color A or B (matching edge color), seam the side edges together using a flat mattress stitch or sl st seam.
Armhole placement: Leave the top 3 squares (10.5 inches / 27 cm) of each side edge unseamed to create the armhole opening. Seam only the bottom 1 square (3.5 inches / 9 cm) of each side edge below the armhole.
After seaming both side seams, you have a tube with a neckline opening at top, two armhole openings on each side, and a waist opening at the bottom.
Section 5: Neckline Band
Using smaller hook (I-9 / 5.5 mm) and Color A, work the ribbed neckline band.
Neckline opening circumference:
Ch 9.
Row 1: Sc in 2nd ch from hook and in each ch across. (8 sc)
Row 2 and all subsequent rows: Ch 1, turn, sc BLO across. (8 sc)
Continue until strip reaches neckline circumference (lightly stretched).
Seam the short ends of the band together to form a loop. With RS facing, sl st band to neckline edge of assembled bodice, placing seam of band at center back neckline.
Section 6: Skirt Assembly
Work Skirt Front and Skirt Back panels separately, then seam.
Skirt Front (size S, other sizes in parentheses):
For the expansion rows (rows 3, 5), the added squares at each edge are positioned at the outer edge. Work a full square at the new position and JAYG it to the outer edge of the row above.
Complete Skirt Back panel identically.
Seam Skirt Front and Skirt Back together at side edges with RS facing using mattress stitch. Leave top edge (waist seam) and bottom edge (hem) open.
Attaching Skirt to Bodice
With RS facing, align the waist edge of the assembled skirt tube with the bottom edge of the assembled bodice tube. Match side seams.
Working with Color A and the larger hook, sc the waist edge of the skirt to the waist edge of the bodice. Distribute any extra skirt width evenly around the seam by working 2 skirt edge sts into the same bodice edge st where needed.
For size S, the waist edges match exactly (104 sc total waist circumference). For sizes M through XL, slight gathering at the waist seam creates a fitted waist.
Checkpoint: After joining the skirt to the bodice, the full dress tube should hang smoothly with a defined waist transition.
Section 7: Hem Scallop Edging
With larger hook and Color A, join yarn at a side seam at the hem edge of the dress.
Preparation Round: Sc evenly around the entire hem edge, working 1 sc per sc along each square base edge, and 3 sc at each corner where squares meet at the hem.
Stitch count adjustments:
Scallop Round: (Skip 2 sts, 5 dc in next st, skip 2 sts, sl st in next st). Rep around. Join with sl st to beg sl st. Fasten off.
Section 8: Sleeves
Work 2 sleeves identically.
Armhole circumference: Each armhole opening is formed by 3 unsewed square edges = 78 sc around the armhole opening for all sizes.
Work the sleeve squares independently as a 2-wide x 3-tall panel (6 squares per sleeve). Seam the left and right edges together to form a tube.
Gathering Round at sleeve cap: Join yarn at top edge of sleeve tube. (Ch 1, sl st in next st) across all top edge sts, pulling the edge in as you go to gather. This creates the puff effect at the sleeve cap.
Attach sleeve to armhole: With RS facing, sl st the gathered sleeve cap evenly around the armhole opening, distributing the gathers evenly.
Ribbed Cuff:
Ch 9.
Row 1: Sc in 2nd ch from hook and in each ch. (8 sc)
Row 2 and on: Ch 1, turn, sc BLO across. (8 sc)
Continue for approximately 33 rows.
Seam short ends. Sl st cuff to sleeve bottom edge. Repeat for second sleeve.
Checkpoint: Both sleeves should be attached with puffed caps and ribbed cuffs. The neckline band should be attached. The hem scallop should be complete.
Section 9: Finishing
Weave in all yarn ends securely with a yarn needle, using a figure-eight path through the crochet fabric on the WS for at least 2 inches in two different directions. Trim ends after securing.
Block the completed dress by soaking in cool water with a small amount of wool wash. Gently squeeze out water (do not wring). Lay flat on blocking mats. Pin hem scallop points out gently to define scallop shape. Pin neckline corners square. Allow to dry completely flat.
Size Customization Tips
To size up beyond XL: Add one additional square to the bodice front and back width for approximately 3.5 inches of additional bust circumference per pair of squares added.
To size down below S: Remove one column of squares from the bodice width and skirt width. For a very fitted small size, consider substituting DK weight yarn with a G-6 / 4.0 mm hook.
To lengthen the skirt: Add additional rows of squares at the hem before working the scallop edge. Each additional row adds approximately 3.5 inches.
To shorten to knee length: Omit the bottom 2 rows of skirt squares.
To adjust sleeve volume: For a less puffy sleeve, reduce to 2 squares wide x 2 squares tall. For more drama, add a third column.
Care Instructions
Machine wash cold on gentle cycle if using 100% acrylic yarn. Lay flat to dry. Do not place in dryer as heat may distort the squares and shrink the garment. If using cotton yarn, machine wash warm on gentle and lay flat to dry. Do not iron directly on the fabric. Store folded flat rather than on a hanger to prevent stretching.
Final Thoughts on This Crochet Summer Dress Pattern
This pink gingham crochet dress is one of those projects that feels like a labor of love. Every square you complete brings you closer to a garment that looks like it stepped out of a vintage boutique. The checkerboard pattern is timeless, the silhouette is flattering, and the puff sleeves add just the right amount of whimsy.
Take your time with this one. Put on your favorite podcast, brew some tea, and enjoy the process. When you slip this dress over your head for the first time, you will understand why every single square was worth it.
Thank you so much for choosing this pattern for your next project. I genuinely hope it brings you as much joy to make as it did for me to design.
If you found this pink gingham crochet summer dress pattern helpful, I would love it if you saved it to your Pinterest boards so you can find it again later. And please drop a comment below if you make one. I always love seeing your finished projects and hearing how the pattern worked up for you!
You Might Also Like
- Mint Green Tiered Shell Dress Free Crochet Pattern
- Ivory Pineapple Lace Girl Dress Free Crochet Pattern
- Sage Green Froggy Toilet Paper Cozy Free Crochet Pattern
- Pastel Rainbow Kitty Tote Bag Free Crochet Pattern