
Last spring, I spent an entire afternoon at a garden party feeling absolutely underdressed. Everyone else had these gorgeous wraps and shawls draped over their shoulders, and I was standing there in a plain cardigan like I had missed some kind of memo. On the drive home, I promised myself I would make something showstopping. Something that would make people stop mid-conversation and ask where I got it.
Get the Ad-Free PDF Pattern
You can find the free pattern below, or you can purchase the ad-free printable PDF from my shop.
Get the Printable PDF →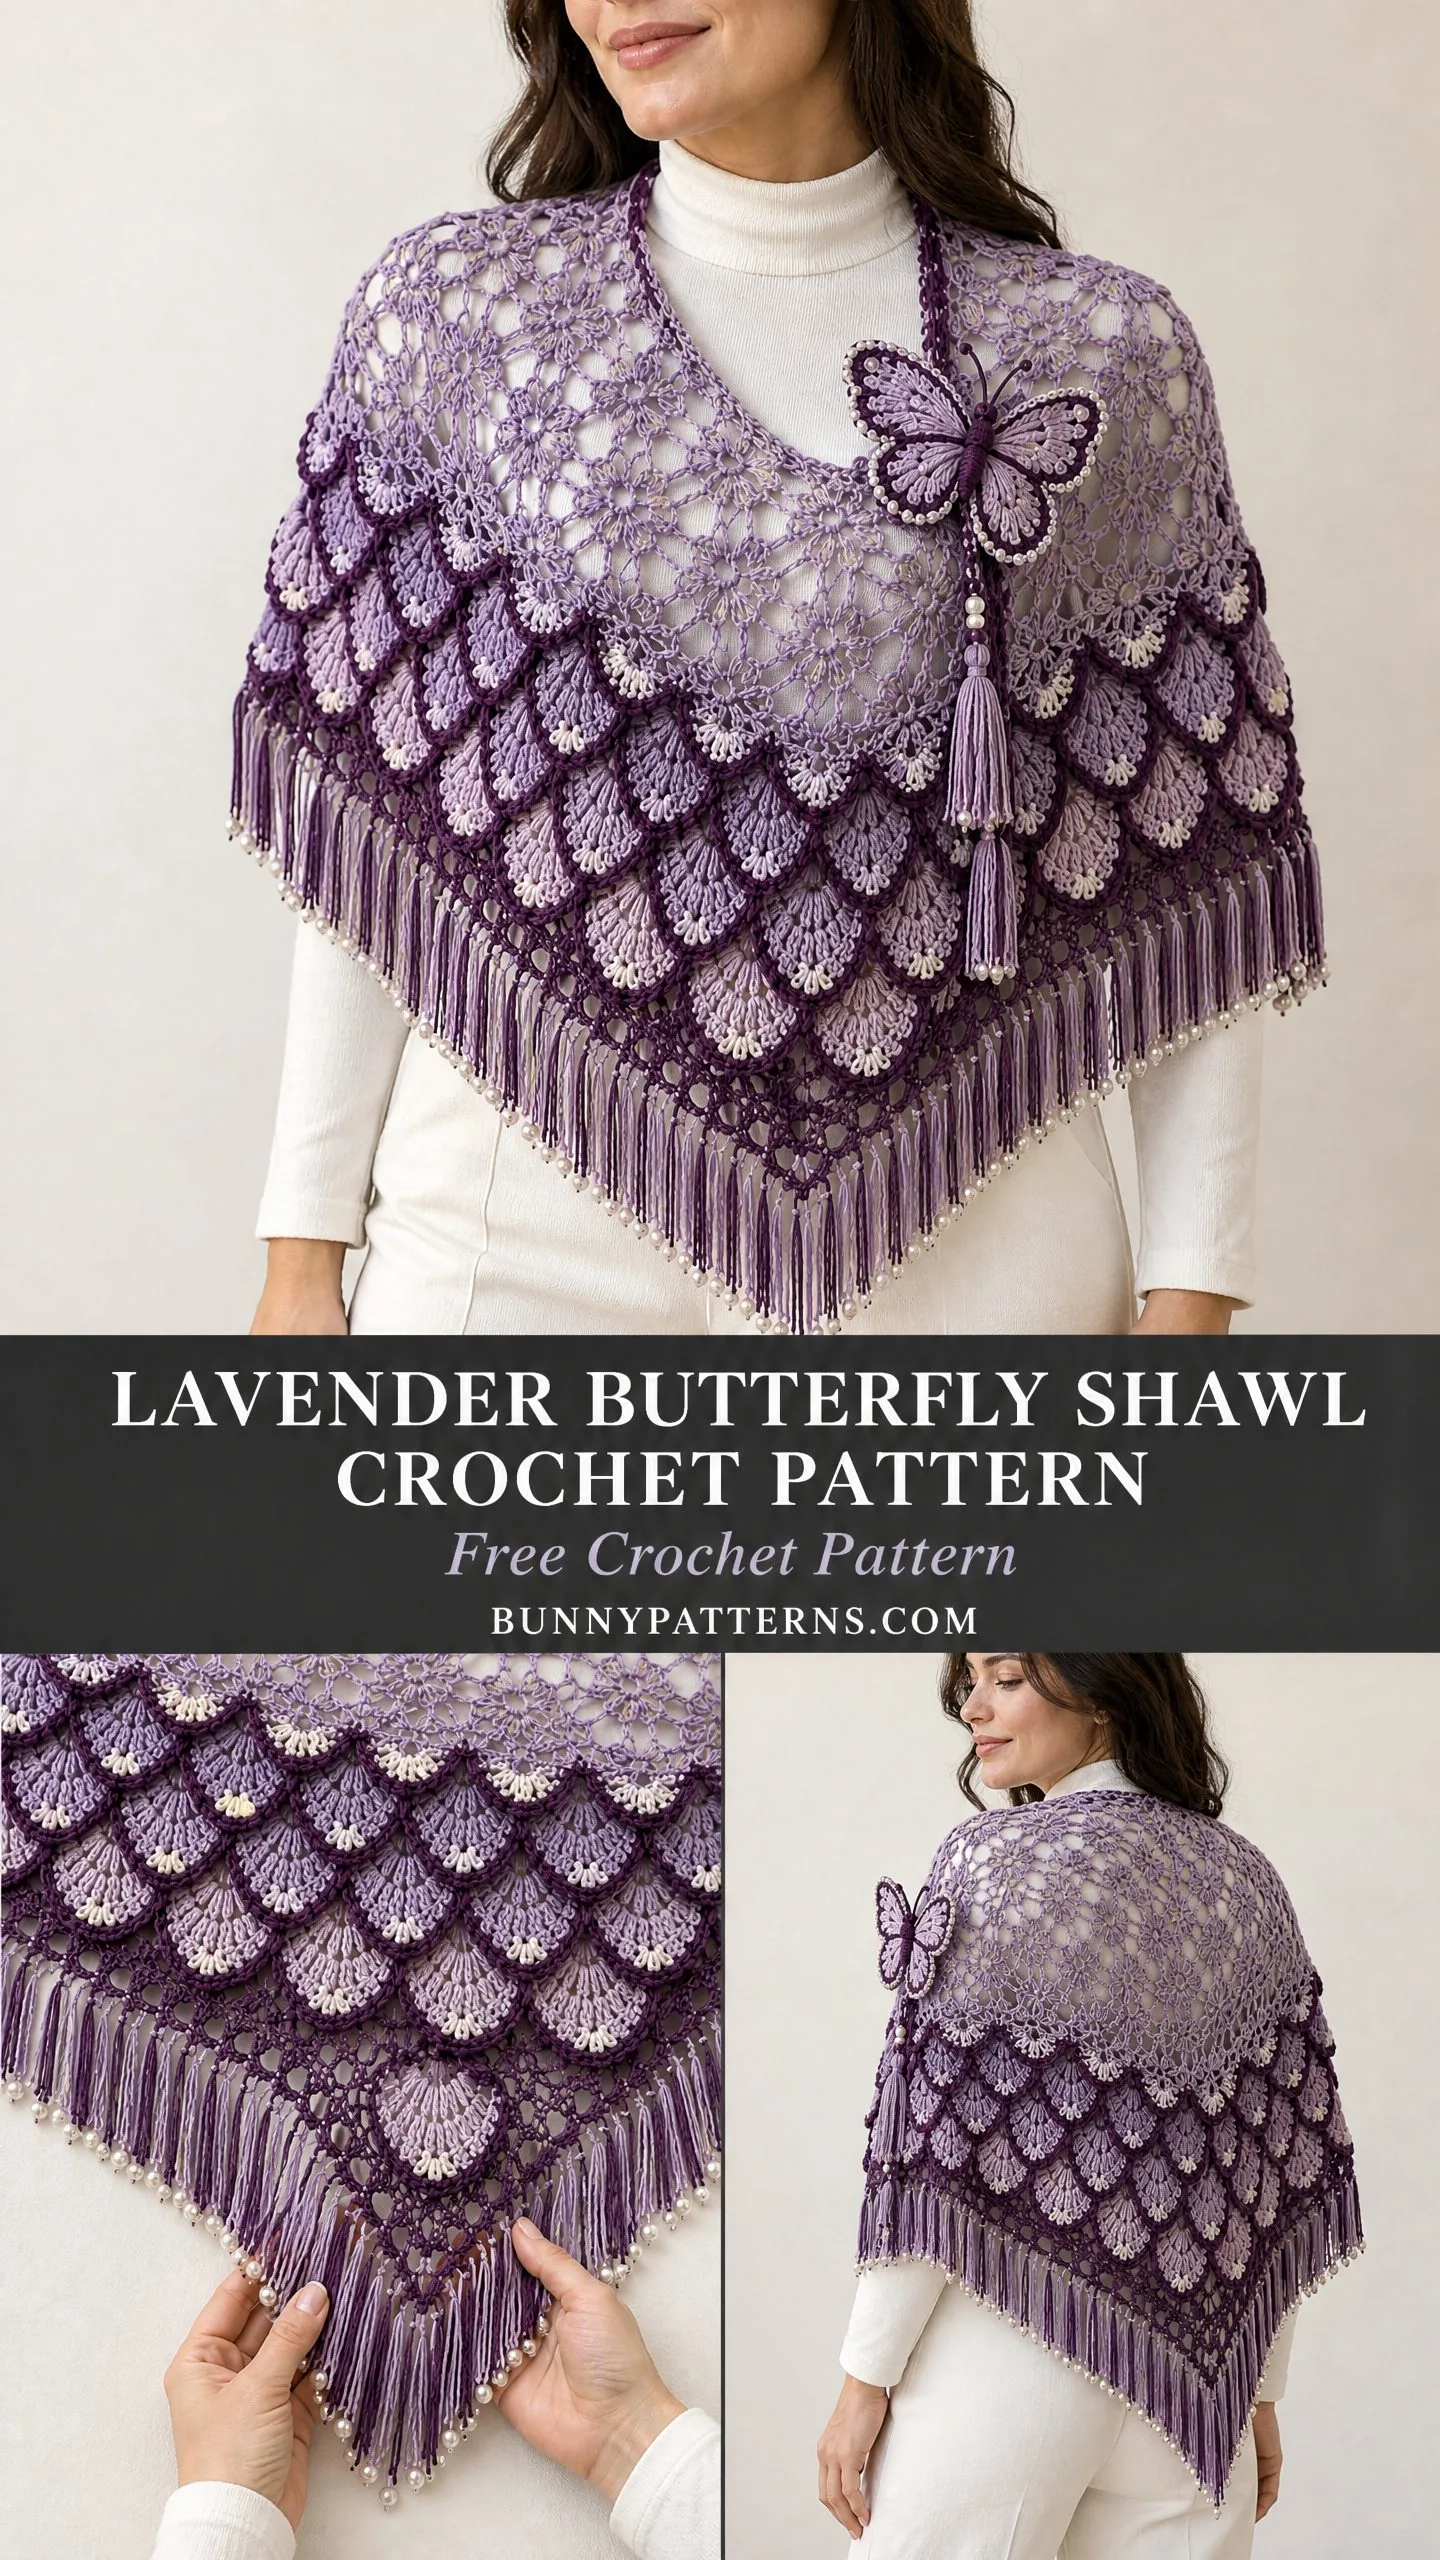
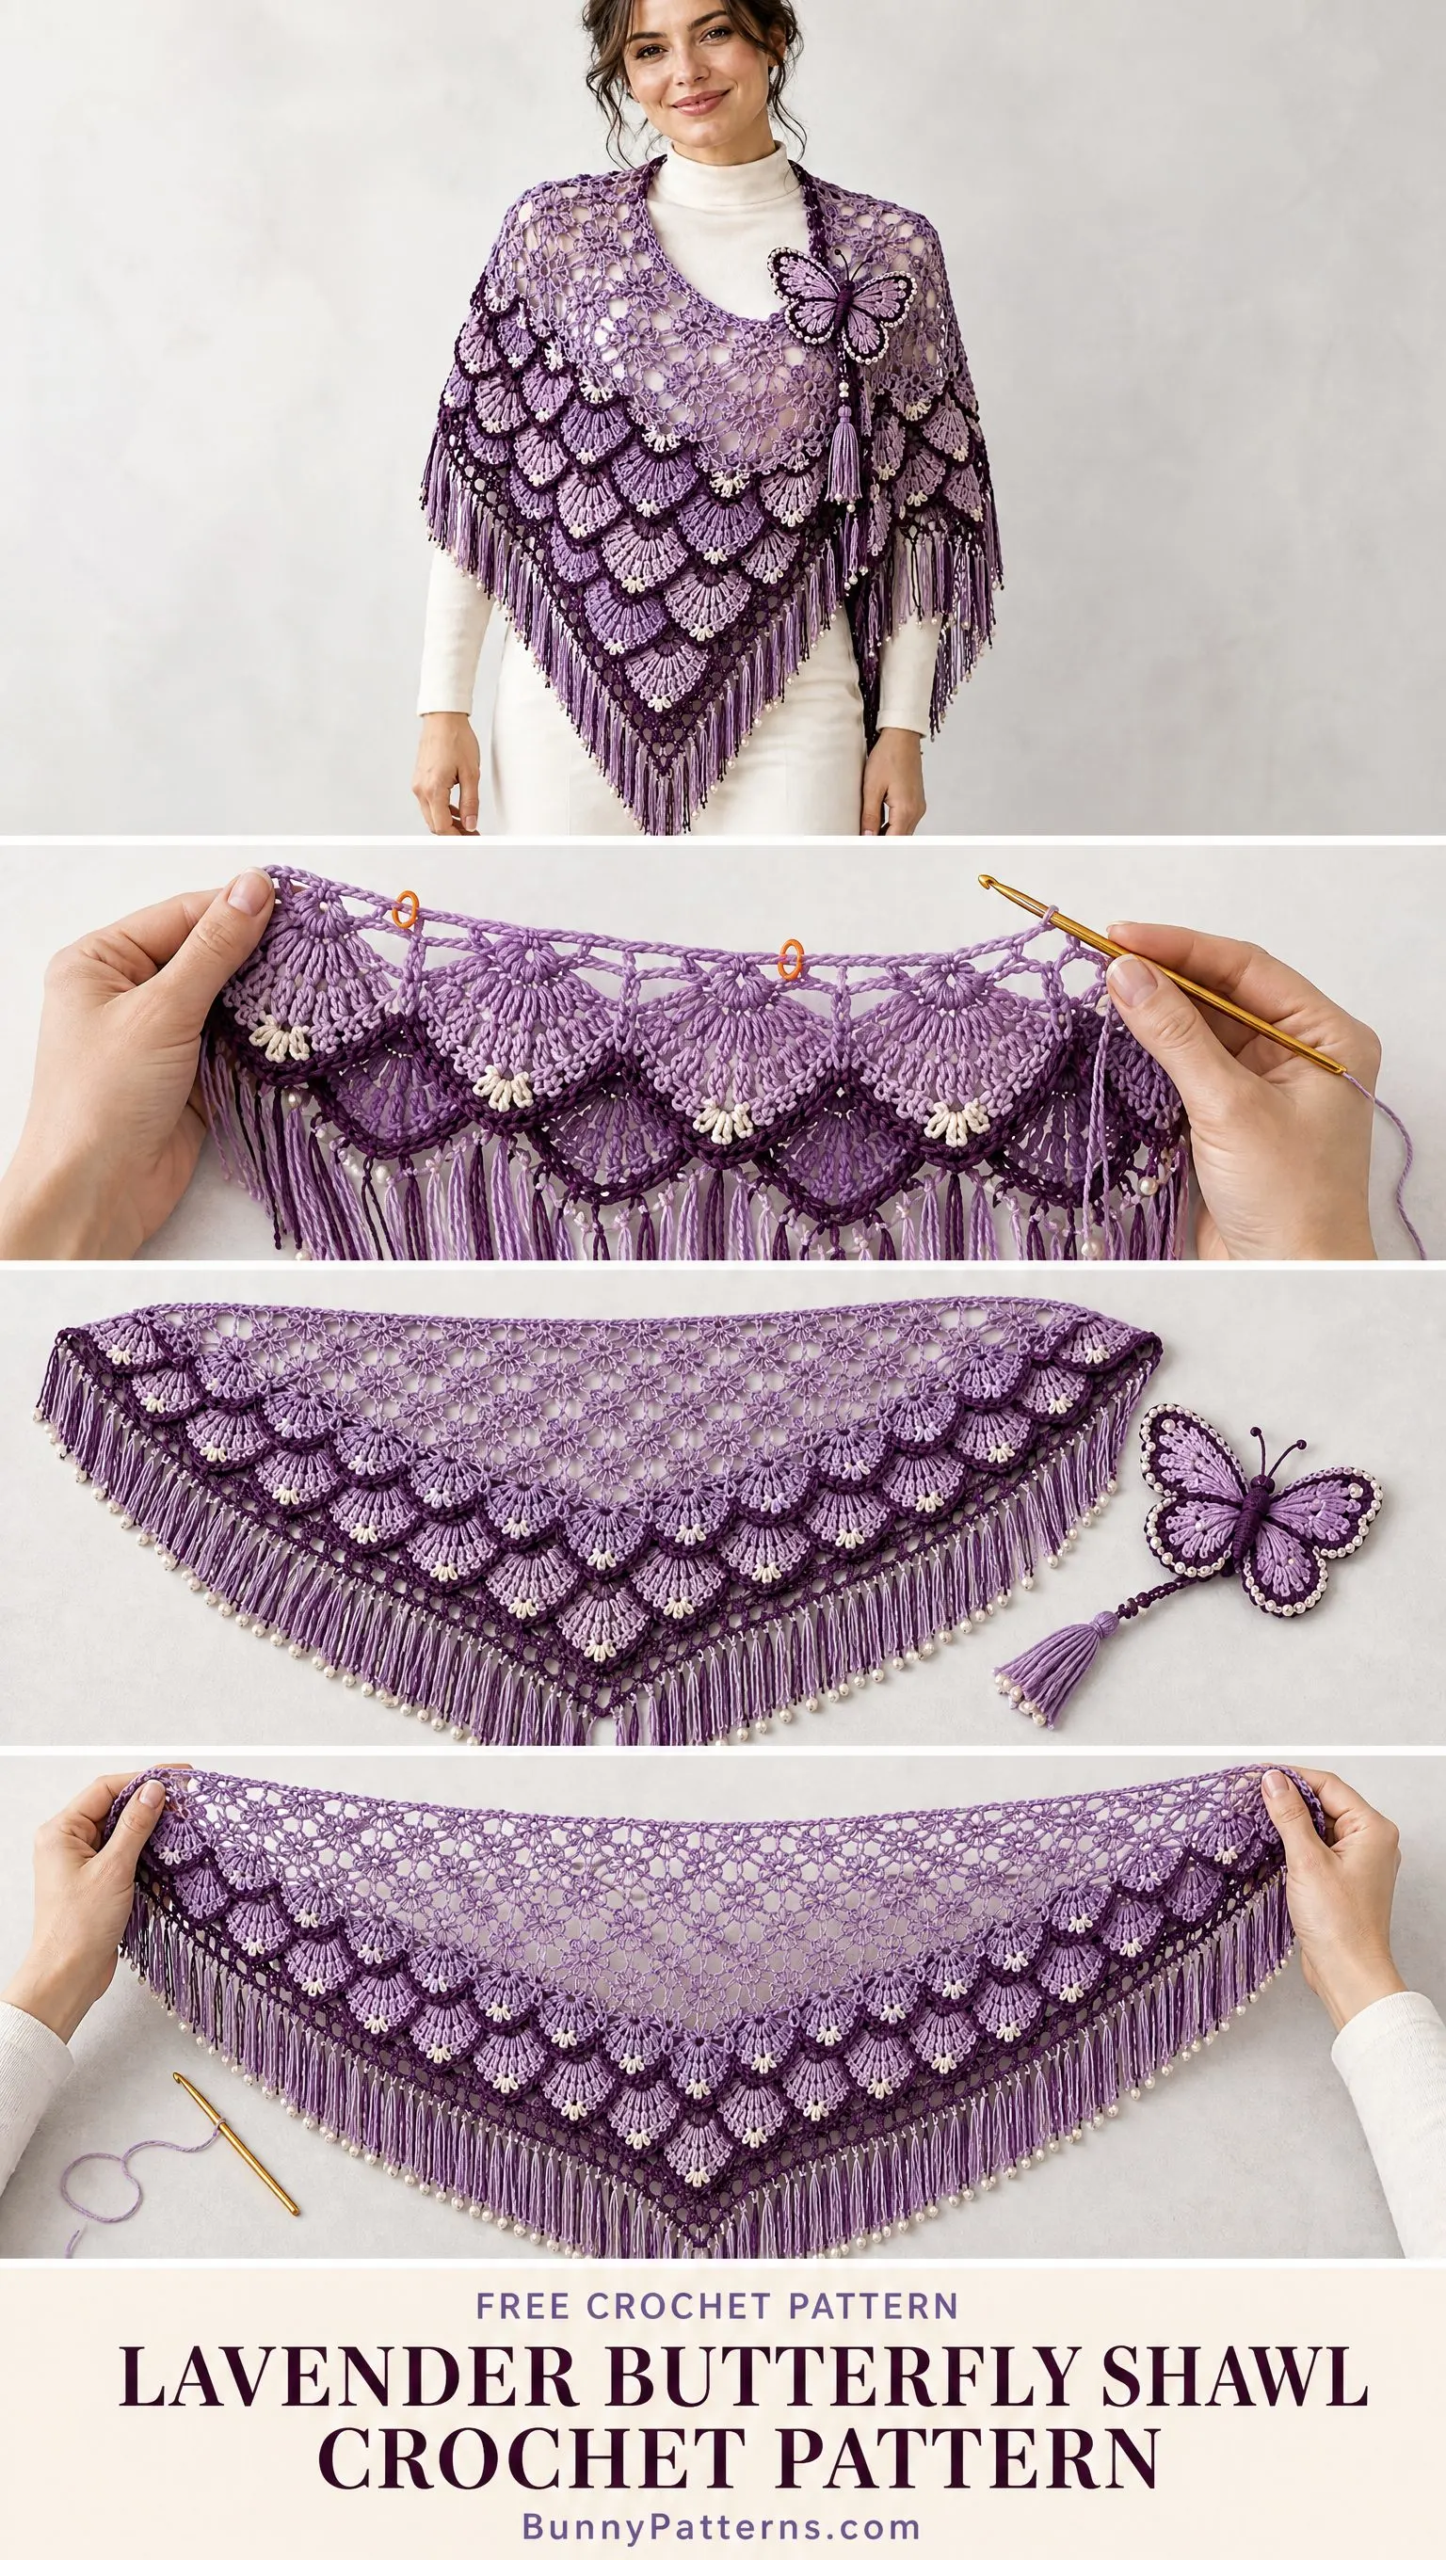
This is that shawl. The Lavender Butterfly Shawl combines everything I love about dramatic crochet: overlapping scales that catch the light, delicate floral lacework, pearl-tipped fringe that sways when you move, and one gorgeous sculptural butterfly that serves as both decoration and a clever closure. It looks incredibly complex, but I promise the construction is more patient than difficult.
If you have been wanting to try appliqué work, motif assembly, or just want to create something truly breathtaking, this is your project. Grab your favorite lavender yarns and let me walk you through every single step.
About This Pattern
This shawl is an intermediate-level project that rewards patience and careful assembly. You will work a simple mesh triangle base, then create 120 individual scale motifs that get sewn on in overlapping tiers. The result mimics the look of crocodile stitch but with much more control over placement and drape.
Target finished size: 160 cm (63 inches) across the straight upper edge, 68 cm (27 inches) from the center to the triangle tip before the border. The lace edging adds about 2 to 3 cm, and the fringe adds another 18 to 20 cm of length.
The construction method is intentional. By making separate scales and sewing them on rather than working continuous crocodile stitch, you get better control over the layered texture and can adjust placement as you go. This also makes the shawl lighter and more fluid.
Materials You Will Need
Yarn: Smooth fingering-weight cotton, approximately 400 meters per 100 grams. You will need about 2,600 meters total (650 grams), including a reserve for adjustments. Cotton-rich yarn with good drape also works beautifully.
Here is how the colors break down:
Hooks: Start with a 3 mm hook for the main work. Use a 2.5 mm hook for the butterfly and body to create a firmer fabric.
Notions: Yarn needle, stitch markers, tape measure, blocking mat and pins, sewing needle and thread, scissors.
Optional embellishments: 24 to 36 lightweight 4 mm pearl beads, 2 sew-on snaps (10 to 12 mm), and two small fabric reinforcement patches approximately 3 x 5 cm.
Important note about quantities: These are planning allowances, not measured consumption. After making 5 scales with edging, weigh them, multiply the average weight by 120, then add your mesh, finishing, and fringe allowance. Keep at least 10% spare yarn in each color.
Stitch Abbreviations and Definitions
Before we begin, let me define every stitch you will use:
Counting rules: Turning ch 1, ch 2, and ch 3 never count as stitches in this pattern. Work into both loops unless stated otherwise. Instructions in brackets are repeated the specified number of times.
Gauge
This is crucial for getting the right finished size. Block your trial pieces before committing to the full project.
Mesh gauge: At the broad edge, 5 mesh spaces should span about 10 cm. Five row intervals should measure about 4.25 cm vertically. Measure without stretching.
Scale gauge: One complete blocked scale should measure about 7 cm across its straight top and 4 cm deep.
If your gauge differs, change your hook size. You may need different hook sizes for the mesh and scales, and that is perfectly fine.
Project Sequence
Make the project in this specific order:
1. Swatch mesh and scale, wash and block both
2. Crochet the complete mesh triangle and block lightly
3. Make 120 scales with plum outlines and ivory tips
4. Position all scales, then sew from the lowest tier upward
5. Add shoulder flowers and the plum perimeter border
6. Make the four-wing butterfly with body, veins, antennae, and tassel
7. Fit the fastening, add fringe and optional pearls, finish and block
Step 1: The Mesh Triangle
Work back and forth from the wide upper edge down to the lower point in Color A. The long foundation chain becomes the shoulder edge. Do not join rows into rounds.
Foundation and First Row
Foundation: Chain 322 loosely. If your chains tend to be tight, use a hook 0.5 mm larger just for this foundation chain.
Row 1: Single crochet in the second chain from hook. Chain 3, skip 3 foundation chains, single crochet in next chain. Repeat from to 80 times. Turn. Count: 80 ch-3 spaces and 81 single crochets. All 321 usable foundation chains have been accounted for.
Decrease Rows
Row 2: Chain 1, single crochet into the first ch-3 space. Chain 3, single crochet into the next ch-3 space. Repeat across. Do not work into the final edge single crochet. Turn. 79 spaces, 80 sc.
Rows 3 through 80: Repeat Row 2. Each row has one fewer space than the previous row. For any Row r, the number of spaces equals 81 minus r. Always begin with a single crochet in the first space and end with a single crochet in the last space.
Row 81 (tip): Chain 1, single crochet into the sole remaining space. Fasten off. There are no spaces on this finishing row.
Checkpoint Table
| Row | Spaces | Single Crochets |
|---|---|---|
| Row 1 | 80 | 81 |
| Row 10 | 71 | 72 |
| Row 20 | 61 | 62 |
| Row 40 | 41 | 42 |
| Row 60 | 21 | 22 |
| Row 80 | 1 | 2 |
| Row 81 | 0 | 1 |
Block and Mark the Mesh
Soak or wash as your yarn label directs. Support the wet fabric, roll it in a towel, and lay flat. Pin a straight 160 cm top edge and a centered tip about 68 cm below it. Do not force an unwilling fabric to these exact measurements. Let dry completely.
With the right side facing up, mark a line across the triangle 22 cm below the top edge. This is the upper attachment line for the first scale tier. Mark additional lines every 3 cm, ending at 64 cm. These are placement guides, not additional crochet rows.
Step 2: Rounded Shell Scales
Make 120 scales total: 45 in Color A, 40 in Color B, and 35 in Color C. Each scale is worked as a flat semicircular fan in turned rows, with the straight diameter at the top and the curved rim pointing down.
One Scale
Row 1: Make a magic ring, chain 3, work 7 double crochet into the ring. Pull ring closed without bunching the stitches. Turn. 7 dc.
Row 2: Chain 3, 2 double crochet in each double crochet across. Turn. 14 dc.
Row 3: Chain 3, double crochet in next dc, 2 double crochet in next dc. Repeat 7 times. Turn. 21 dc. Fasten off the main color.
Row 4 (plum curve): Join Color D in the first dc, chain 1, single crochet in next stitch, 2 single crochet in next stitch, single crochet in next stitch. Repeat 7 times. 28 sc across the curve. Do not turn.
Plum straight top: Continue around the remaining straight diameter: work 2 single crochet around each dc row-end down the first side (6 sc), 1 single crochet at the ring center, then 2 single crochet around each row-end up the other side (6 sc). Slip stitch into the first curve single crochet. Fasten off, leaving a sewing tail. 13 top-edge sc plus 28 curved-edge sc.
Ivory tips: With Color E and a needle, make 3 small straight embroidery stitches over the plum edge at curve stitches 13, 14, and 15, counting from the first curve single crochet. Each stitch crosses the edge once and is secured on the wrong side. Do not pull the edge inward. Weave ends through the fan backs.
Block Your Scales
Lay each scale flat at about 7 x 4 cm, gently smoothing the rounded rim. A slight cup is desirable, but a tightly folded fan is not. If the curve ruffles badly, go down a hook size for the plum single crochet round only. If it curls inward, use a larger edging hook or loosen your tension.
Color Distribution by Tier
| Tier Numbers | Main Color | Scale Total |
|---|---|---|
| 1, 4, 7, 10, 13 | A: lavender | 15 + 12 + 9 + 6 + 3 = 45 |
| 2, 5, 8, 11, 14 | B: wisteria | 14 + 11 + 8 + 5 + 2 = 40 |
| 3, 6, 9, 12, 15 | C: pale mauve | 13 + 10 + 7 + 4 + 1 = 35 |
For a less striped effect, you can exchange a few scales between tiers while keeping the same total quantities. Every scale keeps its plum outline and ivory center-tip accent.
Step 3: Place and Sew the Scales
Lay the dry mesh right side up. Number tiers from top to bottom. Center each tier on the triangle, with the straight top edge of every scale following its marked line. The lower fan curves point toward the triangle tip.
| Tier | Distance Below Top | Scales | Color |
|---|---|---|---|
| 1 / 2 / 3 | 22 / 25 / 28 cm | 15 / 14 / 13 | A / B / C |
| 4 / 5 / 6 | 31 / 34 / 37 cm | 12 / 11 / 10 | A / B / C |
| 7 / 8 / 9 | 40 / 43 / 46 cm | 9 / 8 / 7 | A / B / C |
| 10 / 11 / 12 | 49 / 52 / 55 cm | 6 / 5 / 4 | A / B / C |
| 13 / 14 / 15 | 58 / 61 / 64 cm | 3 / 2 / 1 | A / B / C |
Check the overlap: A 4 cm deep fan placed every 3 cm overlaps the next tier by about 1 cm. Centering tiers with one fewer scale automatically offsets adjoining tiers by half a scale width.
1. Pin first. Place all 15 tiers before sewing. Use locking markers through the mesh and the straight top of each fan.
2. Start at the tip. Sew Tier 15 first. Use its tail to whipstitch the straight top to the nearest mesh row, taking small stitches through both loops of the top single crochet and around stable mesh junctions.
3. Work upward. Add Tier 14, with its curved bottom lying over Tier 15. Continue upward to Tier 1. Catch only the mesh when sewing each new top edge. Keep the layer below free.
4. Secure side fans. If an outside fan flips outward, add one loose tack near its upper outer corner. Never sew the entire curved rim down.
Step 4: Flowers and Plum Lace Border
Shoulder Flowers (Make 18)
Make 12 in Color A, 3 in Color B, and 3 in Color C. Finished flowers should be roughly 4 to 5 cm across.
Round 1: Magic ring, chain 1, 12 single crochet into ring. Join with slip stitch to first single crochet. Pull ring snug. 12 sc.
Round 2: Chain 5, skip next single crochet, slip stitch in following single crochet. Repeat 6 times, placing the final slip stitch into the first single crochet of Round 1. 6 petal arches.
Round 3: Into each ch-5 arch work (sc, hdc, 3 dc, hdc, sc). After the sixth petal, slip stitch into the first single crochet of this round. Fasten off with a sewing tail. 6 petals, 42 stitches.
Arrange two loose staggered bands in the upper 18 cm of the shawl, about 9 flowers per band. Keep the 3 cm nearest the top edge clear. Sew each center and 3 alternating petal tips to mesh junctions, leaving other tips free.
Perimeter Foundation Round
With right side facing, join Color D at a top corner. Chain 1. Across the top foundation work 1 single crochet into each available foundation chain, keeping tension loose. At each top corner work 3 single crochet in the corner point. Down the sloping sides, work about 2 single crochet around each mesh row-end. At the bottom point work 3 single crochet. Join with slip stitch.
Lace on the Two Sloping Sides
Lace Row 1: Join Color D at one top corner. Chain 1, single crochet in corner stitch. Chain 4, skip 2 edge single crochet, single crochet in next edge single crochet. Repeat toward the lower point. Continue up the other slope. Turn.
Lace Row 2: Chain 1. In each ch-4 arch work (sc, hdc, 2 dc, picot, 2 dc, hdc, sc). Slip stitch into each separating anchor single crochet as you pass it. Finish at the opposite top corner and fasten off.
Do not add this scalloped lace to the straight shoulder edge.
Step 5: The Sculptural Butterfly
Use Color A and a 2.5 mm hook for a firmer fabric. Aim for a butterfly about 18 to 20 cm wide with a 7 to 8 cm body.
Upper Wings (Make 2)
Row 1: Magic ring, chain 3, 7 dc. Close ring and turn. 7 dc.
Row 2: Chain 3, 2 dc in each stitch. Turn. 14 dc.
Row 3: Chain 3, dc in next st, 2 dc in next st. Repeat 7 times. Turn. 21 dc.
Row 4: Chain 3, dc in next 2 sts, 2 dc in next st. Repeat 7 times. Turn. 28 dc.
Row 5: Chain 3, dc in next 3 sts, 2 dc in next st. Repeat 7 times. Turn. 35 dc. Fasten off Color A.
Plum edge: Join Color D, chain 1, sc in next 4 sts, 2 sc in next st. Repeat 7 times. 42 curve sc. Continue with 2 sc around each of the 5 row-ends on one straight side, 1 sc at the ring, then 2 sc around each of the other 5 row-ends. Join to first sc. Fasten off. 21 straight-edge sc.
Lower Wings (Make 2)
Work exactly as the scale instructions (Rows 1 through 4 and the straight plum top edge), using the 2.5 mm hook. Omit the three ivory scale-tip stitches. These wings have 28 curved-edge sc and 13 straight-edge sc.
Cream Dots and Raised Plum Veins
Dots: On upper-wing curves, make a small cream French knot at sc 3, 6, 9, and so on through 42 (14 knots per wing). On lower-wing curves use sc 3, 6, 9, and so on through 27 (9 knots per wing).
Veins: Surface slip stitch in Color D from the ring center to curve sc 10, 21, and 32 on each upper wing. Use sc 7, 14, and 21 on each lower wing. Keep each vein raised and loose enough that the wing lies softly.
Body and Antennae
Body: In Color D, chain 17. Single crochet in second chain and each chain across: 16 sc. Work 3 more rows of chain 1, turn, single crochet in each stitch. Fold lengthwise and sew the long edges together, forming a slim unstuffed tube. Close both ends.
Arrange wings in mirrored pairs, upper fans opening upward and outward, lower fans down and outward. Overlap their inner ring corners under the body by about 1 cm. Sew these inner corners together and sew the body over the joins.
Antennae: Join Color D at the head. Chain 12, slip stitch in second chain and each remaining chain. Slip stitch back to head. Repeat for the second antenna. Curve gently with your fingers.
Step 6: Fastening, Fringe, and Care
Fit and Attach the Butterfly
Try on the shawl over your intended outfit. Shift the main point toward the lower front left and bring the other end across to the upper-right chest. Pin the overlap comfortably. Sew one reinforcement patch behind each overlapping area.
Sew the two snap pairs through the reinforced areas, spaced about 2.5 cm apart. Sew the butterfly body and inner wing roots to the outer overlap only, covering the snaps. Keep outer wing tips loose.
Butterfly Tassel
Cut 24 strands, 22 cm each, half Color A and half Color D. Fold them over a separate 20 cm tie strand. Tie the bundle at its midpoint. Fold ends together, wrap Color D firmly around the bundle 1.5 cm below the fold, knot and bury the ends. Trim to about 9 cm. Chain 10 in Color D, fasten the cord to the tassel loop, and sew its other end beneath the butterfly body.
Long Fringe and Optional Pearls
Cut 4 strands per fringe group, each 44 cm long: 2 Color A and 2 Color D. Start with 60 groups (240 strands). Fold each group in half, pull its fold through a lace anchor single crochet with the hook, pass all tails through the loop, and tighten gently. Place groups about 3 to 4 cm apart along both sloping sides, including one at the bottom point. Do not fringe the shoulder edge.
For pearl tips, thread one lightweight bead onto a single strand in every second or third selected group, about 1 to 2 cm above its finished end. Tie a firm double overhand stopper below it. Trim the hanging fringe to 18 to 20 cm after resting overnight.
Final Blocking and Care
Weave all tails at least 5 cm in two directions through matching stitches. Lay flat and lightly damp-block, shaping fans individually. Hand wash cool as your yarn label permits, support the wet shawl fully, blot and dry flat. Store folded with tissue around the butterfly.
Tips for Success
Keep the fabric supple: Leave 15 to 20 cm sewing tails on motifs. Secure magic rings firmly, but do not gather the fans. Sew through structural stitches, not isolated chain strands. Leave the curved lower edges of scales free so they overlap and move naturally.
Fit checkpoint: Before adding trim, drape the shawl over your shoulders. If the weight pulls the mesh into long vertical gaps, reduce scale density or use smaller motifs.
Resizing: For a different starting width, chain 4N + 2, where N is your desired number of starting spaces. Work Row 1 with N repeats, then decrease one space per row. At this gauge, width is about 2N cm and depth about 0.85N cm.
You Did It!
This shawl is absolutely a labor of love, but the finished piece is worth every single stitch. When you drape it over your shoulders and feel those scales shimmer and that fringe sway, you will understand why some projects are worth the extra time.
Thank you so much for choosing this pattern. I would love to see your finished Lavender Butterfly Shawl! Tag me on Instagram or share in my Facebook group so I can celebrate with you.
If this pattern caught your eye, save it to your Pinterest boards so you can find it when you are ready to start. And please drop a comment below if you make one. I love hearing about your color choices, your modifications, and your proud finished project moments!
Want a Quick & Easy Printable Version?
Get a clean, beautifully formatted PDF of this pattern — easy to follow step by step, ready to print or save on any device. No scrolling, no distractions, just the pattern.
Get the Printable PDF →You Might Also Like
- Pastel Bunny Spring Skirt Free Crochet Pattern
- Pastel Rainbow Daisy Backpack Free Crochet Pattern
- Pastel Rainbow Granny Square Toddler Set Free Crochet Pattern
- Blush Pink Lace Baby Dress Free Crochet Pattern