
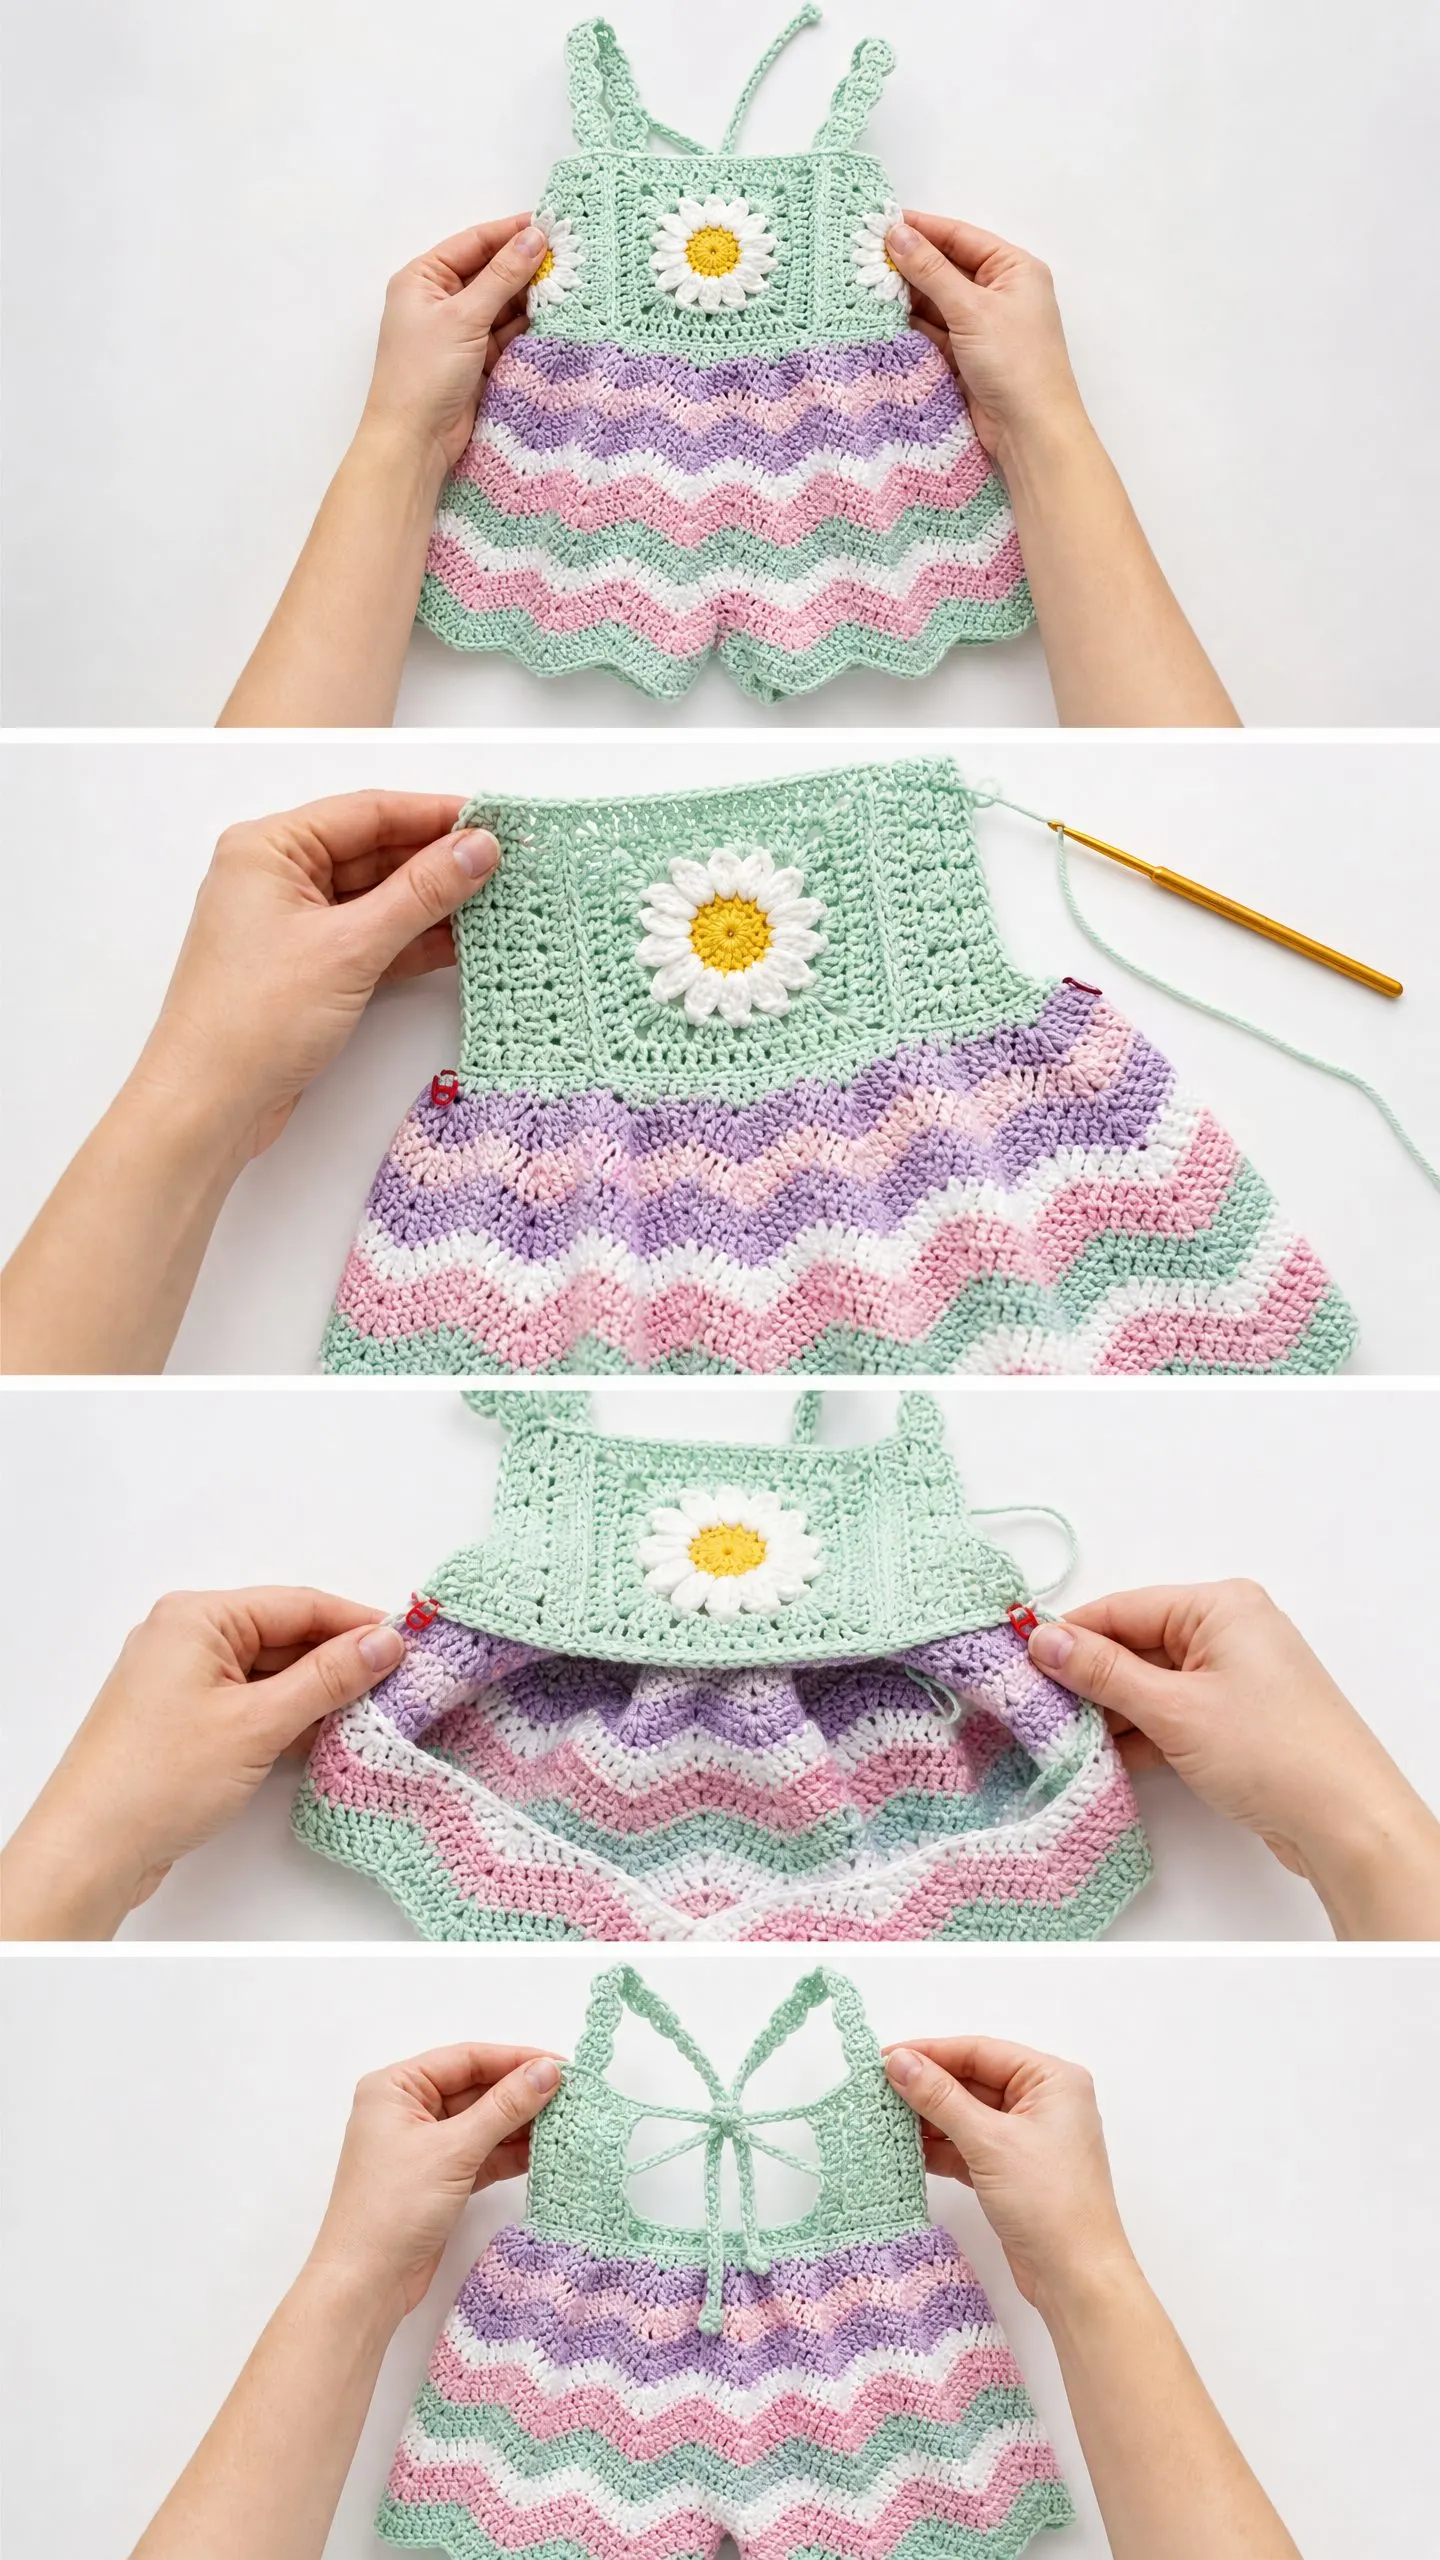
THIS is one of those projects that will have everyone asking, "You MADE that?!" The Daisy Garden Baby Romper looks like it belongs in a boutique window, but I promise you can absolutely create this yourself. The combination of a classic granny square bodice, that sweet three-dimensional daisy, and those gorgeous chevron stripes comes together in about 8 to 14 hours of satisfying stitching.

If you have been wanting to make something truly special for a little one in your life, this is your sign. Baby showers, first birthdays, summer photo sessions. This romper checks every box and then some.
The best part? While it looks incredibly detailed, the construction breaks down into manageable sections that even adventurous beginners can tackle. Let me walk you through every single step.
About This Crochet Pattern
This handcrafted baby romper features a structured granny square bodice with a crocheted daisy motif right at the center. The bodice flows into a chevron ripple skirt that flares gently at the hem, creating that adorable silhouette babies wear so well. The whole piece works from the top down, starting with the bodice worked flat, then joining for the chevron skirt, and finishing with a practical snap-closure crotch panel for easy diaper changes.
The color palette uses soft mint as the primary color throughout the bodice and chevron outline. Lavender, pink, and white alternate through the chevron stripes for that dreamy pastel look. You can absolutely customize these colors to match a nursery theme or personal preference.
Skill Level: Intermediate. You should feel comfortable with granny square construction, working chevron ripple rows, making color changes, seaming pieces together, and attaching embellishments. If you have completed two or three projects already, you will find each individual step manageable.
Finished Sizes:
Size 6 to 12 months (primary size):
Size 12 to 18 months (adjustment notes included at the end):
Materials You Will Need
Yarn (DK weight, yarn weight 3):
I recommend 100% cotton or a cotton blend for comfort and washability. Some excellent options include Lion Brand 24/7 Cotton, Paintbox Yarns Simply DK, or Drops Safran. Any DK weight yarn achieving the stated gauge will work beautifully.
Hooks:
Notions:
Gauge
Getting gauge right matters here because this is a fitted garment. With your E-4 / 3.5 mm hook and Color A, work a swatch in single crochet (sc). That means inserting your hook into a stitch, yarning over, pulling up a loop, yarning over again, and pulling through both loops on the hook.
Single crochet gauge:
Granny square bodice (blocked flat):
Chevron ripple stitch:
If your swatch is too big, go down a hook size. Too small? Go up a hook size. Please do not skip this step.
Abbreviations and Stitch Definitions
Let me define every abbreviation you will encounter:
Special Stitches Explained
Granny Cluster Shell (3 dc into one space):
Work 3 double crochets into the same chain space. This creates one shell and forms the building blocks of your granny square bodice.
Chevron Ripple Stitch:
This creates the wave pattern in the skirt. Each 18-stitch repeat works like this: single crochet in each of the next 7 stitches, work 3 sc into the next stitch (this is your peak), sc in each of the next 7 stitches, then sc2tog twice (this is your valley). The peak adds 2 stitches while the valley removes 2 stitches, keeping your count consistent.
Daisy Petal:
Chain 8, single crochet into second chain from hook, hdc into next, dc into next 3, hdc into next, sc into last, slip stitch into base. This creates one elongated petal shape.
Pattern Notes Before You Begin
1. The bodice is worked flat as a modified granny-style square panel. You make two identical panels: one front, one back.
2. The chevron skirt attaches to the lower edge of both bodice panels, works flat in rows, then gets seamed at the sides.
3. For color changes, pull the new color through the final 2 loops of the last stitch before the new color begins.
4. The turning chain at the beginning of every single crochet row does NOT count as a stitch. Always work into the first actual stitch.
5. Mark the right side of both bodice panels with a stitch marker before assembly.
6. The daisy motif is worked separately and sewn onto the center of the front bodice after blocking.
Step by Step Instructions
Section 1: Bodice Front Panel
Foundation Ring:
With Color A and E-4 hook, ch 4, join with sl st to first ch to form a ring. (4 ch ring)
Round 1 (RS):
Ch 3 (counts as first dc), work 2 dc into ring, ch 2, (work 3 dc into ring, ch 2) 3 times, join with sl st to top of beginning ch-3. (12 dc, 4 ch-2 corner spaces)
Round 2:
Sl st across to first ch-2 corner space. Ch 3 (counts as first dc), work (2 dc, ch 2, 3 dc) into same corner space. Ch 1. Work (3 dc, ch 2, 3 dc) into each remaining ch-2 corner space, with ch 1 between corner groups. Join with sl st to top of beginning ch-3. (24 dc, 4 ch-2 corner spaces, 4 ch-1 side spaces)
Round 3:
Sl st to first ch-2 corner space. Ch 3, work (2 dc, ch 2, 3 dc) into same corner space. Ch 1. Work 3 dc into the ch-1 side space. Ch 1. Work (3 dc, ch 2, 3 dc) into next corner space. Rep (ch 1, 3 dc into side space, ch 1, corner shell into corner space) around. Join with sl st to top of beginning ch-3. (36 dc, 4 ch-2 corner spaces, 8 ch-1 spaces)
Round 4:
Sl st to first ch-2 corner space. Ch 3, work (2 dc, ch 2, 3 dc) into same corner space. (Ch 1, 3 dc into next ch-1 sp) twice. Ch 1. Work corner shell into next ch-2 corner space. Rep around. Join with sl st. (48 dc, 4 ch-2 corner spaces, 12 ch-1 side spaces)
Round 5:
Sl st to first ch-2 corner space. Ch 3, work (2 dc, ch 2, 3 dc) into same corner space. (Ch 1, 3 dc into next ch-1 sp) 3 times. Ch 1. Work corner shell into next corner space. Rep around. Join with sl st. (60 dc, 4 ch-2 corner spaces, 16 ch-1 spaces)
After Round 5, your granny square measures approximately 4.5 in / 11.5 cm square. Do not fasten off.
Row 6 (top edge, worked flat):
With RS facing, join Color A at top-right corner ch-2 space. Ch 1. Work 1 sc into same space, then work sc evenly across the top edge of the completed granny square, placing 1 sc into each dc and 1 sc into each ch-1 sp across. At the top center: skip ch-2 corner, continue across. Turn. (36 sc)
Row 7:
Ch 1. Sc in each sc across. Turn. (36 sc)
Row 8:
Ch 1. Sc in each sc across. Turn. (36 sc)
Checkpoint: After Row 8, your bodice front panel should measure approximately 5.5 in / 14 cm tall and 7 in / 18 cm wide.
Fasten off, leaving a 12-in / 30-cm tail for seaming.
Section 2: Bodice Back Panel
Work exactly as the bodice front panel, Rounds 1 through 5, then Rows 6 through 8. (36 sc across top edge at completion)
Fasten off, leaving a 12-in / 30-cm tail for seaming.
Section 3: Halter Ties (make 2)
With Color A and E-4 hook, ch 80. Sl st into second ch from hook and into each ch across. Fasten off. (79 sl st ties, each measures approximately 14 in / 35.5 cm)
Thread one tie through the top-right ch-2 corner space of the front bodice panel and knot at one end to secure. Repeat for top-left corner space. The ties cross behind the neck and tie in a bow.
Section 4: Chevron Skirt Front
Foundation Row (joining row):
With RS of bodice front facing, join Color A at bottom-right corner ch-2 space of the granny square. Ch 1. Work sc evenly across the bottom edge of the granny square, placing stitches to achieve exactly 54 sc across. Turn. (54 sc)
Place stitch markers at stitches 9, 18, 27, 36, and 45 to mark peak and valley positions.
Skirt Row 1 (Color A):
Ch 1. Work chevron pattern across all 54 stitches: (sc in next 7 sts, 3 sc in next st, sc in next 7 sts, sc2tog, sc2tog) 3 times. Turn. (54 sc)
Skirt Row 2 (Color A):
Ch 1. Work chevron pattern across. Turn. (54 sc)
Skirt Row 3 (Color B, Lavender):
Join Color B by pulling new color through last 2 loops of final stitch of Row 2. With Color B, ch 1. Work chevron pattern across. Turn. (54 sc)
Skirt Row 4 (Color B):
Ch 1. Work chevron pattern across. Turn. (54 sc)
Skirt Row 5 (Color D, White):
Join Color D. Ch 1. Work chevron pattern across. Turn. (54 sc)
Skirt Row 6 (Color D):
Ch 1. Work chevron pattern across. Turn. (54 sc)
Skirt Row 7 (Color C, Pink):
Join Color C. Ch 1. Work chevron pattern across. Turn. (54 sc)
Skirt Row 8 (Color C):
Ch 1. Work chevron pattern across. Turn. (54 sc)
Skirt Row 9 (Color D, White):
Join Color D. Ch 1. Work chevron pattern across. Turn. (54 sc)
Skirt Row 10 (Color D):
Ch 1. Work chevron pattern across. Turn. (54 sc)
Skirt Row 11 (Color A, Mint):
Join Color A. Ch 1. Work chevron pattern across. Turn. (54 sc)
Skirt Row 12 (Color A):
Ch 1. Work chevron pattern across. Turn. (54 sc)
Checkpoint: After Row 12, your chevron skirt front should measure approximately 4.75 in / 12 cm in length. Your stripe sequence is: 2 rows Mint, 2 rows Lavender, 2 rows White, 2 rows Pink, 2 rows White, 2 rows Mint.
Fasten off Color A, leaving a 10-in / 25-cm tail for seaming.
Section 5: Chevron Skirt Back
Work exactly as Chevron Skirt Front, joining to the bottom edge of the bodice back panel. Work all 12 rows in the same color sequence. (54 sc at completion of each row)
Fasten off, leaving a 10-in / 25-cm tail for seaming.
Section 6: Crotch Gusset Panel
Foundation Chain:
With Color A and E-4 hook, ch 15.
Row 1:
Sc into second ch from hook and each ch across. Turn. (14 sc)
Rows 2 through 14:
Ch 1. Sc in each sc across. Turn. (14 sc each row)
After Row 14, your gusset panel measures approximately 3 in / 7.5 cm wide and 3 in / 7.5 cm tall.
Fasten off, leaving a 14-in / 35.5 cm tail for seaming.
Section 7: Daisy Motif
Using D-3 hook throughout.
Daisy Center:
With yellow yarn, make a magic ring. Ch 1, work 8 sc into ring, join with sl st to first sc, pull ring closed. (8 sc)
Fasten off yellow, leaving a 6-in tail for sewing.
Daisy Petals:
With white yarn and D-3 hook, join with sl st to any sc of the daisy center.
For each petal: Ch 8. Sc into second ch from hook, hdc into next ch, dc into next 3 chs, hdc into next ch, sc into last ch. Sl st into same center stitch as the joining sl st to close petal base. Sl st into next sc of center ring to move to the next petal position.
Repeat for all 8 petals, each joined to one sc of the center ring. (8 petals total)
Fasten off, leaving a 10-in tail for attaching to bodice.
Assembly
Step 1: Side seams.
Hold front and back bodice panels with right sides facing outward. Using Color A and tapestry needle, whipstitch along both side edges from the top armhole edge down to the bottom of the granny square section, approximately 5.5 in / 14 cm per side seam. Leave armhole openings open at the top sides.
Step 2: Skirt side seams.
Continue seaming down the side edges of the front and back chevron skirt panels. Align chevron stripe rows carefully so the pattern matches at the seam. Seam the full 4.75-in / 12-cm length on each side.
Step 3: Leg openings.
The lower edges of the front and back skirt panels remain open after the skirt side seams are closed, forming two leg holes. Work a single crochet edging around each leg opening: Join Color A at one side seam base. Ch 1. Work 1 sc into each stitch and 1 sc into each row end around the leg opening. Join with sl st. Fasten off. Repeat for the second leg opening.
Step 4: Attach crotch gusset.
Center the gusset panel beneath the two leg openings. Sew the front edge (7 stitches) to the center bottom of the front skirt. Sew the back edge to the center bottom of the back skirt with a lapped seam, leaving approximately 1 in / 2.5 cm of the back gusset flap free and overlapping the front. Attach 3 snaps evenly spaced across the overlapping back crotch flap.
Step 5: Attach daisy motif.
Center the daisy on the front bodice granny square, approximately 1 in / 2.5 cm below the top edge. Tack each petal tip lightly to the bodice fabric. Sew the center firmly to the bodice with a few stitches pulled through to the wrong side.
Step 6: Halter ties.
Thread each halter chain tie through the top corner ch-2 spaces of the front bodice panel. Tie a small overhand knot at each end on the wrong side to prevent the tie from pulling through.
Edging
Work a single crochet edging along the entire top edge of the front and back bodice panels. Join Color A at one upper corner. Ch 1. Work 1 sc into each stitch across the top edge. At side edges, work 1 sc into each row end. Continue around the armhole openings for a finished look. Fasten off.
Optional: Work 1 round of reverse single crochet (crab stitch) after the sc edging for a more polished edge.
Size Customization Tips
For size 12 to 18 months:
Work one additional round on the granny square bodice panels before beginning the top edge rows. Increase the chevron skirt foundation row to 72 stitches (4 full repeats). Add 2 additional chevron rows. Increase the crotch gusset chain by 4 stitches and work 16 rows total.
For a smaller newborn size:
Work only 4 rounds of the granny square bodice. Begin the chevron foundation row with 36 stitches (2 full repeats). Work only 10 chevron rows.
Finishing and Blocking
Weave in all ends securely on the wrong side, running each end through at least 1 in / 2.5 cm of stitches in two directions before trimming.
Wet blocking is strongly recommended for cotton yarn. Soak the finished romper in cool water for 10 to 15 minutes. Gently squeeze out excess water without wringing. Lay flat on a clean towel or blocking mat. Pin to finished measurements, paying particular attention to the chevron peaks and valleys. Allow to dry completely, 12 to 24 hours.
Care Instructions
Machine wash cold on a gentle cycle. Lay flat to dry. Do not tumble dry. Do not iron directly over the daisy motif. Remove snaps before washing if they are not rust-proof.
I really hope you love making this little romper as much as I loved designing it. The finished piece photographs beautifully and makes an unforgettable handmade gift. Thank you so much for choosing this pattern for your next project!
If you want to find this pattern easily later, go ahead and save it to your Pinterest boards. And please, please leave a comment below if you make one. I would absolutely love to see your color combinations and hear how the process went for you!
You Might Also Like
- Pastel Sunset Granny Tote Bag Free Crochet Pattern
- Baby Ladybug Poncho Free Crochet Pattern
- Lavender Bloom Granny Square Table Runner Free Crochet Pattern
- Peach Blossom Flutter Dress Free Crochet Pattern