
I have been dreaming about designing a backpack that feels polished enough for everyday wear but still has that handmade charm I love so much. When I finally sat down to work out this design, I knew I wanted a few specific things: a structured shape that holds itself up, a statement flap with visual interest, and straps comfortable enough for actual use.
Get the Ad-Free PDF Pattern
You can find the free pattern below, or you can purchase the ad-free printable PDF from my shop.
Get the Printable PDF →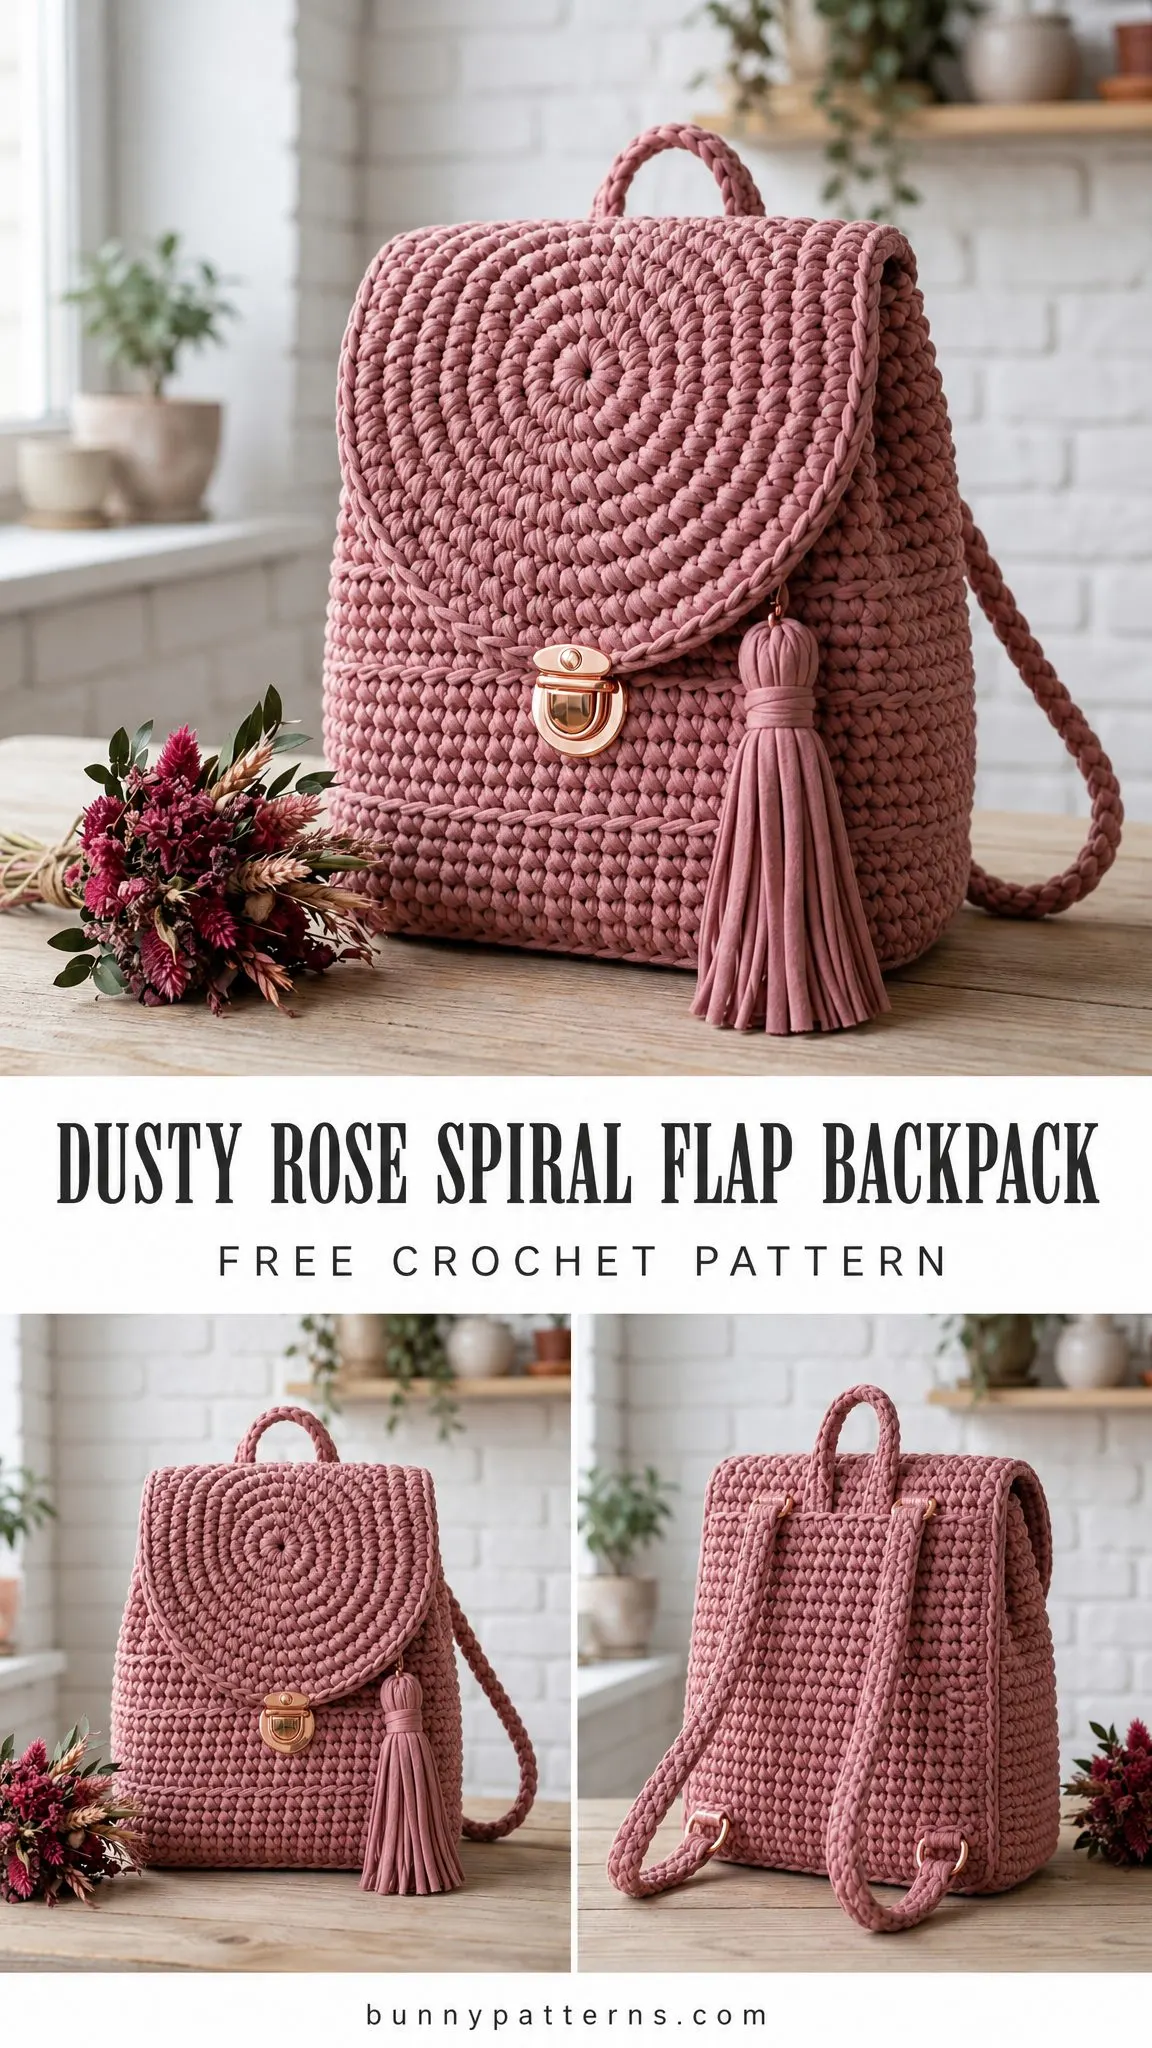
The spiral detail on the flap became my favorite part of the whole project. It adds that "wow" moment without complicated stitches. Just surface slip stitches spiraling outward from the center, creating texture that catches the light beautifully.
I am SO pleased with how this turned out! The split single crochet gives the body a dense, almost woven look that photographs beautifully and wears even better. If you have been wanting to try your hand at bag making, this backpack hits that sweet spot between impressive and achievable.
About This Crochet Backpack Pattern
This Dusty Rose Spiral Flap Backpack is a plush, structured bag featuring a rounded spiral flap, front pocket, braided straps, a gold turn-lock detail, and a soft tassel accent. The finished size measures approximately 9.5 inches wide by 10.5 inches tall by 3.5 inches deep (24 x 27 x 9 cm).
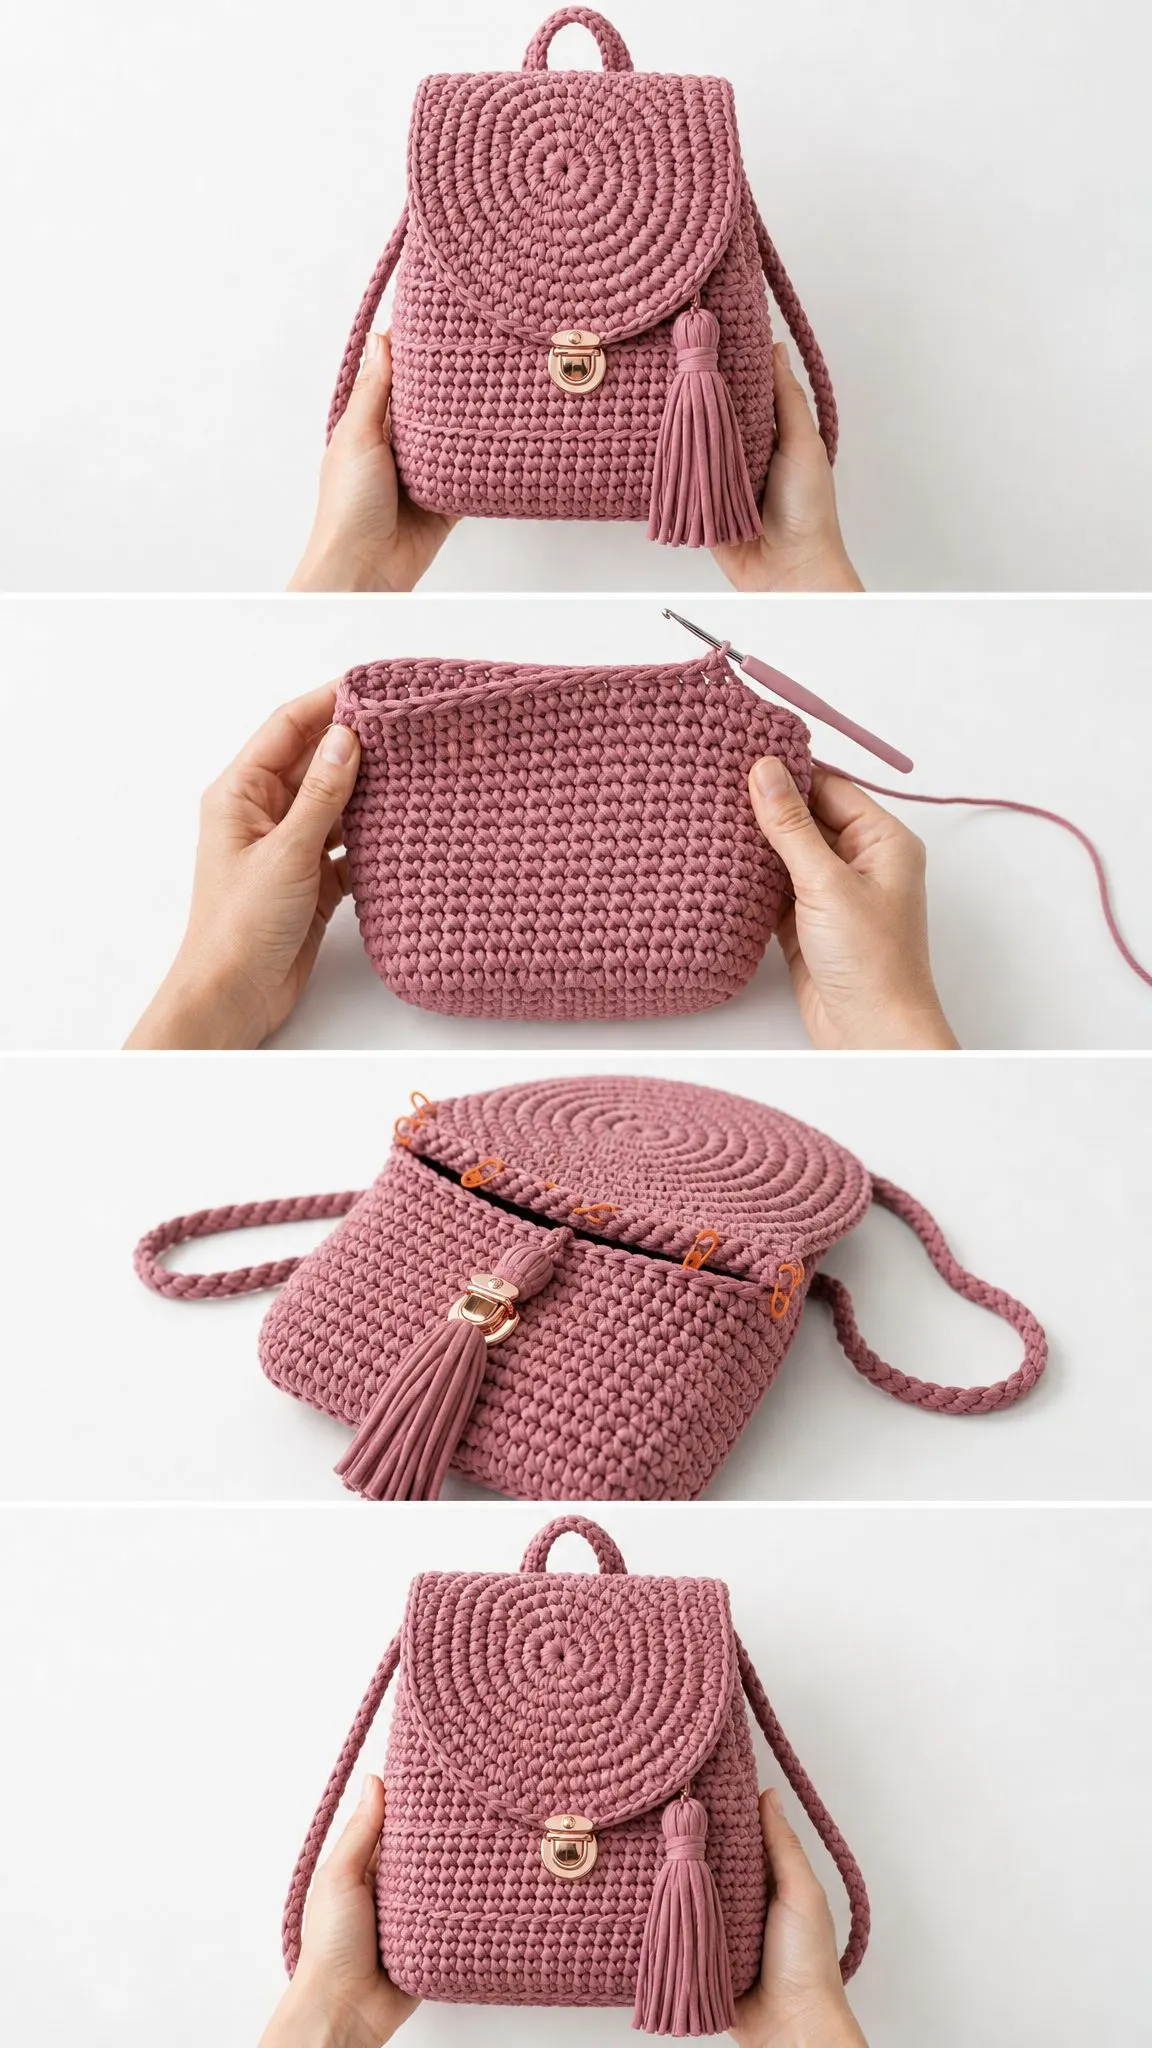
The construction starts with a rounded rectangular base, then the body works upward in joined rounds. You will make the front pocket, circular spiral flap, handle, straps, tassel, and hardware separately, then attach everything during finishing.
The split single crochet (also called waistcoat stitch) creates that dense, pillowy texture you see in the photos. Surface slip stitches form the gorgeous spiral on the flap. Plan for about 8 to 12 relaxed hours of work, plus finishing and blocking time.
Skill level: Confident intermediate. The stitches themselves are simple, but this project needs firm tension, accurate placement, surface crochet technique, hardware attachment, and neat three-dimensional assembly.
Materials You Will Need
Yarn: 300 to 360 yards (274 to 329 meters) of bulky tubular cotton-blend or T-shirt yarn in dusty rose. You will use approximately 250 to 290 yards for the bag itself and 50 to 70 yards for straps, tassel, and seams.
Hook: US K-10.5 / 6.5 mm, or the size needed to match gauge. Use US J-10 / 6 mm for straps if your straps tend to stretch.
Notions:
Yarn Suggestions
Good options include Bernat Maker, Hoooked Zpagetti, or a smooth recycled T-shirt yarn with firm body. Choose a yarn that compresses into a dense fabric instead of opening into loose gaps. When substituting yarn, match gauge and fabric firmness, not just yarn weight.
Gauge
8 split single crochet stitches x 9 rounds = 4 inches (10 cm), worked in the round with the larger hook and blocked lightly. Strap gauge may be slightly tighter.
Progress point: After Round 8 of the body, the base plus sides should measure approximately 9.5 x 3.5 inches (24 x 9 cm) across the bottom, with the side wall beginning to stand upright.
Please note that individual results may vary depending on your yarn, tension, hook size, and finishing technique. You may need to make small adjustments to achieve the closest possible result to the finished project shown.
Stitch Guide and Abbreviations
US terms are used throughout this pattern. UK makers, please note: US sc equals UK dc. The turning chain does not count as a stitch unless stated otherwise.
Special Stitches Explained
Split single crochet (ssc): This stitch creates that beautiful, dense fabric you see in the photos. Insert your hook between the two vertical legs of the next single crochet (you will see them as a little "V" on the front of your work), yarn over, pull up a loop, yarn over, pull through both loops. Keep your loops tall enough so the round does not tighten as you work.
Surface slip stitch spiral: Hold working yarn on the wrong side. Insert hook from front to back through the fabric, catch the yarn, pull a loop to the front, then insert at the next marked point and pull the new loop through the loop on the hook. Continue in this manner to create the spiral.
Invisible join: Cut yarn, pull tail through the last stitch, thread needle, insert under both loops of the first stitch of the round, then back into the center of the last stitch. Weave in.
A Note for Left-Handed Makers
Left-handed crocheters will work the rounds in the opposite direction. The spiral may travel the opposite way, and this is perfectly balanced and beautiful. Keep the closure centered at the front and attach straps symmetrically.
Base and Body Instructions
Work firmly throughout this section. Use stitch markers at the two short ends of the oval base. Join each round with a slip stitch to the first stitch, then chain 1. The chain 1 does not count as a stitch.
Round 1: Ch 17. 2 sc in 2nd ch from hook, sc in next 14 ch, 4 sc in last ch; working along the other side of the chain, sc in next 14 ch, 2 sc in same ch as the first 2 sc. Join. (36 sc)
Round 2: Ch 1. 2 sc in each of first 2 sts, sc in next 14 sts, 2 sc in each of next 4 sts, sc in next 14 sts, 2 sc in each of last 2 sts. Join. (44 sc)
Round 3: Ch 1. [Sc in next st, 2 sc in next st] 2 times, sc in next 14 sts, [sc in next st, 2 sc in next st] 4 times, sc in next 14 sts, [sc in next st, 2 sc in next st] 2 times. Join. (52 sc)
Round 4: Ch 1. Working BLO, sc in each st around. Join. (52 sc)
Rounds 5-8: Ch 1, ssc in each st around. Join. (52 ssc)
Round 9: Ch 1, sc in each st around through both loops. Join. This makes the lower band. (52 sc)
Rounds 10-20: Ch 1, ssc in each st around. Join. (52 ssc each round)
Round 21: Ch 1, sc in each st around through both loops. Join. This makes the upper band. (52 sc)
Rounds 22-27: Ch 1, ssc in each st around. Join. (52 ssc each round)
Round 28: Ch 1, reverse sc or firm sl st in each st around. Join invisibly. (52 sts)
Progress point: Your body should measure approximately 10.5 inches (27 cm) tall from base edge to top rim and about 26 inches (66 cm) around the top.
Optional structure: Whipstitch plastic canvas to the inside of the base before lining for extra stability.
Front Pocket Instructions
Row 1: Ch 17. Sc in 2nd ch from hook and in each ch across. Turn. (16 sc)
Rows 2-9: Ch 1, ssc in each st across. Turn. (16 ssc each row)
Edging: Ch 1, work 16 sc across top, 9 sc down first side, 16 sc across bottom, and 9 sc up second side. Join invisibly. (50 sc)
Center the pocket on the front of your backpack, with the lower edge just above the base curve. Sew the sides and bottom only, leaving the top open. Add a surface slip stitch line across the pocket top if desired for extra detail.
Spiral Flap Instructions
This is where the magic happens! The flap works in continuous rounds without joining.
Round 1: Make a magic ring, ch 1, 6 sc in ring. Do not turn. (6 sc)
Round 2: 2 sc in each st around. (12 sc)
Round 3: [Sc in next st, 2 sc in next st] 6 times. (18 sc)
Round 4: [Sc in next 2 sts, 2 sc in next st] 6 times. (24 sc)
Round 5: [Sc in next 3 sts, 2 sc in next st] 6 times. (30 sc)
Round 6: [Sc in next 4 sts, 2 sc in next st] 6 times. (36 sc)
Round 7: [Sc in next 5 sts, 2 sc in next st] 6 times. (42 sc)
Round 8: [Sc in next 6 sts, 2 sc in next st] 6 times. (48 sc)
Round 9: [Sc in next 7 sts, 2 sc in next st] 6 times. (54 sc)
Round 10: [Sc in next 8 sts, 2 sc in next st] 6 times. (60 sc)
Round 11: Sc evenly around, easing the circle smooth. Join invisibly. (60 sc)
Spiral ridge: Surface slip stitch from the center outward, following the spaces between rounds. Work 6 to 7 graceful turns and finish near the lower right edge. Fasten off neatly.
Progress point: Your flap should measure approximately 8.75 to 9.25 inches (22 to 23.5 cm) across after gentle blocking. Mark the top 20 stitches for attachment to the back rim.
Straps, Handle, and Tassel
Back Straps (Make 2)
Row 1: Ch 57. Sc in 2nd ch from hook and in each ch across. Turn. (56 sc)
Row 2: Ch 1, sc in each st across. Turn. (56 sc)
Row 3: Sl st loosely in each st across. Fasten off, leaving tails for sewing. (56 sl sts)
Top Handle
Row 1: Ch 22. Sc in 2nd ch from hook and in each ch across. Turn. (21 sc)
Rows 2-3: Ch 1, sc in each st across. Turn. (21 sc each row)
Edging: Sl st evenly around handle. Fasten off. (approximately 48 sl sts)
Tassel
Cut 16 strands, each 14 inches (36 cm) long. Fold together, tie 1 inch (2.5 cm) below fold, wrap 10 to 12 times, knot firmly, and trim ends even. Attach to the lower right edge of the flap with a short crocheted cord or split ring.
Closure
Install the turn-lock or magnetic snap so the flap sits centered over the front pocket. Reinforce the inside of the fabric with a small patch of lining fabric or felt before crimping hardware. This step is important for durability!
Assembly Instructions
1. Block the body lightly by filling it with towels and steaming from a safe distance. Let dry fully before moving on.
2. Sew the pocket to the lower front. Keep the top open and use small, firm stitches along the sides and bottom.
3. Attach the flap by centering the marked 20 top stitches along the back top rim. Sew through both thicknesses twice for strength.
4. Sew the top handle to the back rim, placing each end approximately 1.5 inches (4 cm) from center.
5. Attach D-rings at the upper back corners and lower side corners. Sew straps to the rings, or sew strap ends directly through the bag fabric and reinforce with a square of lining.
6. Add tassel, closure, and lining. Weave in all ends and trim only after tug-testing seams.
Placement guide: The pocket sits on the lower front third, the flap covers the top two-thirds, the tassel hangs from the right lower flap edge, and the straps attach vertically on the back.
Durability tip: Bag hardware takes stress. Sew through a ring, through crochet fabric, and back through a hidden fabric backing at least 4 times for security.
Customization Options
Size: Add or subtract base rounds in multiples of 8 stitches. Then keep the body stitch count even. For a wider bag, start with more chains; for a deeper bag, add more base rounds.
Height: Add or remove body rounds before the top edging. Every 2 rounds changes height by approximately 0.9 inches (2.2 cm).
Strap length: Add or subtract chains before Row 1. Each 2 chains changes length by approximately 1 inch (2.5 cm).
Flap size: Stop at Round 9 for a smaller flap or add one more increase round for a bolder flap, then re-center the closure.
Troubleshooting Common Issues
Body leans or twists: Loosen your ssc tension and join in the first true stitch, not the join.
Base cups: Use a larger hook for the base or block flat before body rounds.
Base ruffles: Use a smaller hook or work Round 3 more firmly.
Flap waves: Remove the edging round or block flat under a towel.
Straps stretch: Use a smaller hook, sew in ribbon backing, or shorten by 4 to 6 chains.
Care Instructions
Spot clean with cool water and mild soap. Reshape while damp and dry flat. Remove detachable tassel or hardware charms before cleaning. Do not hang the wet bag by its straps.
Final Thoughts on This Crochet Backpack Pattern
This Dusty Rose Spiral Flap Backpack crochet pattern combines beautiful texture with practical design. The split single crochet creates a fabric sturdy enough to hold your essentials, while the spiral flap adds that handmade artisan touch that makes people ask, "Did you make that yourself?"
Take your time with the assembly. This is where the backpack really comes together, and careful stitching makes all the difference in how professional your finished piece looks.
I hope you love making this backpack as much as I loved designing it! If you create one, I would absolutely love to see it. Save this pattern to your Pinterest boards so you can find it when you are ready to start, and please leave a comment below if you give it a try. Seeing your finished projects truly makes my day!
Want a Quick & Easy Printable Version?
Get a clean, beautifully formatted PDF of this pattern — easy to follow step by step, ready to print or save on any device. No scrolling, no distractions, just the pattern.
Get the Printable PDF →You Might Also Like
- Coral Sunset Gradient Chain Purse Free Crochet Pattern
- Ocean Wave Candy Bolster Pillow Free Crochet Pattern
- Boho Rainbow Granny Square Tote Free Crochet Pattern
- Mustard Yellow Duck Toilet Paper Cozy Free Crochet Pattern