
Meet the Seafoam Fan Lace Vest, a design with the soul of vintage seaside elegance and the breezy confidence of a modern wardrobe staple. The soft seafoam green paired with delicate ivory scalloped edging gives this piece a romantic, almost mermaid-like quality. Each layered fan motif cascades down the body like gentle waves, creating movement and texture that catches the light beautifully.
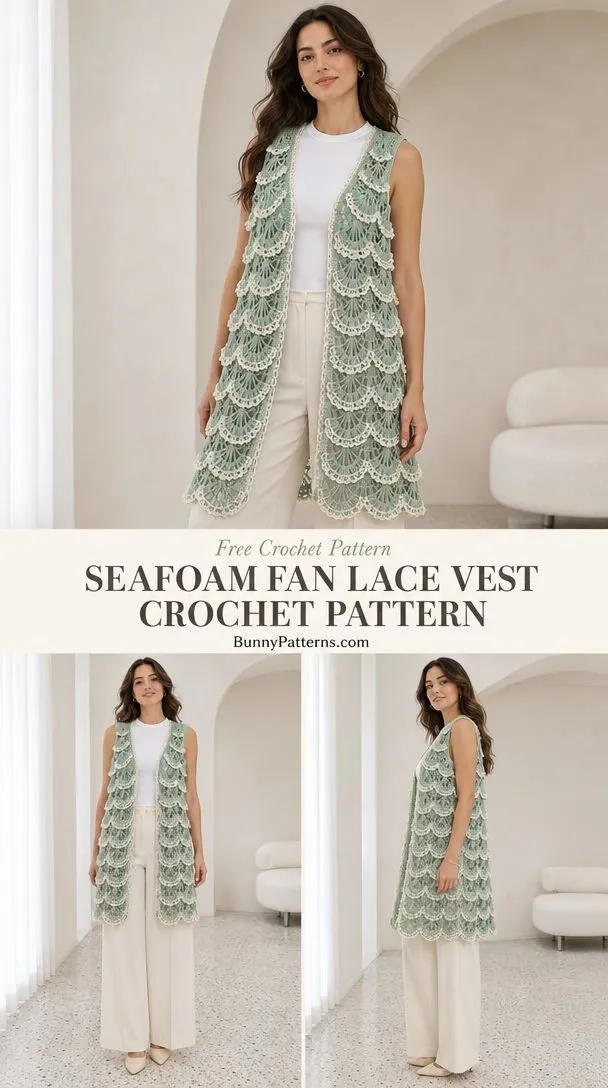
This open-front sleeveless vest combines a filet mesh foundation with stunning fan lace overlays. The result is an airy, feminine layering piece that works over a simple tee or a flowing dress. The construction is straightforward: you’ll work a back panel and two mirrored front panels from the hem up, shape the neckline, seam everything together, then add those gorgeous fan overlays and finishing borders.
Whether you’re drawn to the coastal color palette or the elegant drape of lace, this vest is a rewarding project for confident crocheters ready to try something special. The filet mesh base works up quickly, and the individual fan motifs are small and portable. Let’s dive into everything you need to bring this beautiful design to life.
At a Glance: What You’re Making
This pattern creates an open-front sleeveless fan-lace vest with a filet foundation. It fits an intended bust of 88 to 94 cm, with a finished bust measurement (total panel width) of 100 cm. The finished shoulder-to-hem length is 72 cm.
The vest is worked as three separate pieces: one back panel and two shaped front panels. These are seamed at the shoulders and sides, leaving openings for the armholes. The fan overlays are made individually and sewn onto the mesh foundation in overlapping tiers. Finally, borders are added around the armholes, neckline, front opening, and hem.
Skill level: Intermediate. You should be comfortable with filet mesh, working flat panels, basic garment shaping, and seaming. The fan motifs are simple, but placement and attachment require attention to detail.
Materials and Tools
Yarn:
- Main color (seafoam): Smooth DK weight cotton, approximately 750 g / 1650 m (220 m per 100 g)
- Accent color (ivory): 120 g / 264 m
If you prefer a single color, combine the totals. These amounts include a 15% allowance for peace of mind.
Hooks:
- 3.5 mm hook for mesh and edgings
- 3 mm hook for motifs and fan overlays
Adjust your mesh hook size as needed to achieve gauge.
Additional supplies:
- Tapestry needle
- Removable stitch markers
- Tape measure
- Rust-resistant blocking pins
- Scissors
No beads, wire, or buttons are required for this design.
Gauge
Getting gauge right matters for garment fit. Here’s what you’re aiming for:
Blocked mesh: 18 underlying stitch positions and 10 rows = 10 x 10 cm. This is equivalent to 6 square cells and 10 rows. A cell consists of chain 2 (ch 2) plus the next double crochet (dc). Mesh width is measured excluding the initial edge dc.
How to make a gauge swatch:
Chain 41. Work a dc in the eighth chain from hook, then [ch 2, skip 2 ch, dc in next ch] 11 times. This gives you 12 cells (including the initial skipped-chain cell) and 13 dc. Continue working mesh rows until you have 16 rows total. Wash and dry your swatch flat. Measure the central 6 cells and 10 rows. If your measurements don’t match, change your hook size and try again.
Abbreviations and Special Stitches
This pattern uses US crochet terminology.
- ch = chain
- sl st = slip stitch
- sc = single crochet
- hdc = half double crochet
- dc = double crochet (yarn over, insert hook, pull up a loop, yarn over and pull through 2 loops twice)
- tr = treble crochet
- st(s) = stitch(es)
- RS = right side
- WS = wrong side
- rep = repeat
- sc2tog = single crochet 2 together (a decrease stitch: yarn over and draw up a loop in each of 2 stitches, yarn over and draw through all 3 loops)
Special Stitches:
Mesh row: Ch 3 (counts as first dc), turn. [Ch 2, dc in next dc] across. Each cell contains one ch-2 gap bounded by dc posts. Work the last dc in the top of the turning ch-3. The turning chain counts as an edge dc, never an extra cell.
Picot: Ch 3, sl st in first ch.
Shell: 5 dc in one base stitch.
Magic ring: An adjustable yarn loop. Work your stitches around the loop, pull the tail to close it, then secure the tail after joining.
Pattern Notes
Read through the entire pattern before you begin. Row 1 is the right side (RS). Work flat unless instructed otherwise. Brackets indicate sections to be repeated only the stated number of times. All row numbers include the foundation row. Stitch counts describe cells and dc posts separately; chain spaces are not counted as dc.
This is a single-size pattern, not graded for multiple sizes. Choose a fit with 6 to 12 cm ease at the bust. To adjust length, add or remove plain mesh rows before the armhole shaping. Each row adds approximately 1 cm. If you change the length, recalculate your yarn needs.
Because this is an open lace design, wear it over an opaque layer.
Construction Overview
You’ll work the back and two mirrored fronts from the hem upward. The front neck edges are tapered with decreases. After seaming the shoulders and sides, you’ll add the fan overlays in tiers, then finish with borders. All dimensions given exclude stretch while worn.
- Back: 50 cm wide
- Fronts: 25 cm wide each
- Length: 72 cm
- Armhole depth: 22 cm
Instructions
Back Panel
Foundation: Ch 95.
Row 1: Dc in eighth ch from hook. [Ch 2, skip 2 ch, dc in next ch] 29 times. (30 cells, 31 dc)
Rows 2 through 68: Work mesh row. Fasten off after the final row. (30 cells, 31 dc per row)
Front Panels (Make 2 Mirror Images)
Foundation: Ch 50.
Row 1: Dc in eighth ch from hook. [Ch 2, skip 2 ch, dc in next ch] 14 times. (15 cells, 16 dc)
Rows 2 through 54: Work mesh row. Mark one long side as the neck edge. (15 cells, 16 dc per row)
Neck Shaping (Rows 55 through 68, worked as local rows 1 through 14):
Decrease 1 cell at the neck edge on odd-numbered local rows 1, 3, 5, 7, 9, 11, and 13. Work even on local rows 2, 4, 6, 8, 10, 12, and 14.
Cell counts for local rows 1 through 14: 14, 14, 13, 13, 12, 12, 11, 11, 10, 10, 9, 9, 8, 8. Each row has the cell count plus 1 dc.
How to decrease at the beginning of a row: Turn, slip stitch into the ch-2 gap and the next dc, ch 3, then continue the mesh row from that dc.
How to decrease at the end of a row: Finish at the penultimate dc, leaving the final cell unworked.
Keep the outer (armhole) edge straight throughout. Mirror the neck shaping on the second front so they are opposites. Fasten off. (8 cells, 9 dc each shoulder)
Fan Overlays (Make Individually)
Use the 3 mm hook and main color yarn.
Foundation: Ch 5, join with sl st to form a ring.
Row 1: Ch 3 (counts as dc), 8 dc into ring, turn. (9 dc)
Row 2: Ch 3, 2 dc in each of the next 8 dc, turn. (17 dc)
Row 3: Ch 1, sc in first dc, [ch 3, sc in next dc] 16 times. Fasten off. (17 sc, 16 ch-3 loops)
For every second horizontal tier, use the accent (ivory) yarn for Row 3. This creates the beautiful two-tone scalloped effect.
Block each fan to 8 cm wide by 5 cm tall.
Placement: You’ll have 6 columns of fans across the back and 3 columns across each front below the neck shaping. Place tier centers every 4 mesh rows, with the upper fan overlapping the lower fan by 1 cm. For tiers above the neck taper, omit any fan that would cross the neckline or armhole.
Count and make your fans against the assembled vest. The typical total is 180 to 240 fans, depending on your exact layout.
Assembly
You’ll need: Main-color yarn, 3.5 mm hook for slip-stitch joins, or tapestry needle for mattress stitch.
Shoulder Seams (Seam 1):
Lay the front and back panels with right sides together. Join the outer 8 cells of each shoulder using slip stitch: 1 sl st per dc and 2 sl sts per ch-2 gap. Leave the center 14 back cells unjoined for the neck opening. (25 joining positions each shoulder)
Side Seams (Seam 2):
Using mattress stitch, sew each side from the hem upward through Row 46, working 1 pass per row edge. Leave the top 22 rows open for the armholes. (46 row-edge pairs each side)
Checkpoint:
Both shoulders should lie flat. Side seams should match row for row. Each armhole should measure 22 cm deep. The flat back width is 50 cm, and each front is 25 cm below the neckline.
Edgings and Details
You’ll need: Seafoam yarn and 3.5 mm hook for borders. Ivory yarn and 3 mm hook for motifs or fans. Tapestry needle.
Armhole and Neckline Border
Border Round 1: With RS facing, work sc evenly around each armhole and around the neckline/front opening. Use this spacing: 2 sc per dc row edge, 1 sc per dc post, 2 sc per ch-2 gap. Add 2 sc at each outer corner. Use sc2tog at sharp inward corners. Join with sl st. (Record your actual count; it will depend on your edges)
Border Round 2: Ch 1, sc in each sc, join. Keep your tension loose enough for the border to lie flat. (Same count as Round 1)
Hem Edging
Hem Foundation: Work sc across the lower edge(s). Use 1 sc per dc and 2 sc per ch-2 gap. Before seaming, the vest totals: back 91 sc, each front 46 sc. Adjust by at most 3 evenly spaced increases or sc2tog decreases to reach a multiple of 6. (Vest target: 180 sc combined after seams)
Hem Row/Round 1: Ch 1. [Sc in next 3 sc, picot, sc in next 3 sc] across or around. (180 sc for vest, 30 picots)
Hem Row/Round 2: Ch 1, sc in each sc, passing behind the picots. Join if working in the round. Fasten off. (180 sc)
Block the lower edging to 4 cm depth. If the relaxed depth differs from your target, correct the final length by changing the number of plain mesh rows before attaching the edging.
Attaching the Fan Overlays
Overlay Pass 1: Pin fans in overlapping tiers with the curved edge facing downward. Sew only the straight top edge and both top corners, leaving the lower scallop raised. Join adjoining fan corners with ch 3 and sl st. (One top seam per fan; no change to mesh count)
Checkpoint:
Edges lie flat with no pulling. Embellishments are securely sewn. The front opening remains usable. Fan overlap is 1 cm, and no fan obstructs an armhole.
Finishing
You’ll need: Seafoam and ivory yarn tails, tapestry needle, pins, towel and cool water. Keep your 3.5 mm hook handy for any repairs.
Pass 1: Weave each tail through at least 5 cm of dense stitches in two directions. Do not thread across an open mesh gap.
Pass 2: Soak briefly in cool water. Support the garment when lifting. Press gently in a towel, lay flat, and pin to measurements. Keep front and back rows aligned.
Pass 3: Shape motifs and hem gently. Allow to dry fully. Remove pins and trim tails.
Final Checkpoint:
Finished length should be 72 cm. Bust/panel circumference should be 100 cm. Back width is 50 cm, and fronts are 25 cm each below the taper. Record your actual gauge and any changes for a future make.
Care and Safety
Follow your yarn label for care instructions. Hand wash in cool water with mild detergent. Reshape and dry flat. Do not hang while wet. Avoid hot ironing.
This adult garment is not intended for children. The long loops on the fan overlays can snag. Make sure every motif is securely attached, and keep loose yarn away from babies and pets. No detachable small parts are used in this design.
A Few Tips Before You Begin
Take your time with the fans. Making 180 to 240 small motifs might sound tedious, but they work up quickly once you get into a rhythm. Consider making them while watching a show or listening to a podcast. Keep them organized by tier as you go.
Pin before you sew. The overlapping layout is what gives this vest its stunning dimensional look. Take the time to pin every fan in place before you start attaching them. Step back and check the spacing from a distance.
Block generously. The filet mesh and fan motifs both benefit from wet blocking. This opens up the lacework and helps everything lie flat and even.
Trust the PDF measurements. This pattern includes built-in ease. If you’re between sizes or on the edge of the size range, make a swatch and trust the numbers.
Wrapping Up
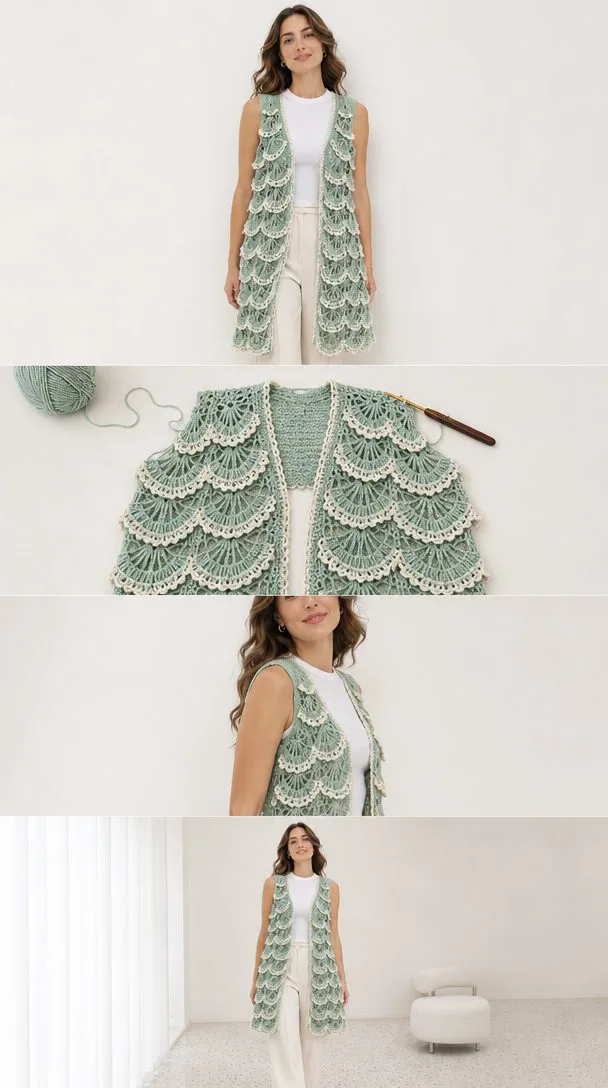
The Seafoam Fan Lace Vest is a truly special project. The combination of airy filet mesh and cascading fan motifs creates a garment that looks intricate but is built on simple, repeatable elements. The seafoam and ivory palette is timeless, and the open-front silhouette makes this vest versatile enough for warm evenings or layered over a cozy top.
You’ll love the meditative rhythm of making the fan motifs and the satisfaction of seeing them come together on the finished vest. This is the kind of piece that gets compliments every time you wear it.
Thank you so much for choosing this pattern. If you make the Seafoam Fan Lace Vest, I would love to see it! Share your photos on Instagram or Facebook and tag your work so fellow crocheters can admire your creation.
If this pattern caught your eye, save it to your Pinterest boards so you can find it when you’re ready to cast on. And if you do make it, drop a comment below. I’d love to hear how it turned out for you!
You Might Also Like
- Blueberry Dream Cropped Cardigan Free Crochet Pattern
- Blush Pink Ruffle Top & Strawberry Shorts Pattern
- Lavender Meadow Vest Crochet Pattern
- Oatmeal Basketweave Dress Crochet Pattern