
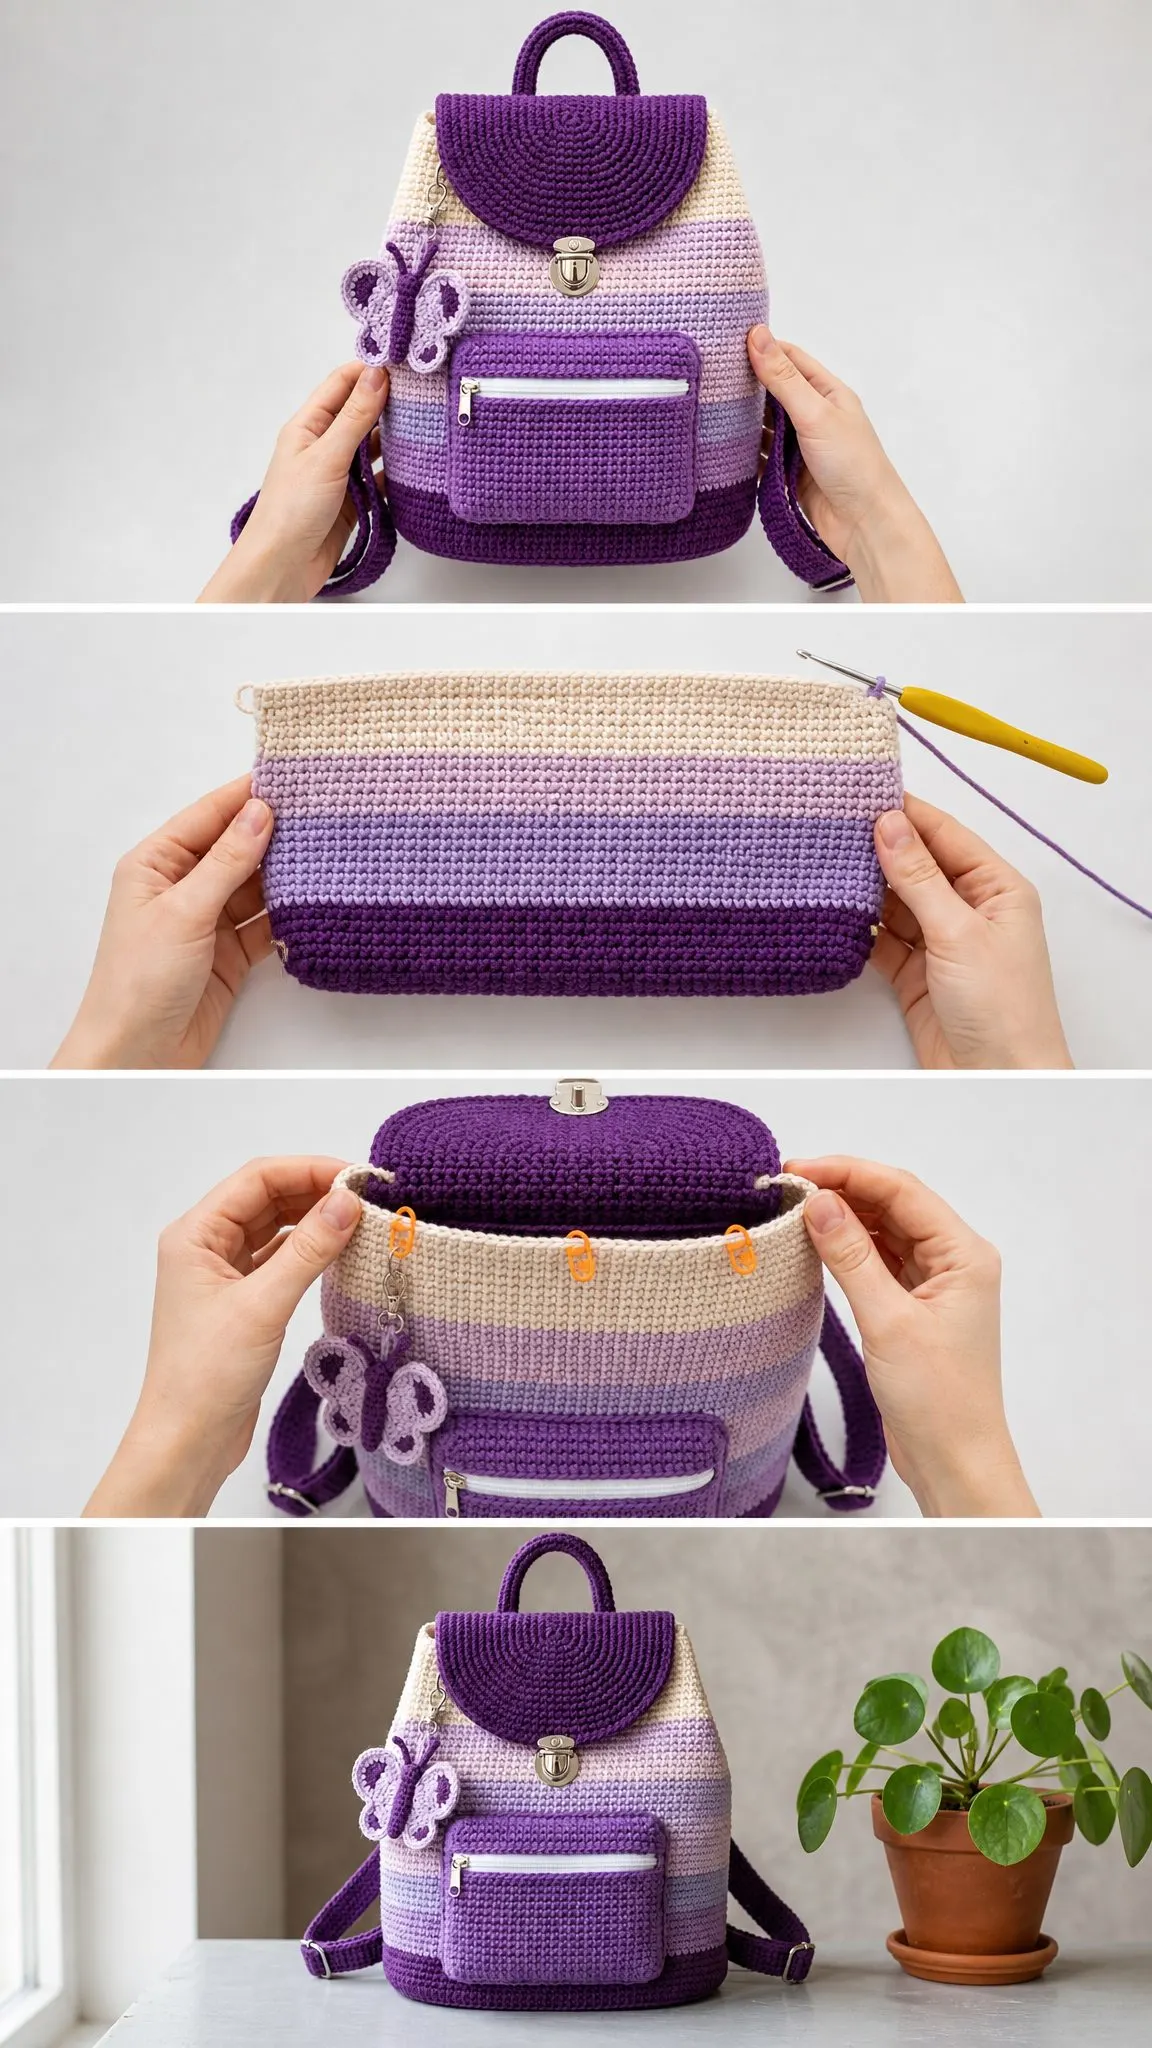
This mini backpack uses single crochet, a handful of hardware pieces, and four shades of purple. The construction is straightforward: oval base, body worked in continuous rounds, flat flap, zippered pocket, and adjustable straps.
Get the Ad-Free PDF Pattern
You can find the free pattern below, or you can purchase the ad-free printable PDF from my shop.
Get the Printable PDF →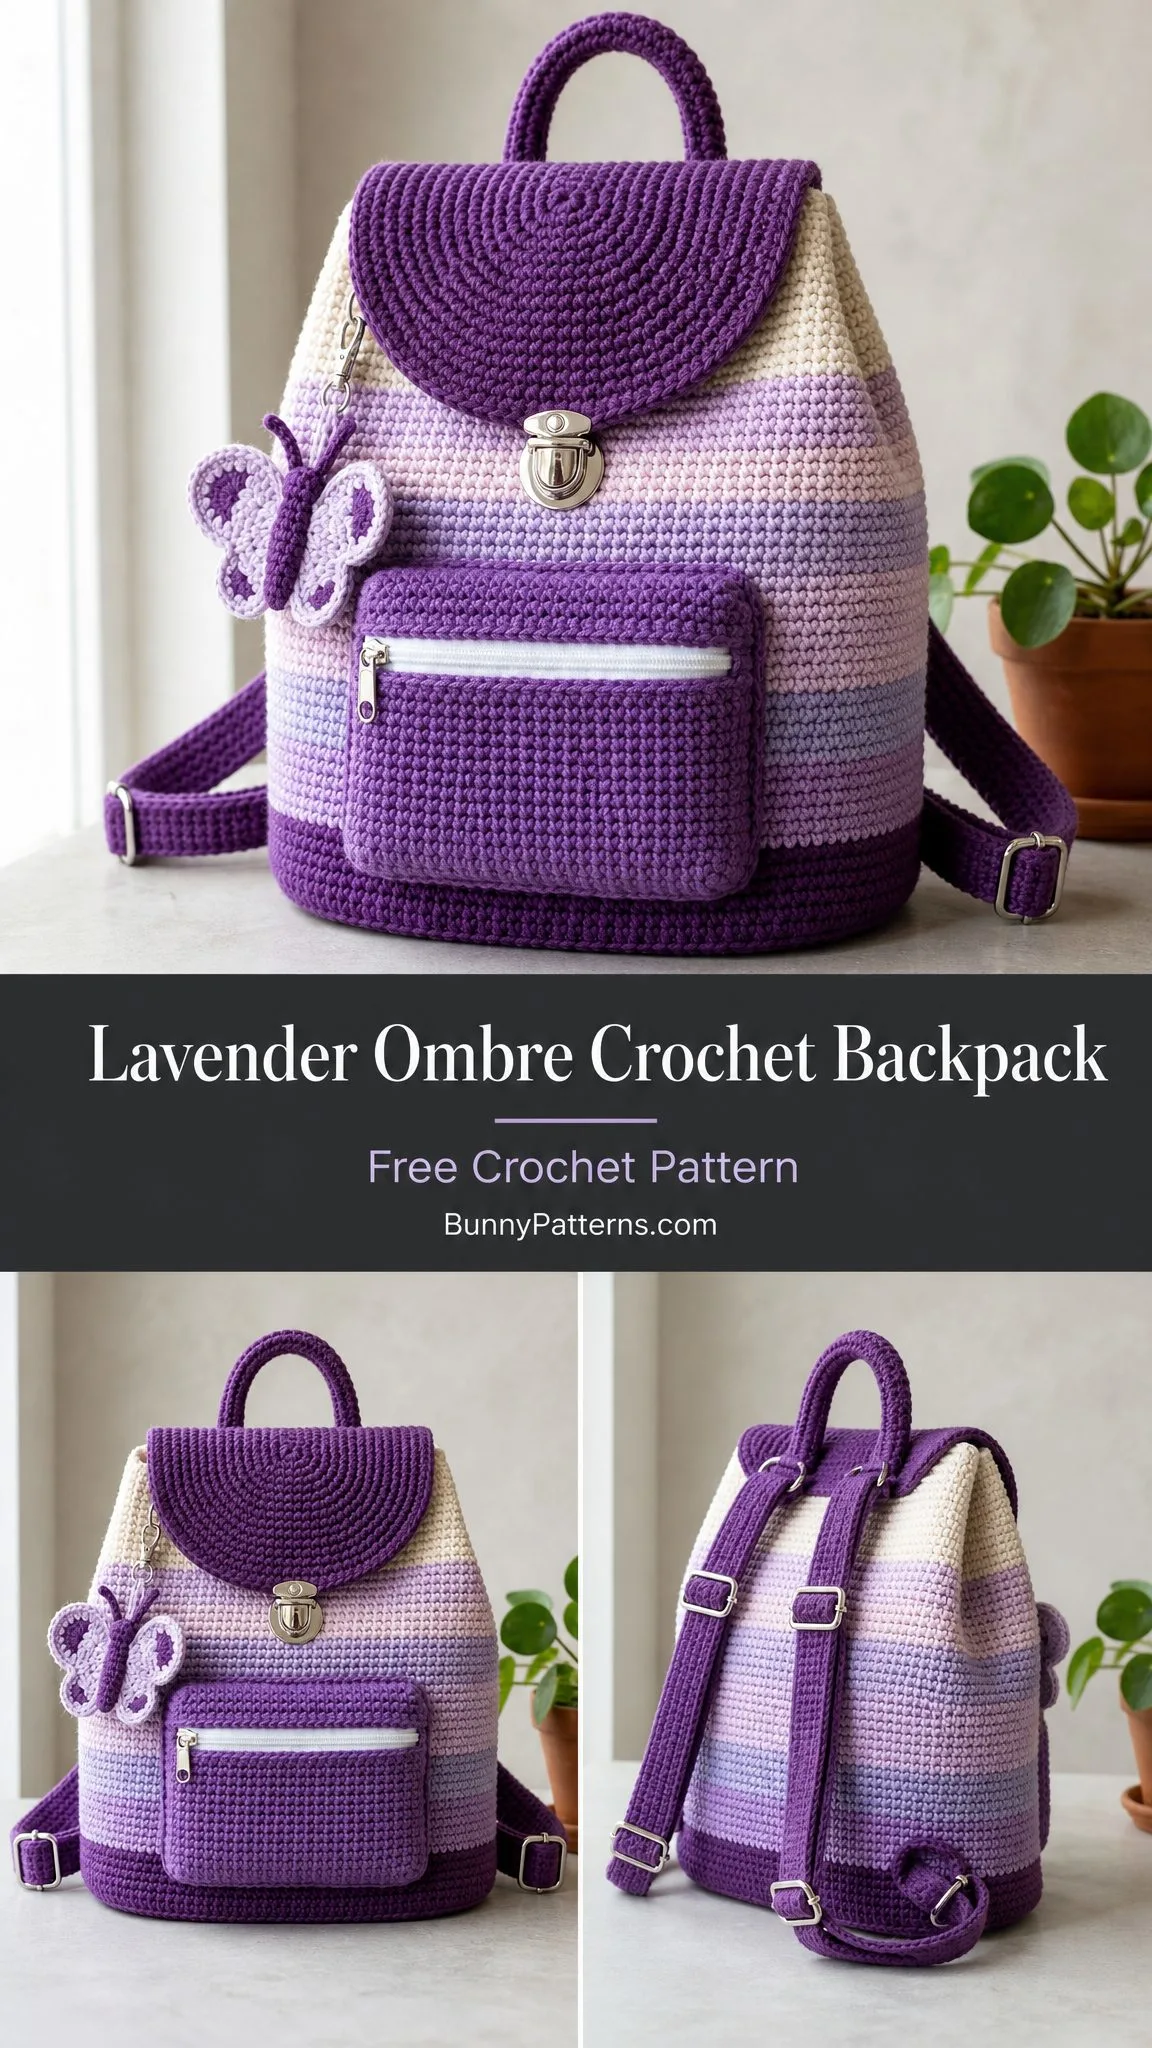
If you can single crochet in the round and sew a zipper, you can make this bag. The ombre stripes happen automatically as you change colors every few rounds.
The butterfly charm is optional but adds a sweet finishing touch. Let me walk you through the whole project.
What You Are Making
This is a structured mini backpack measuring approximately 8.5 inches wide by 10 inches tall by 3.5 inches deep. It features a rounded flap with a tuck lock closure, a front zippered pocket, a top drawstring, a carry handle, and two adjustable shoulder straps.
The lavender ombre effect comes from working horizontal stripes in plum, medium lavender, pale lavender, and cream. The color transitions create a gradient from dark at the bottom to light near the top, then back to plum at the very edge.
Skill level: Intermediate. You will work an oval base with increases, continuous rounds for the body, shaped flat pieces for the flap and pocket, and you will attach hardware including a zipper, D-rings, strap sliders, and a clasp.
Time estimate: 12 to 16 relaxed hours, plus blocking and drying time.
Materials You Will Need
Yarn
You need worsted weight (medium 4) cotton or cotton-acrylic blend yarn in four colors. The total yardage is approximately 760 yards or 695 meters.
| Color | Yardage | Meters |
|---|---|---|
| Plum | 260 yd | 238 m |
| Medium lavender | 240 yd | 219 m |
| Pale lavender | 170 yd | 155 m |
| Cream | 90 yd | 82 m |
Recommended yarns: Lily Sugar’n Cream Solids, Paintbox Yarns Cotton Aran, or Lion Brand 24/7 Cotton. Choose a firm, smooth yarn that holds its shape well. Avoid very soft yarns unless you plan to add a canvas lining, because the backpack needs structure to stand upright.
Hook
US G/6 (4.0 mm) or the size needed to achieve gauge. You may also want a US F/5 (3.75 mm) for tighter work on the straps and butterfly charm.
Notions
Gauge
Getting gauge matters for this project because the bag needs to hold its shape and the hardware needs to fit properly.
| Measurement | Result |
|---|---|
| 16 sc x 18 rounds | 4 inch (10 cm) square in worked-round single crochet |
| Pocket gauge | 30 sc = 7.5 inches (19 cm) wide |
| Checkpoint after body Round 43 | 10 inches (25.5 cm) tall from base bottom |
If your gauge is off, adjust your hook size. Too loose means a floppy bag. Too tight means a stiff bag that is hard to work.
Abbreviations and Stitch Definitions
Before we begin, let me define every abbreviation you will see in this pattern.
UK crocheters: This pattern uses US terms. US sc equals UK dc. US hdc equals UK htr. US dc equals UK tr.
Pattern Notes
Use a stitch marker for the first stitch of each continuous round. Move it up as you work. The chain 1 at the beginning of rows does not count as a stitch. Only join rounds where the instructions specifically say to join.
Keep your body fabric firm. A bag that feels slightly dense at first will hold its shape much better after use.
Left-handed makers: Work the same instructions in your natural direction. Your spiral seam and flap overlap will mirror the photos. Place the pocket and charm after trying the bag on to see which side feels right for you.
The Backpack Body
Oval Base (Plum)
The base is worked in continuous rounds with increases at the curved ends to create an oval shape.
Round 1: Chain 23. Single crochet in the 2nd chain from the hook and in the next 20 chains. Work 3 single crochet in the last chain. Now working along the underside of the foundation chain, single crochet in the next 20 chains, then work 2 single crochet in the first chain. (46 sc)
Round 2: Increase in the first stitch, single crochet 20, increase in the next 3 stitches, single crochet 20, increase in the last 2 stitches. (52 sc)
Round 3: (Single crochet 1, increase), single crochet 20, (single crochet 1, increase) 3 times, single crochet 20, (single crochet 1, increase) 2 times. (58 sc)
Round 4: (Single crochet 2, increase), single crochet 20, (single crochet 2, increase) 3 times, single crochet 20, (single crochet 2, increase) 2 times. (64 sc)
Round 5: (Single crochet 3, increase), single crochet 20, (single crochet 3, increase) 3 times, single crochet 20, (single crochet 3, increase) 2 times. (70 sc)
Round 6: (Single crochet 4, increase), single crochet 20, (single crochet 4, increase) 3 times, single crochet 20, (single crochet 4, increase) 2 times. (76 sc)
Base checkpoint: Your oval should measure approximately 8.25 x 3.5 inches (21 x 9 cm) after Round 6.
Body Rounds
Round 7 is the turning ridge that helps the backpack stand upright. You will work into the back loops only for this round. Keep 76 stitches throughout the body unless a round says otherwise.
Round 7 (Plum): Single crochet in the back loop only around. (76 sc)
Rounds 8 through 12 (Plum): Single crochet around. (76 sc each round)
Rounds 13 through 20 (Medium lavender): Single crochet around. (76 sc each round)
Rounds 21 through 26 (Pale lavender): Single crochet around. (76 sc each round)
Rounds 27 through 32 (Medium lavender): Single crochet around. (76 sc each round)
Rounds 33 through 38 (Cream): Single crochet around. (76 sc each round)
Round 39 (Cream): Single crochet around. Mark the center front 30 stitches for pocket placement. (76 sc)
Round 40 (Eyelet round): Single crochet 5, chain 1, skip 1. Repeat from to 12 times, single crochet 4. (76 total positions)
Rounds 41 through 42 (Cream): Single crochet in each single crochet and each chain-1 space around. (76 sc each round)
Round 43 (Plum): Single crochet around, slip stitch to the first stitch, invisible finish. (76 sc)
Body checkpoint: Your bag should measure approximately 19 inches (48 cm) around and 10 inches (25.5 cm) tall from the base bottom. The eyelets should sit about 0.75 inches (2 cm) below the top edge.
Top Draw Cord
With plum yarn, chain 95. Slip stitch in each chain across. Weave this cord through the Round 40 eyelets starting from the center front, bringing both ends to the front. Knot the ends or add small beads. The flap will cover the cord when the bag is closed.
Optional Structure
For extra stability, cut plastic canvas or heavy interfacing to fit the oval base. Insert it before adding lining, or tack it inside the bottom with a few stitches.
Flap and Front Pocket
Rounded Flap (Plum)
The flap is worked flat from the straight top edge downward. Chain 1 to turn at the beginning of each row. The chain 1 does not count as a stitch.
Row 1: Chain 35. Single crochet in the 2nd chain from the hook and across. (34 sc)
Rows 2 through 5: Single crochet across. (34 sc)
Row 6: Sc2tog, single crochet 30, sc2tog. (32 sc)
Row 7: Sc2tog, single crochet 28, sc2tog. (30 sc)
Row 8: Sc2tog, single crochet 26, sc2tog. (28 sc)
Row 9: Sc2tog, single crochet 24, sc2tog. (26 sc)
Row 10: Sc2tog, single crochet 22, sc2tog. (24 sc)
Row 11: Sc2tog, single crochet 20, sc2tog. (22 sc)
Row 12: Sc2tog, single crochet 18, sc2tog. (20 sc)
Row 13: Sc2tog, single crochet 16, sc2tog. (18 sc)
Row 14: Sc2tog, single crochet 14, sc2tog. (16 sc)
Row 15: Sc2tog, single crochet 12, sc2tog. (14 sc)
Border: Single crochet evenly around the sides and curved edge, working 2 single crochet in each lower corner. Invisible finish.
Sew the straight top edge to the back of the bag over Rounds 39 through 43, centered over 34 stitches. Add one half of your clasp at the lower center of the flap.
Front Zip Pocket (Plum)
Chain 31.
Row 1: Single crochet in the 2nd chain from the hook and across. (30 sc)
Rows 2 through 16: Single crochet across. (30 sc)
Border: Single crochet around the entire piece, placing 2 single crochet in each corner.
Sew the zipper to the top edge using doubled sewing thread. Pin the pocket centered on the front of the bag over Rounds 11 through 25, then sew the sides and bottom only (leave the top open for the zipper).
Pocket size: Approximately 7.5 x 3.5 inches (19 x 9 cm).
Handle, Straps, and Assembly
Top Handle (Plum)
Chain 45.
Row 1: Single crochet in the 2nd chain from the hook and across. (44 sc)
Rows 2 through 4: Single crochet across. (44 sc)
Fold the long edges toward the wrong side and whipstitch them together to form a padded tube. Sew the ends to the back top edge of the bag, spacing them 2.5 inches (6.5 cm) apart.
Finished handle arch: Approximately 5 inches (13 cm) tall.
Back Strap Tabs (Plum, make 4)
Chain 9.
Row 1: Single crochet in the 2nd chain from the hook and across. (8 sc)
Rows 2 through 6: Single crochet across. (8 sc)
Fold each tab through a D-ring or slider and sew securely to the back top and lower side positions of the bag.
Adjustable Straps (Plum, make 2)
Chain 86 for each strap.
Row 1: Single crochet in the 2nd chain from the hook and across. (85 sc)
Rows 2 through 4: Single crochet across. (85 sc)
Edge each long side with slip stitches for firmness. Feed the straps through the sliders and D-rings, then stitch the ends down firmly.
Finished adjustable range: Approximately 18 to 30 inches (46 to 76 cm).
Clasp and Flap Attachment
Close the top drawstring cord lightly. Fold the flap down and mark the clasp placement at center front, just above the pocket. Sew or install the second half of your clasp through a reinforced fabric patch on the inside of the backpack.
Seaming Strength Tips
Use doubled sewing thread for the zipper and clasp. For crocheted joins, sew through several strands without pulling so tightly that the fabric puckers. Reinforce strap anchor points with a square-and-X stitch pattern for durability.
Placement checkpoint: The pocket covers the lower center front. The flap’s lower edge overlaps the top of the pocket by about 0.75 inches (2 cm) when closed.
Butterfly Charm
This little charm uses pale lavender for the wings and plum for the body. Work with the smaller hook (3.75 mm) if you want a neat, firm charm.
Large Wings (make 2)
Chain 8.
Round 1: Single crochet in the 2nd chain from the hook, half double crochet 2, double crochet 2, half double crochet 1, 3 single crochet in the last chain. Working along the underside, half double crochet 1, double crochet 2, half double crochet 2, single crochet 1. Slip stitch to the first stitch. (17 sts)
Round 2: Chain 1, single crochet 2, half double crochet 3, 2 double crochet in each of the next 2 stitches, half double crochet 3, single crochet 7, slip stitch. Fasten off.
Small Wings (make 2)
Chain 6.
Round 1: Single crochet in the 2nd chain from the hook, half double crochet 1, double crochet 2, 3 single crochet in the last chain. Working along the underside, double crochet 2, half double crochet 1, single crochet 1. Slip stitch. (13 sts)
Round 2: Chain 1, single crochet 2, half double crochet 2, 2 double crochet in the next stitch, half double crochet 2, single crochet 6, slip stitch. Fasten off.
Body and Antennae
With plum yarn, chain 13. Slip stitch in the 2nd chain from the hook and the next 2 chains. Chain 3, slip stitch in the 2nd chain from the hook and the next chain for the first antenna. Slip stitch back into the body chain, then chain 3 and repeat for the second antenna. Slip stitch down the remaining body chain. Sew the body between the wings.
Attaching the Charm
Arrange the two large wings above the two small wings, slightly overlapping. Sew them to the body, then attach the finished butterfly to a small split ring or directly to the left front side of the flap seam. Add a short chain loop if you want the charm to dangle.
Customization Ideas
Size Adjustments
To widen the backpack, add chains to the base foundation in multiples of 2. Each 4 added chains increases the bag width by approximately 1 inch (2.5 cm). The oval formula stays the same: the straight single crochet sections increase by the same number you added to the chain.
To make the bag taller, add body rounds before Round 39. To make it shorter, remove rounds before the cream section.
Color Adjustments
For a softer ombre, work fewer rounds in plum and more rounds in pale lavender. For crisp stripes with clean color transitions, change color on the final yarn-over of the last stitch before the new round.
Troubleshooting Common Issues
Base cups upward: Your tension may be tight or your increases may be stacked too narrowly. Block the base flat and try loosening the first 6 rounds if you need to redo it.
Base ruffles: Your tension may be loose. Use the smaller hook for the base.
Body leans to one side: Move the stitch marker up every round and tug the spiral seam into place while blocking.
Pocket waves: Sew the zipper with small, even stitches and do not stretch the crochet fabric.
Straps stretch over time: Add a row of surface slip stitches down the center, or sew cotton twill tape to the back of each strap.
Blocking and Care
Blocking
Steam lightly or wet block without flattening the texture. Shape the base oval, stuff the bag with towels to hold its form, smooth the flap curve, and let everything dry completely before attaching hardware or lining.
Care
Spot clean when possible. If your yarn label allows machine washing, place the bag in a laundry bag, wash on cold with a gentle cycle, reshape while damp, and air dry flat. Remove or protect the hardware before washing when practical.
Final Thoughts on This Lavender Ombre Crochet Backpack Pattern
This project takes a bit of time, but every piece comes together logically. The oval base teaches you shaping. The body is meditative rounds of single crochet with color changes. The flap and pocket give you practice with flat shaping. And the hardware assembly introduces bag-making skills you can use on future projects.
I love how the ombre effect makes this backpack look far more complicated than it actually is. Four colors, one main stitch, and suddenly you have a bag that looks like it came from a boutique.
Thank you so much for choosing this pattern. I hope you enjoy every stitch.
If you make this backpack, I would absolutely love to see it. Save this pattern to your Pinterest boards so you can find it when you are ready to start, and please leave a comment below to share your finished project or ask any questions along the way. Happy crocheting!
Want a Quick & Easy Printable Version?
Get a clean, beautifully formatted PDF of this pattern — easy to follow step by step, ready to print or save on any device. No scrolling, no distractions, just the pattern.
Get the Printable PDF →You Might Also Like
- Dusty Rose Cable Cuff Slipper Boots Free Crochet Pattern
- Watermelon Slice Couple Amigurumi Free Crochet Pattern
- Lavender Purple Dreamy Peplum Crochet Top Pattern
- Coral Sunset Gradient Chain Purse Free Crochet Pattern