
A newborn needs warmth, softness, and security. This star-shaped baby bunting delivers all three while looking absolutely adorable. The ocean-inspired color palette in navy, teal, seafoam, and white radiates outward like the rays of a starfish, making it a perfect gift for beach-loving families or anyone who appreciates creative baby wear.
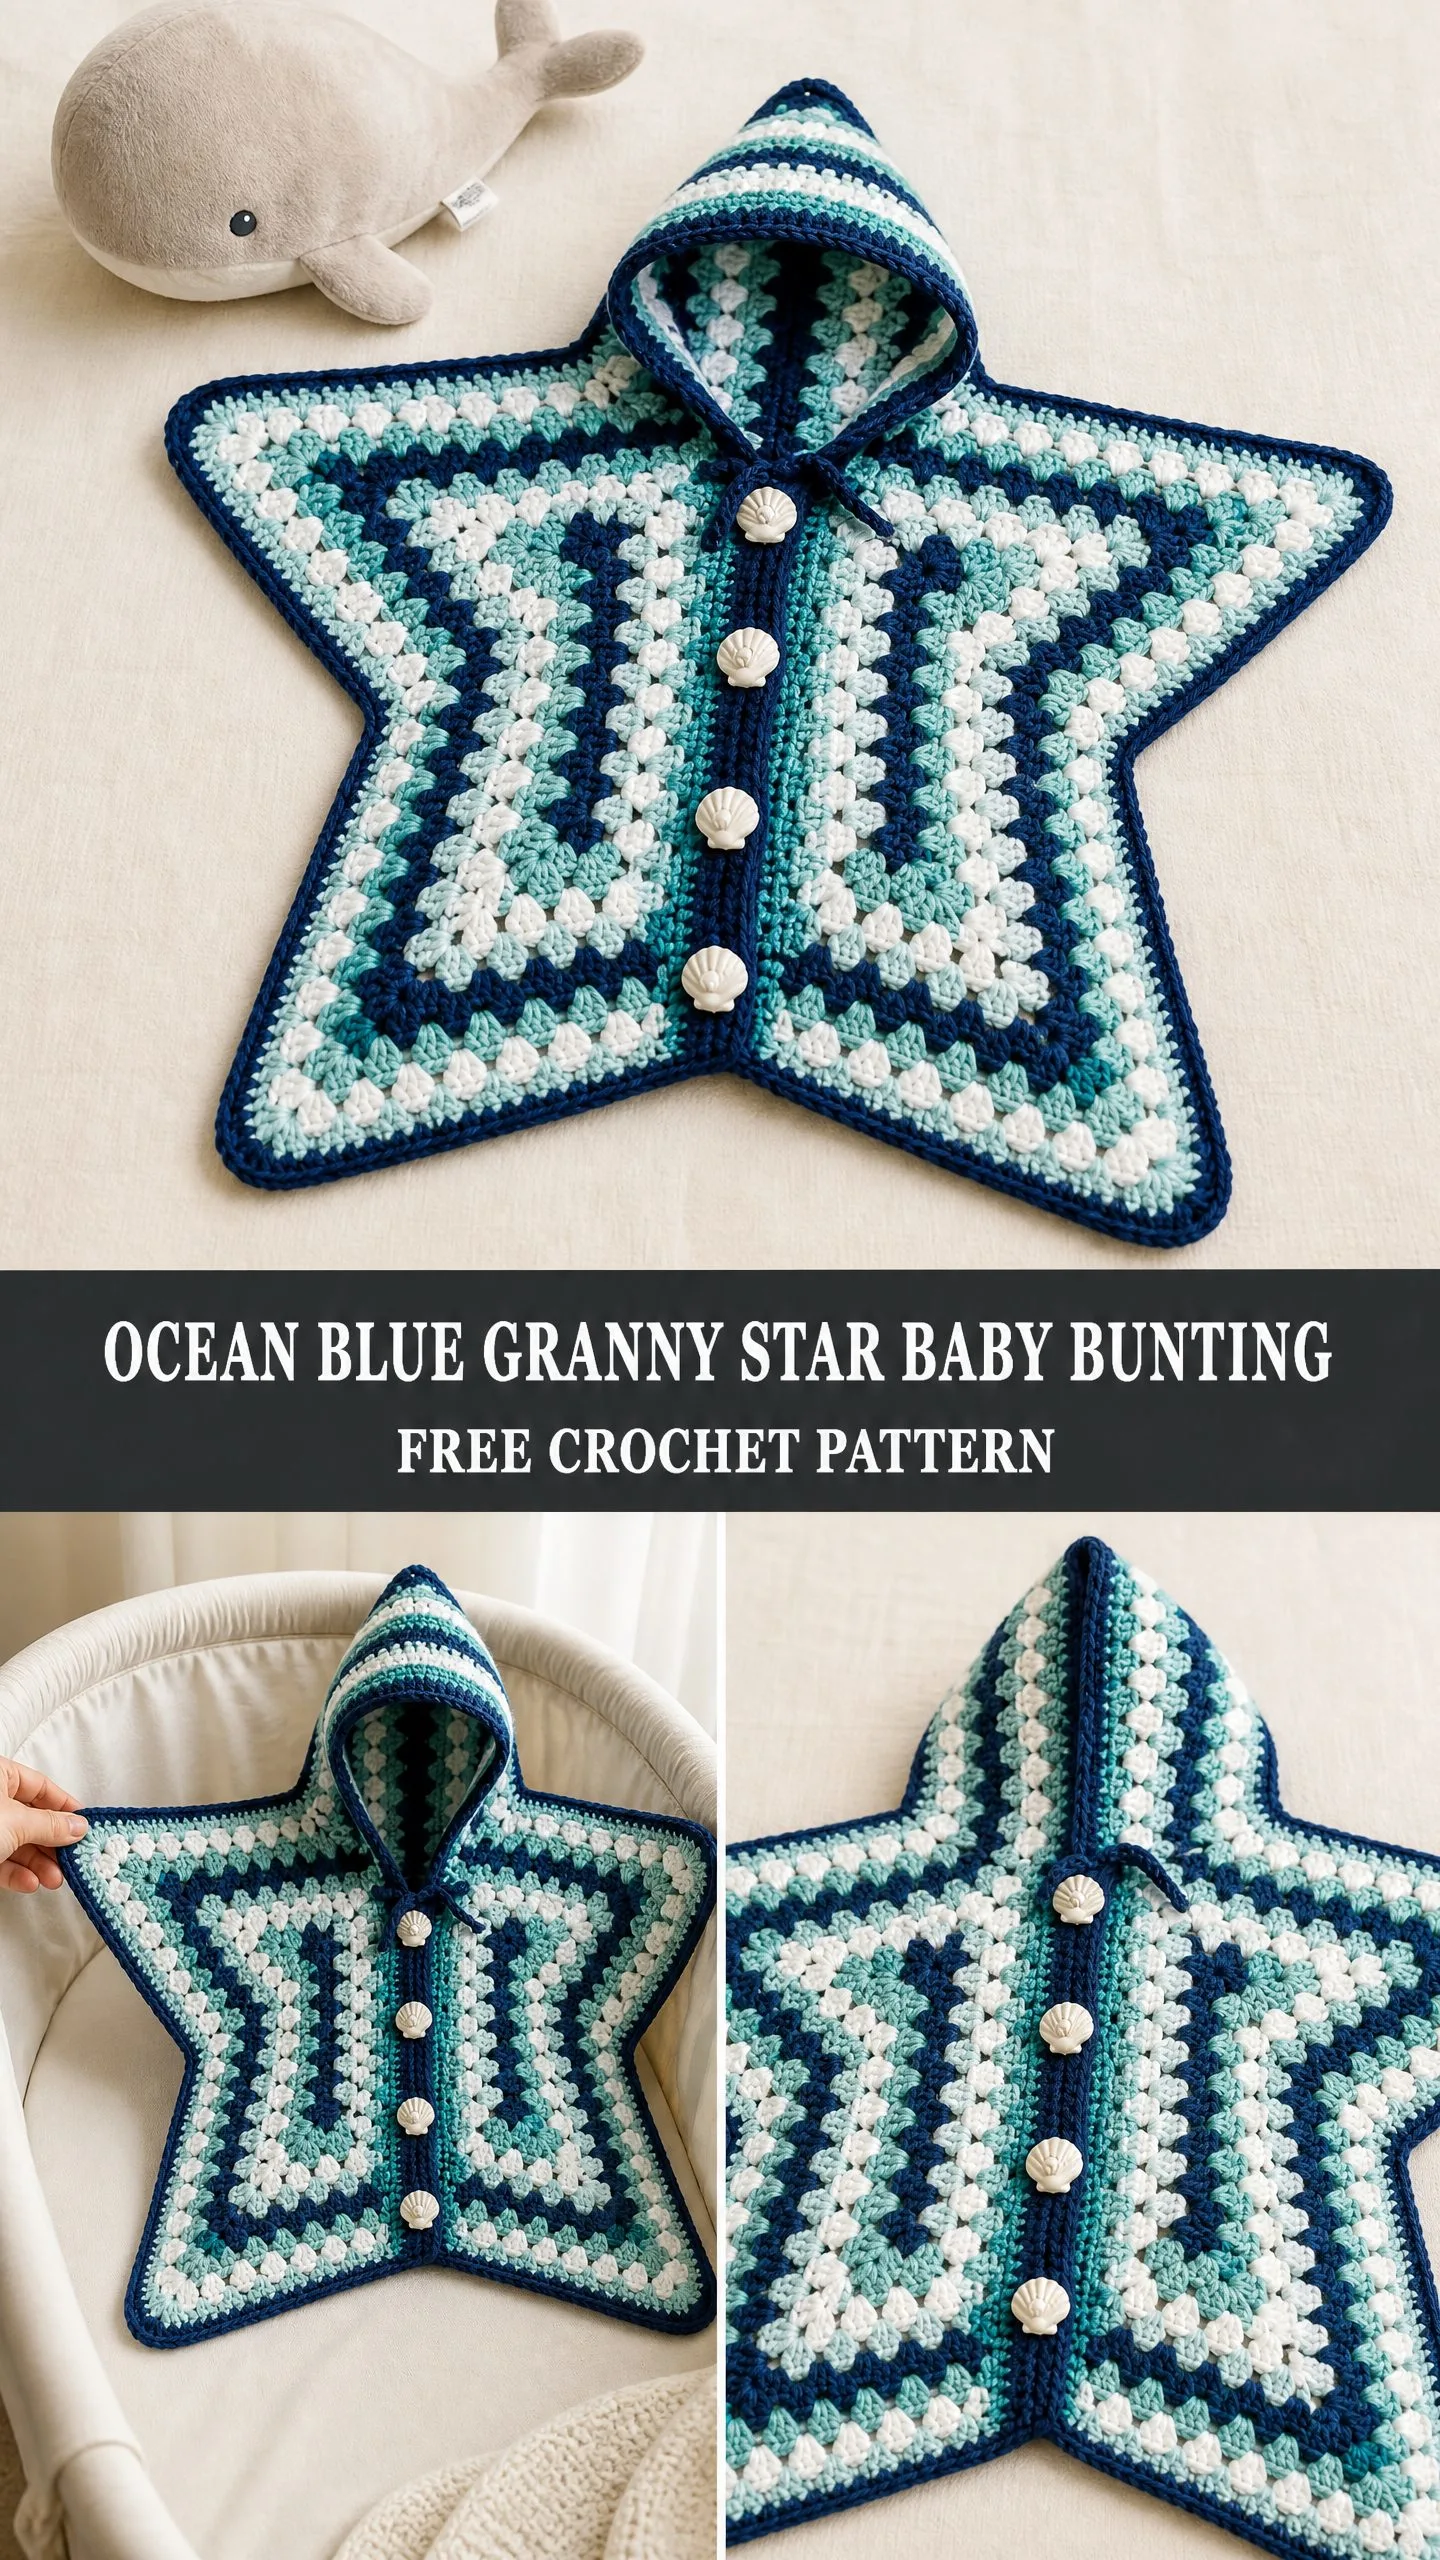
The construction uses granny clusters worked in the round from the center outward. If you can work a basic granny square, you already have the skills for this project. The five-pointed star shape comes from placing increases at five evenly-spaced points on every other round. It sounds fancy, but once you see the pattern emerge, you will find it surprisingly intuitive.
This bunting fits newborns up to 3 months and works up in approximately 15 to 20 hours. It makes an unforgettable baby shower gift or a cherished keepsake for your own little one. The separate hood attaches to the top point, and seashell-shaped buttons down the front add that final ocean touch.
What Makes This Baby Bunting Special
This is not your typical sleep sack. The star shape creates natural arm openings at two of the points, giving baby freedom to move while staying snuggled inside. The granny cluster stitch creates a slightly open weave that provides warmth without overheating. And that hood? It comes to a sweet little point that echoes the star tips below.
The color sequence is simple to follow. You work two rounds each of navy, teal, seafoam, and white, then repeat. The stripes radiate outward from the center like ripples in water, giving you that beautiful ocean gradient effect you see in the photos.
Skill Level and Time Investment
I rate this pattern as intermediate. You should feel comfortable with joining rounds invisibly, working into chain spaces, managing four yarn colors, and seaming pieces neatly. If you have made granny squares before, you already understand the basic cluster technique.
Allow 15 to 20 hours for the complete project. The body works up relatively quickly once you get into the rhythm. Budget extra time for weaving in all those color-change ends and for attaching the hood.
Materials You Will Need
Yarn: Worsted weight, 100% acrylic or acrylic-wool blend
Hook: US Size J-10 / 6.0 mm crochet hook
Notions:
Yarn Suggestions: Lion Brand Vanna’s Choice works beautifully for this project. Caron Simply Soft gives a lovely drape with slight sheen. Paintbox Yarns Simply DK held double creates a plush, dense fabric. Any worsted weight yarn that achieves gauge will work. Prioritize machine washability and softness for baby items.
Gauge
With US J-10 / 6.0 mm hook in granny cluster stitch pattern:
One granny cluster group (3 dc, ch 1) plus one chain-1 space equals approximately 1.5 inches (3.8 cm) wide. Four rounds of granny cluster pattern equals approximately 2 inches (5.1 cm) tall.
Practical gauge: 14 double crochet stitches in 4 rows equals 4 inches (10 cm). 8 rows equals 4 inches (10 cm).
Make a gauge swatch before starting. Chain 16 and work double crochet rows for 8 rows. Adjust your hook size up or down as needed. Gauge matters here because the bunting needs to fit a real baby comfortably.
Finished Dimensions
The finished star measures approximately 24 inches point to point (61 cm) at its widest diagonal. The hood measures approximately 7 inches tall by 9 inches wide at the base (18 cm by 23 cm). These dimensions fit a newborn to 3-month infant.
Abbreviations and Stitch Definitions
Let me walk you through every abbreviation before we begin. Understanding these terms will make the pattern instructions much easier to follow.
Special Stitches for This Crochet Pattern
Granny Cluster (cl): This is the heart of the pattern. Yarn over, insert hook into indicated stitch or space, yarn over and pull up a loop, yarn over and draw through 2 loops. Repeat this sequence 3 times into the same space. Then yarn over and draw through all 4 loops on hook. You have just made 3 double crochets worked together into one space, creating that classic granny puff. Each cluster counts as one unit.
Granny Shell at Increase Point: Work (cl, ch 1, cl) all into the same corner chain space. This double-cluster placement happens at each of the five star points on increase rounds. It creates the angular points of your star.
Standing Double Crochet: This lets you begin a new color without a slip knot. Hold yarn tail, yarn over once, insert hook into indicated space, yarn over and pull up a loop (3 loops on hook), yarn over and draw through 2 loops, yarn over and draw through 2 loops. This counts as the first dc of a cluster.
Button Loop: Chain 4, slip stitch into base of chain to form a small loop. You will use this along the front placket for button fastenings.
Pattern Notes Before You Begin
Read through these notes carefully. They will save you confusion later.
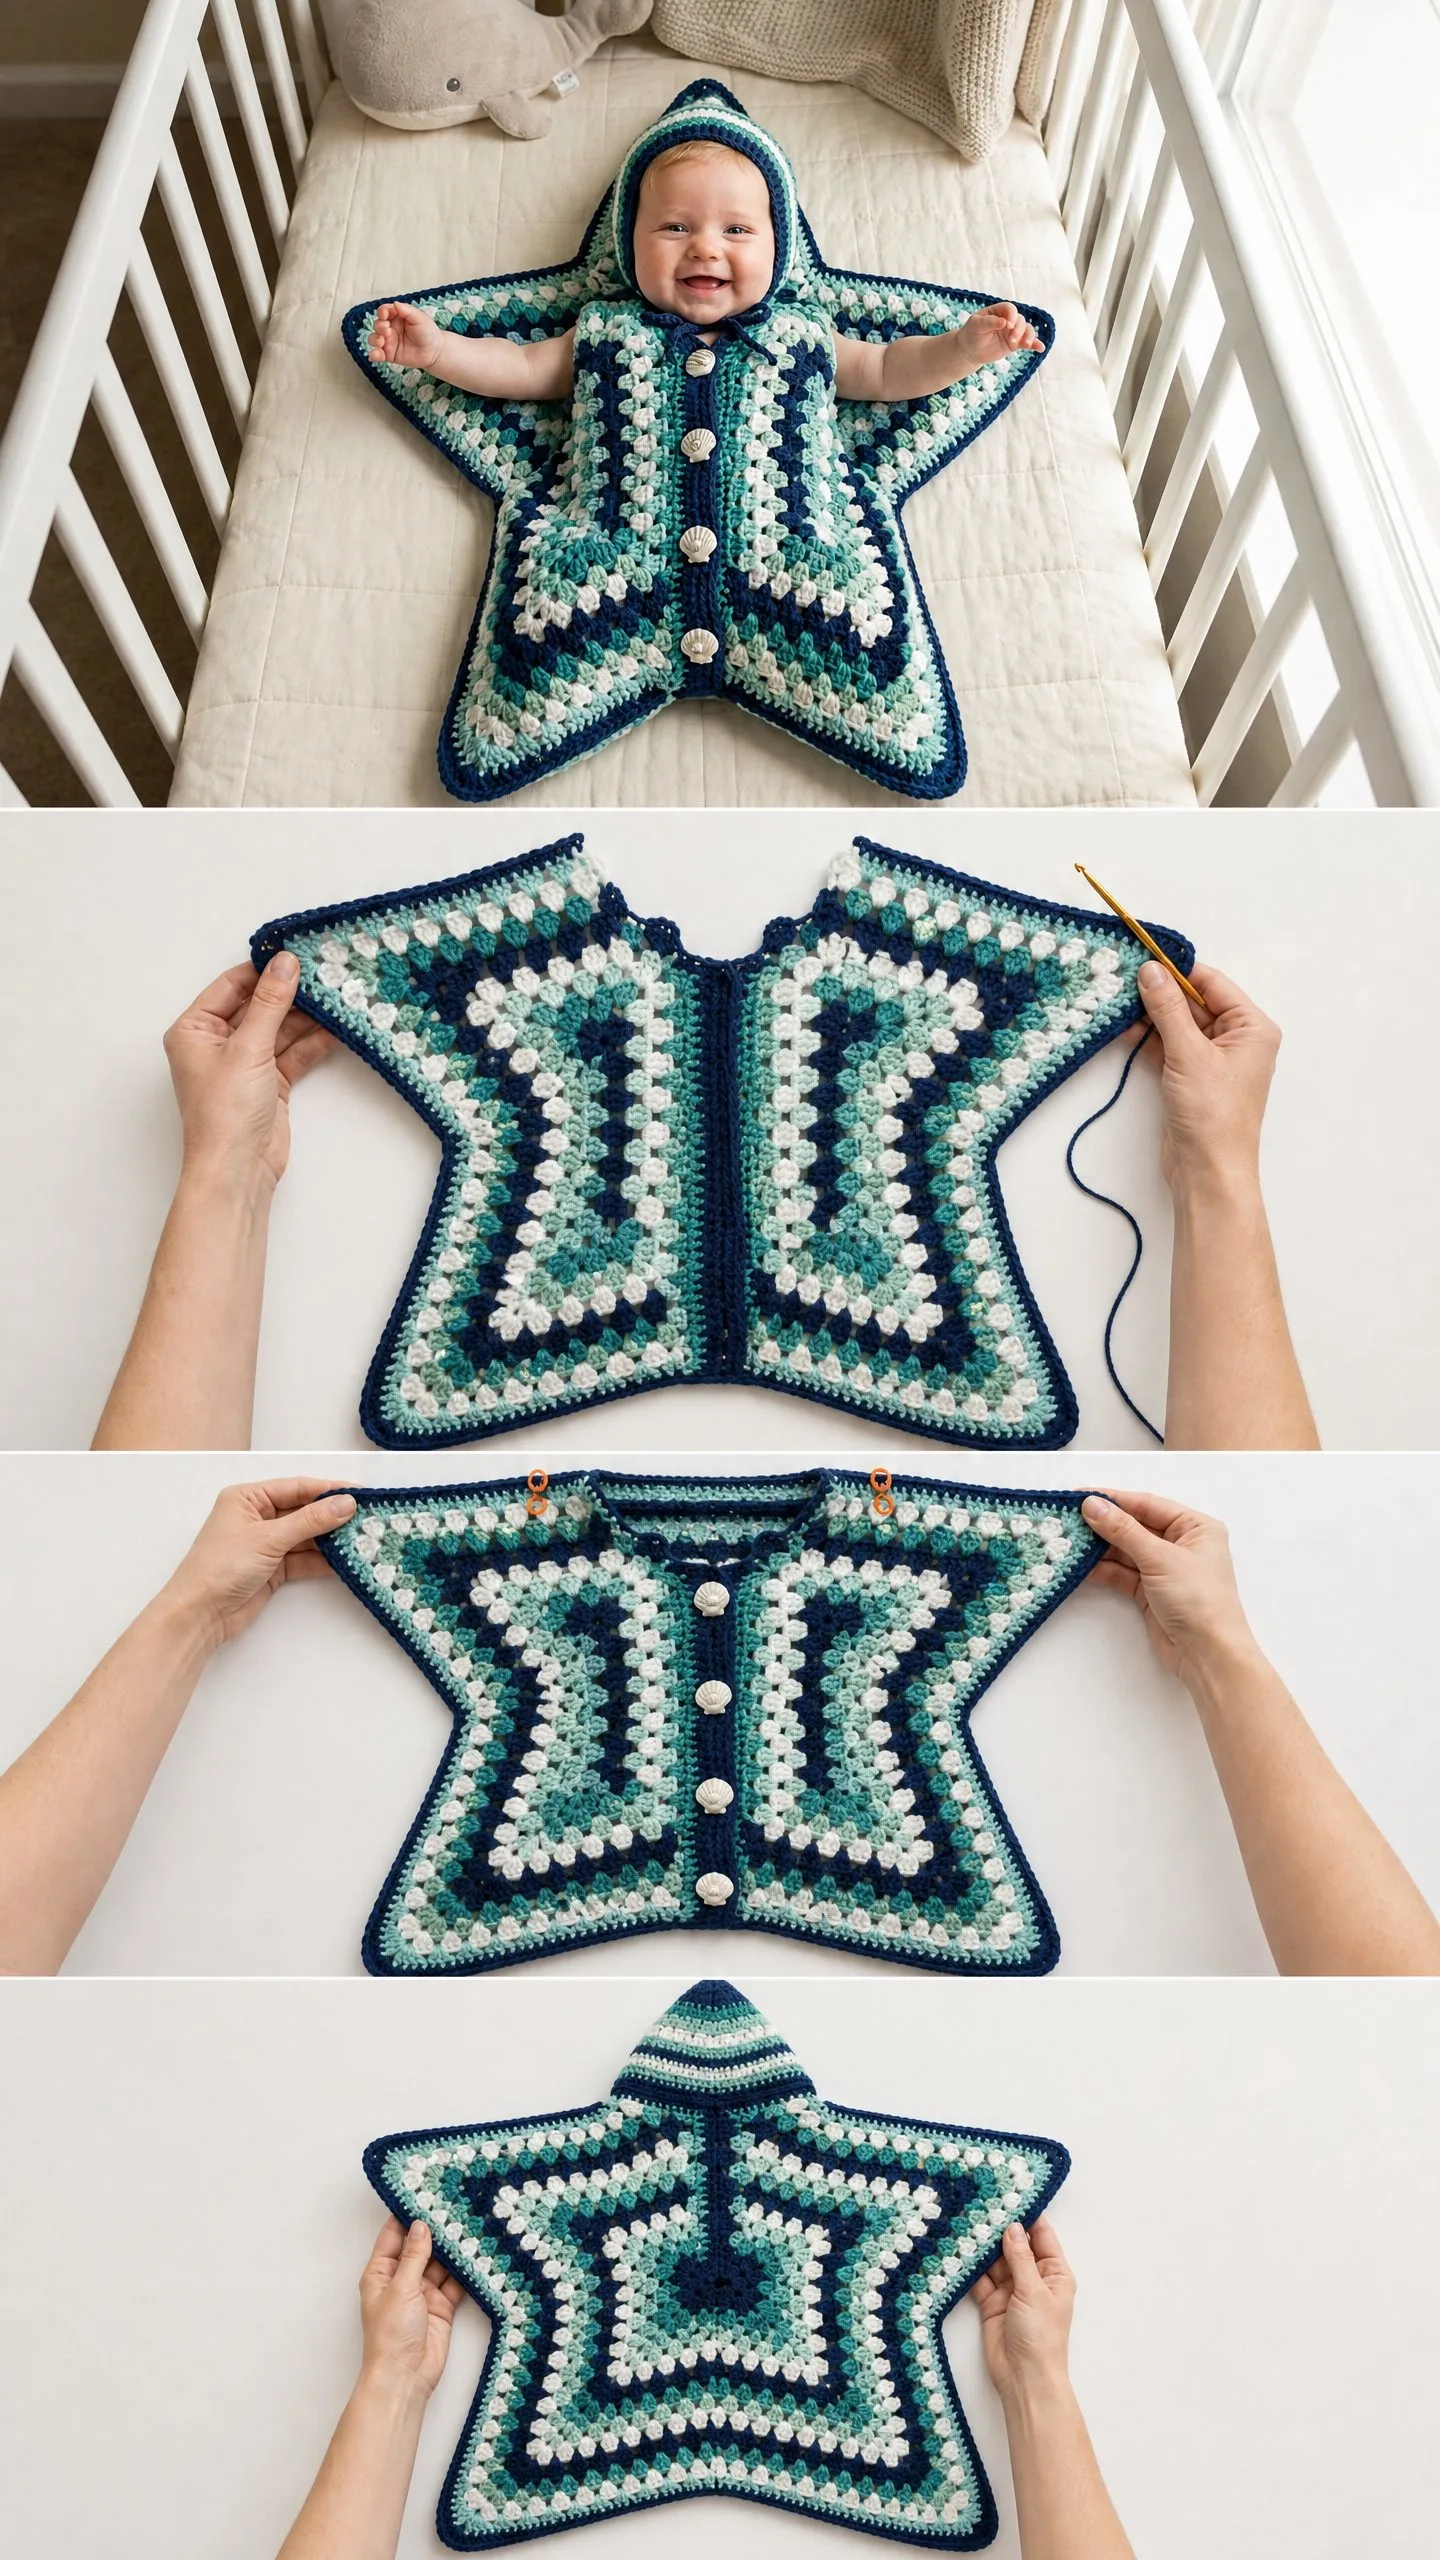
1. The body is worked as a single flat piece in joined rounds, building a five-pointed star from the center outward. You then fold it in half and seam the edges to create a cocoon shape.
2. Color sequence: 2 rounds Color A (Navy), 2 rounds Color B (Teal), 2 rounds Color C (Seafoam), 2 rounds Color D (White), then repeat.
3. All rounds are joined with a slip stitch to the top of the first cluster of the round, not to the turning chain.
4. The chain-2 at the start of each round does NOT count as a stitch or cluster.
5. Place markers at each of the 5 corner chain-2 spaces and move them up every 2 rounds.
6. Carry yarn colors loosely on the wrong side when they will be re-used within 2 rounds. Cut yarn for colors not used for 4 or more rounds and rejoin with a standing stitch.
Step by Step Instructions for the Body
The body is worked as a flat star from the center outward. After blocking and folding, it becomes a three-dimensional cocoon.
Setup Ring
Using Color A, make a magic ring (also called an adjustable ring).
Round 1 (Color A)
Chain 2 (does not count as stitch). Work 10 dc into magic ring. Join with sl st to first dc. Pull tail to close ring. (10 dc)
Checkpoint: You should have a small flat circle of 10 dc.
Round 2 (Color A)
Chain 2 (does not count as stitch). Work 1 cl into the first dc of Round 1. Chain 2. [Work 1 cl into the next dc, chain 2] 4 times. You now have 5 clusters each separated by a ch-2 space. These 5 ch-2 spaces are your star points. Place a stitch marker in each ch-2 space. Join with sl st to top of first cl. (5 cl, 5 ch-2 point spaces)
Round 3 (Color A)
Chain 2. Work (cl, ch 2, cl) into the first marked ch-2 point space. Chain 1. [Work (cl, ch 2, cl) into next marked ch-2 point space, chain 1] 4 times. Join with sl st to top of first cl. Move markers to the ch-2 point spaces. (10 cl, 5 ch-2 point spaces, 5 ch-1 side spaces)
Round 4 (Color B)
Join Color B with standing dc in any ch-2 point space. Chain 2. Work (cl, ch 2, cl) into the same ch-2 point space. Chain 1. Work 1 cl into the ch-1 side space. Chain 1. [Work (cl, ch 2, cl) into next ch-2 point space, chain 1. Work 1 cl into next ch-1 side space, chain 1] 4 times. Join with sl st to first cl. Move markers. (15 cl, 5 ch-2 point spaces, 10 ch-1 side spaces)
Round 5 (Color B)
Chain 2. Work (cl, ch 2, cl) into the first ch-2 point space. Chain 1. [Work 1 cl into each ch-1 side space, chain 1 between each] until next ch-2 point space (2 cl in side spaces). Work (cl, ch 2, cl) into ch-2 point space. Chain 1. Rep from bracket around. Join with sl st to first cl. (25 cl, 5 ch-2 point spaces, 20 ch-1 side spaces)
The General Rule for All Remaining Body Rounds
From here, the pattern follows a predictable formula:
Each round adds 1 additional side cluster per side section. With 5 sides, each round adds 5 clusters to the total count.
Round 6 (Color C)
Join Color C. Work point shells at all 5 points. Work 3 cl in side spaces on each of the 5 sides. (35 cl, 5 ch-2 point spaces, 30 ch-1 side spaces)
Round 7 (Color C)
Work point shells at all 5 points. Work 4 cl in side spaces on each of the 5 sides. (45 cl, 5 ch-2 point spaces, 40 ch-1 side spaces)
Round 8 (Color D)
Join Color D. Work point shells at all 5 points. Work 5 cl in side spaces on each of the 5 sides. (55 cl, 5 ch-2 point spaces, 50 ch-1 side spaces)
Round 9 (Color D)
Work point shells at all 5 points. Work 6 cl in side spaces on each of the 5 sides. (65 cl, 5 ch-2 point spaces, 60 ch-1 side spaces)
Round 10 (Color A)
Join Color A. Work point shells at all 5 points. Work 7 cl in side spaces on each of the 5 sides. (75 cl, 5 ch-2 point spaces, 70 ch-1 side spaces)
Round 11 (Color A)
Work point shells at all 5 points. Work 8 cl in side spaces on each of the 5 sides. (85 cl, 5 ch-2 point spaces, 80 ch-1 side spaces)
Round 12 (Color B)
Join Color B. Work point shells at all 5 points. Work 9 cl in side spaces on each of the 5 sides. (95 cl, 5 ch-2 point spaces, 90 ch-1 side spaces)
Round 13 (Color B)
Work point shells at all 5 points. Work 10 cl in side spaces on each of the 5 sides. (105 cl, 5 ch-2 point spaces, 100 ch-1 side spaces)
Round 14 (Color C)
Join Color C. Work point shells at all 5 points. Work 11 cl in side spaces on each of the 5 sides. (115 cl, 5 ch-2 point spaces, 110 ch-1 side spaces)
Round 15 (Color C)
Work point shells at all 5 points. Work 12 cl in side spaces on each of the 5 sides. (125 cl, 5 ch-2 point spaces, 120 ch-1 side spaces)
Round 16 (Color D)
Join Color D. Work point shells at all 5 points. Work 13 cl in side spaces on each of the 5 sides. (135 cl, 5 ch-2 point spaces, 130 ch-1 side spaces)
Round 17 (Color D)
Work point shells at all 5 points. Work 14 cl in side spaces on each of the 5 sides. (145 cl, 5 ch-2 point spaces, 140 ch-1 side spaces)
Round 18 (Color A)
Join Color A. Work point shells at all 5 points. Work 15 cl in side spaces on each of the 5 sides. (155 cl, 5 ch-2 point spaces, 150 ch-1 side spaces)
Round 19 (Color A)
Work point shells at all 5 points. Work 16 cl in side spaces on each of the 5 sides. (165 cl, 5 ch-2 point spaces, 160 ch-1 side spaces)
Round 20 (Color B)
This is the final body round. Work point shells at all 5 points. Work 17 cl in side spaces on each of the 5 sides. (175 cl, 5 ch-2 point spaces, 170 ch-1 side spaces)
Border Round (Color A)
Join Color A. Work 1 sc into each cl and 1 sc into each ch-1 side space around. At each ch-2 point space, work (sc, ch 2, sc). Join with sl st to first sc. Fasten off and weave in ends. (approximately 350 sc plus 5 ch-2 corners)
Checkpoint: The finished flat star should measure approximately 24 inches (61 cm) from one outer point tip to the opposite outer point tip. The star should have crisp, well-defined points and lie flat without curling.
Construction: Folding and Seaming the Baby Bunting
Now comes the transformation from flat star to cozy cocoon.
Identify your 5 points: Top point (hood attachment), lower-front point (bottom of bunting), two side points (arm openings), and the fifth point at the back-lower (bottom rear).
Step 1: Fold the star in half with right sides together, lining up the back and front layers so all star edges align.
Step 2: Using Color A and a yarn needle, whipstitch or mattress stitch the outer edges together along these sections: the left outer arm point side, the lower-left side, the lower-rear point, the lower-right side, and the right outer arm point side.
Step 3: Leave the top point open for hood attachment.
Step 4: Leave the top one-third of the center front seam open for the button-band placket. This means you leave the last 4 to 5 inches (10 to 13 cm) of the front center unstitched.
Step 5: Turn piece right side out.
The arm openings are the two side star points, left naturally open. Baby’s arms extend through these points.
Checkpoint: After seaming, the bunting should look like a three-dimensional star-shaped sack. The body interior depth (from front to back at the center) should be approximately 4 to 5 inches (10 to 13 cm).
Hood Instructions
The hood is worked flat in rows and shaped to create a pointed top that echoes the star points of the body.
Using Color A, chain 33.
Row 1 (RS): Dc into 4th ch from hook (beg ch-3 counts as first dc). Dc in each ch across. Ch 3, turn. (31 dc including beg ch-3)
Row 2 (WS): Dc in each dc across. Ch 3, turn. (31 dc)
Row 3 (Color B): Join Color B. Dc in each dc across. Ch 3, turn. (31 dc)
Row 4 (Color B): Dc in each dc across. Ch 3, turn. (31 dc)
Row 5 (Color C): Join Color C. Dc in each dc across. Ch 3, turn. (31 dc)
Row 6 (Color C): Dc in each dc across. Ch 3, turn. (31 dc)
Row 7 (Color D): Join Color D. Dc in each dc across. Ch 3, turn. (31 dc)
Row 8 (Color D): Dc in each dc across. Ch 3, turn. (31 dc)
Row 9 (Color A): Join Color A. Dc in each dc across. Ch 3, turn. (31 dc)
Row 10 (Color A): Dc in each dc across. Ch 3, turn. (31 dc)
Hood Shaping Begins
Row 11 (Color B): Join Color B. Dc2tog over first 2 dc. Dc in each dc to last 2 dc. Dc2tog over last 2 dc. Ch 3, turn. (29 dc)
Row 12 (Color B): Dc2tog over first 2 dc. Dc in each dc to last 2 dc. Dc2tog over last 2 dc. Ch 3, turn. (27 dc)
Row 13 (Color C): Join Color C. Dc2tog over first 2 dc. Dc in each dc to last 2 dc. Dc2tog over last 2 dc. Ch 3, turn. (25 dc)
Row 14 (Color C): Dc2tog over first 2 dc. Dc in each dc to last 2 dc. Dc2tog over last 2 dc. Ch 3, turn. (23 dc)
Row 15 (Color D): Join Color D. Dc2tog over first 2 dc. Dc in each dc to last 2 dc. Dc2tog over last 2 dc. Ch 3, turn. (21 dc)
Row 16 (Color D): Dc2tog over first 2 dc. Dc in each dc to last 2 dc. Dc2tog over last 2 dc. Ch 3, turn. (19 dc)
Row 17 (Color A): Join Color A. Dc2tog over first 2 dc. Dc in each dc to last 2 dc. Dc2tog over last 2 dc. Ch 3, turn. (17 dc)
Row 18 (Color A): Dc2tog over first 2 dc. Dc in each dc to last 2 dc. Dc2tog over last 2 dc. Ch 3, turn. (15 dc)
Row 19 (Color B): Join Color B. [Dc2tog] twice. Dc in each dc to last 4 dc. [Dc2tog] twice. Ch 3, turn. (11 dc)
Row 20 (Color B): [Dc2tog] twice. Dc in each dc to last 4 dc. [Dc2tog] twice. Ch 3, turn. (7 dc)
Row 21 (Color C): Join Color C. [Dc2tog] 3 times. Dc in last dc. (4 dc). Do not turn.
Fasten off, leaving a 12-inch (30 cm) tail for seaming.
Finishing the Hood
Fold the hood in half with right sides together so the shaped top point aligns. Using the tail, whipstitch the top seam closed from the outer edge to the point. Fasten off and weave in end. Turn hood right side out.
Hood Border: With RS facing and Color A, join yarn at lower-right corner of hood opening. Work 1 row of sc evenly around the front opening edge of the hood. Work approximately 1 sc per dc-row end. Join or fasten off neatly.
Checkpoint: The finished hood should measure approximately 9 inches (23 cm) wide at the lower opening and approximately 7 inches (18 cm) tall from lower edge to the tip of the point.
Attaching the Hood to the Body
With right sides facing out on both pieces, align the center back of the hood base with the center-back seam of the top point of the body star.
Pin the hood opening evenly around the top star point, distributing fullness. The hood base will wrap entirely around the opening of the top star point.
Using Color A and a yarn needle, whipstitch the hood to the body all the way around the top star point opening. Stitch through both layers for security.
Button Band and Button Loops
Left Front Band: With Color A and RS facing, join yarn at the top of the front-left opening edge (nearest the hood). Work sc evenly down the left front opening edge. Work approximately 1 sc per row end or 1 sc per cluster. Fasten off.
Right Front Band: With Color A and RS facing, join yarn at the lower right front opening edge. Work sc evenly up the right front opening edge.
Buttonhole row: After working 3 sc from the bottom, [chain 4, skip 2 sc, work 5 sc] 4 times. Chain 4, skip 2 sc, work remaining sc to top. Fasten off. (5 buttonholes placed evenly up the right front band)
Checkpoint: The button band should measure approximately 4 to 5 inches (10 to 13 cm) from the lower front point to the base of the hood.
Optional Drawstring
Using Color A, crochet a chain approximately 24 inches (61 cm) long. Fasten off. Weave through the sc border at the hood face opening to cinch around baby’s face. Knot each end or attach a small pom-pom or toggle.
Final Embellishment
Sew the 5 seashell-shaped shank buttons onto the left front band, aligning with the 5 buttonholes on the right front band. Sew securely through both layers of the band for safety. Important: Check all buttons before placing the garment on an infant.
Size Customization Tips
For Newborn (fits 0 to 1 month, up to 10 lbs): Work only 16 body rounds instead of 20. Final star will measure approximately 20 inches (51 cm) point to point. Reduce hood by 4 rows at the beginning before starting shaping.
For 3 to 6 Months: Add 4 additional body rounds (2 full color stripe repeats) after Round 20 before the border round. Final star will measure approximately 28 inches (71 cm) point to point. Add 4 plain rows to the hood before shaping.
Blocking and Finishing
Weave in all yarn ends securely on the wrong side, weaving each tail in at least two directions.
Wet blocking: Soak the finished bunting in cool water with a small amount of wool wash or gentle soap for 15 to 20 minutes. Gently squeeze out water without wringing. Roll in a dry towel to remove excess moisture. Pin to a foam blocking mat in a star shape with all 5 points stretched to their full length. Allow to dry completely flat, approximately 24 to 48 hours depending on humidity.
Blocking opens the granny cluster lacework slightly, evens the color stripe transitions, and sets the star points crisp and sharp. I highly recommend this step. It will noticeably improve the finished appearance.
Attach buttons after blocking and drying are complete.
Care Instructions
Machine wash cold on gentle cycle. Lay flat to dry. Do not tumble dry, as heat may distort the acrylic fiber and affect the sizing. Do not iron. If using a wool-blend yarn, handwash only in cool water and dry flat. Check all buttons before each use to ensure they remain securely attached.
Final Thoughts on This Crochet Baby Bunting Pattern
This ocean blue granny star baby bunting is one of those projects that looks impressive but follows a logical, rhythmic pattern once you get started. The granny cluster stitch becomes almost meditative after the first few rounds. And when you see that little star taking shape beneath your hook, with those beautiful ocean colors radiating outward? Pure joy.
New parents will absolutely treasure receiving this as a gift. The star shape is unique, the colors are stunning, and the craftsmanship shows in every stitch. Whether you are making it for your own baby, a grandchild, or a friend’s new arrival, this bunting wraps little ones in handmade love.
Thank you so much for choosing this pattern for your next project. I hope you enjoy every stitch of it. If you make one, I would love to see it! Share your finished bunting on Instagram or Facebook and tag me so I can admire your work.
If this pattern caught your eye, save it to your Pinterest boards so you can find it easily when you are ready to start. And please drop a comment below once you make yours. I always love hearing how your projects turn out and seeing the color combinations you choose!
You Might Also Like
- Lavender Daisy Wrist Cuff Free Crochet Pattern
- Blush Pink Round Chain Bag Free Crochet Pattern
- Dusty Rose Chunky Cropped Turtleneck Free Crochet Pattern
- Dusty Rose Spiral Flap Backpack Free Crochet Pattern