
Okay, yarn lovers. This is your sign to dig into that stash and pull out those gorgeous skeins you have been saving for something special. This Pink Rose Tiered Dress is exactly the kind of project that deserves your best cotton or bamboo blend.
Get the Ad-Free PDF Pattern
You can find the free pattern below, or you can purchase the ad-free printable PDF from my shop.
Get the Printable PDF →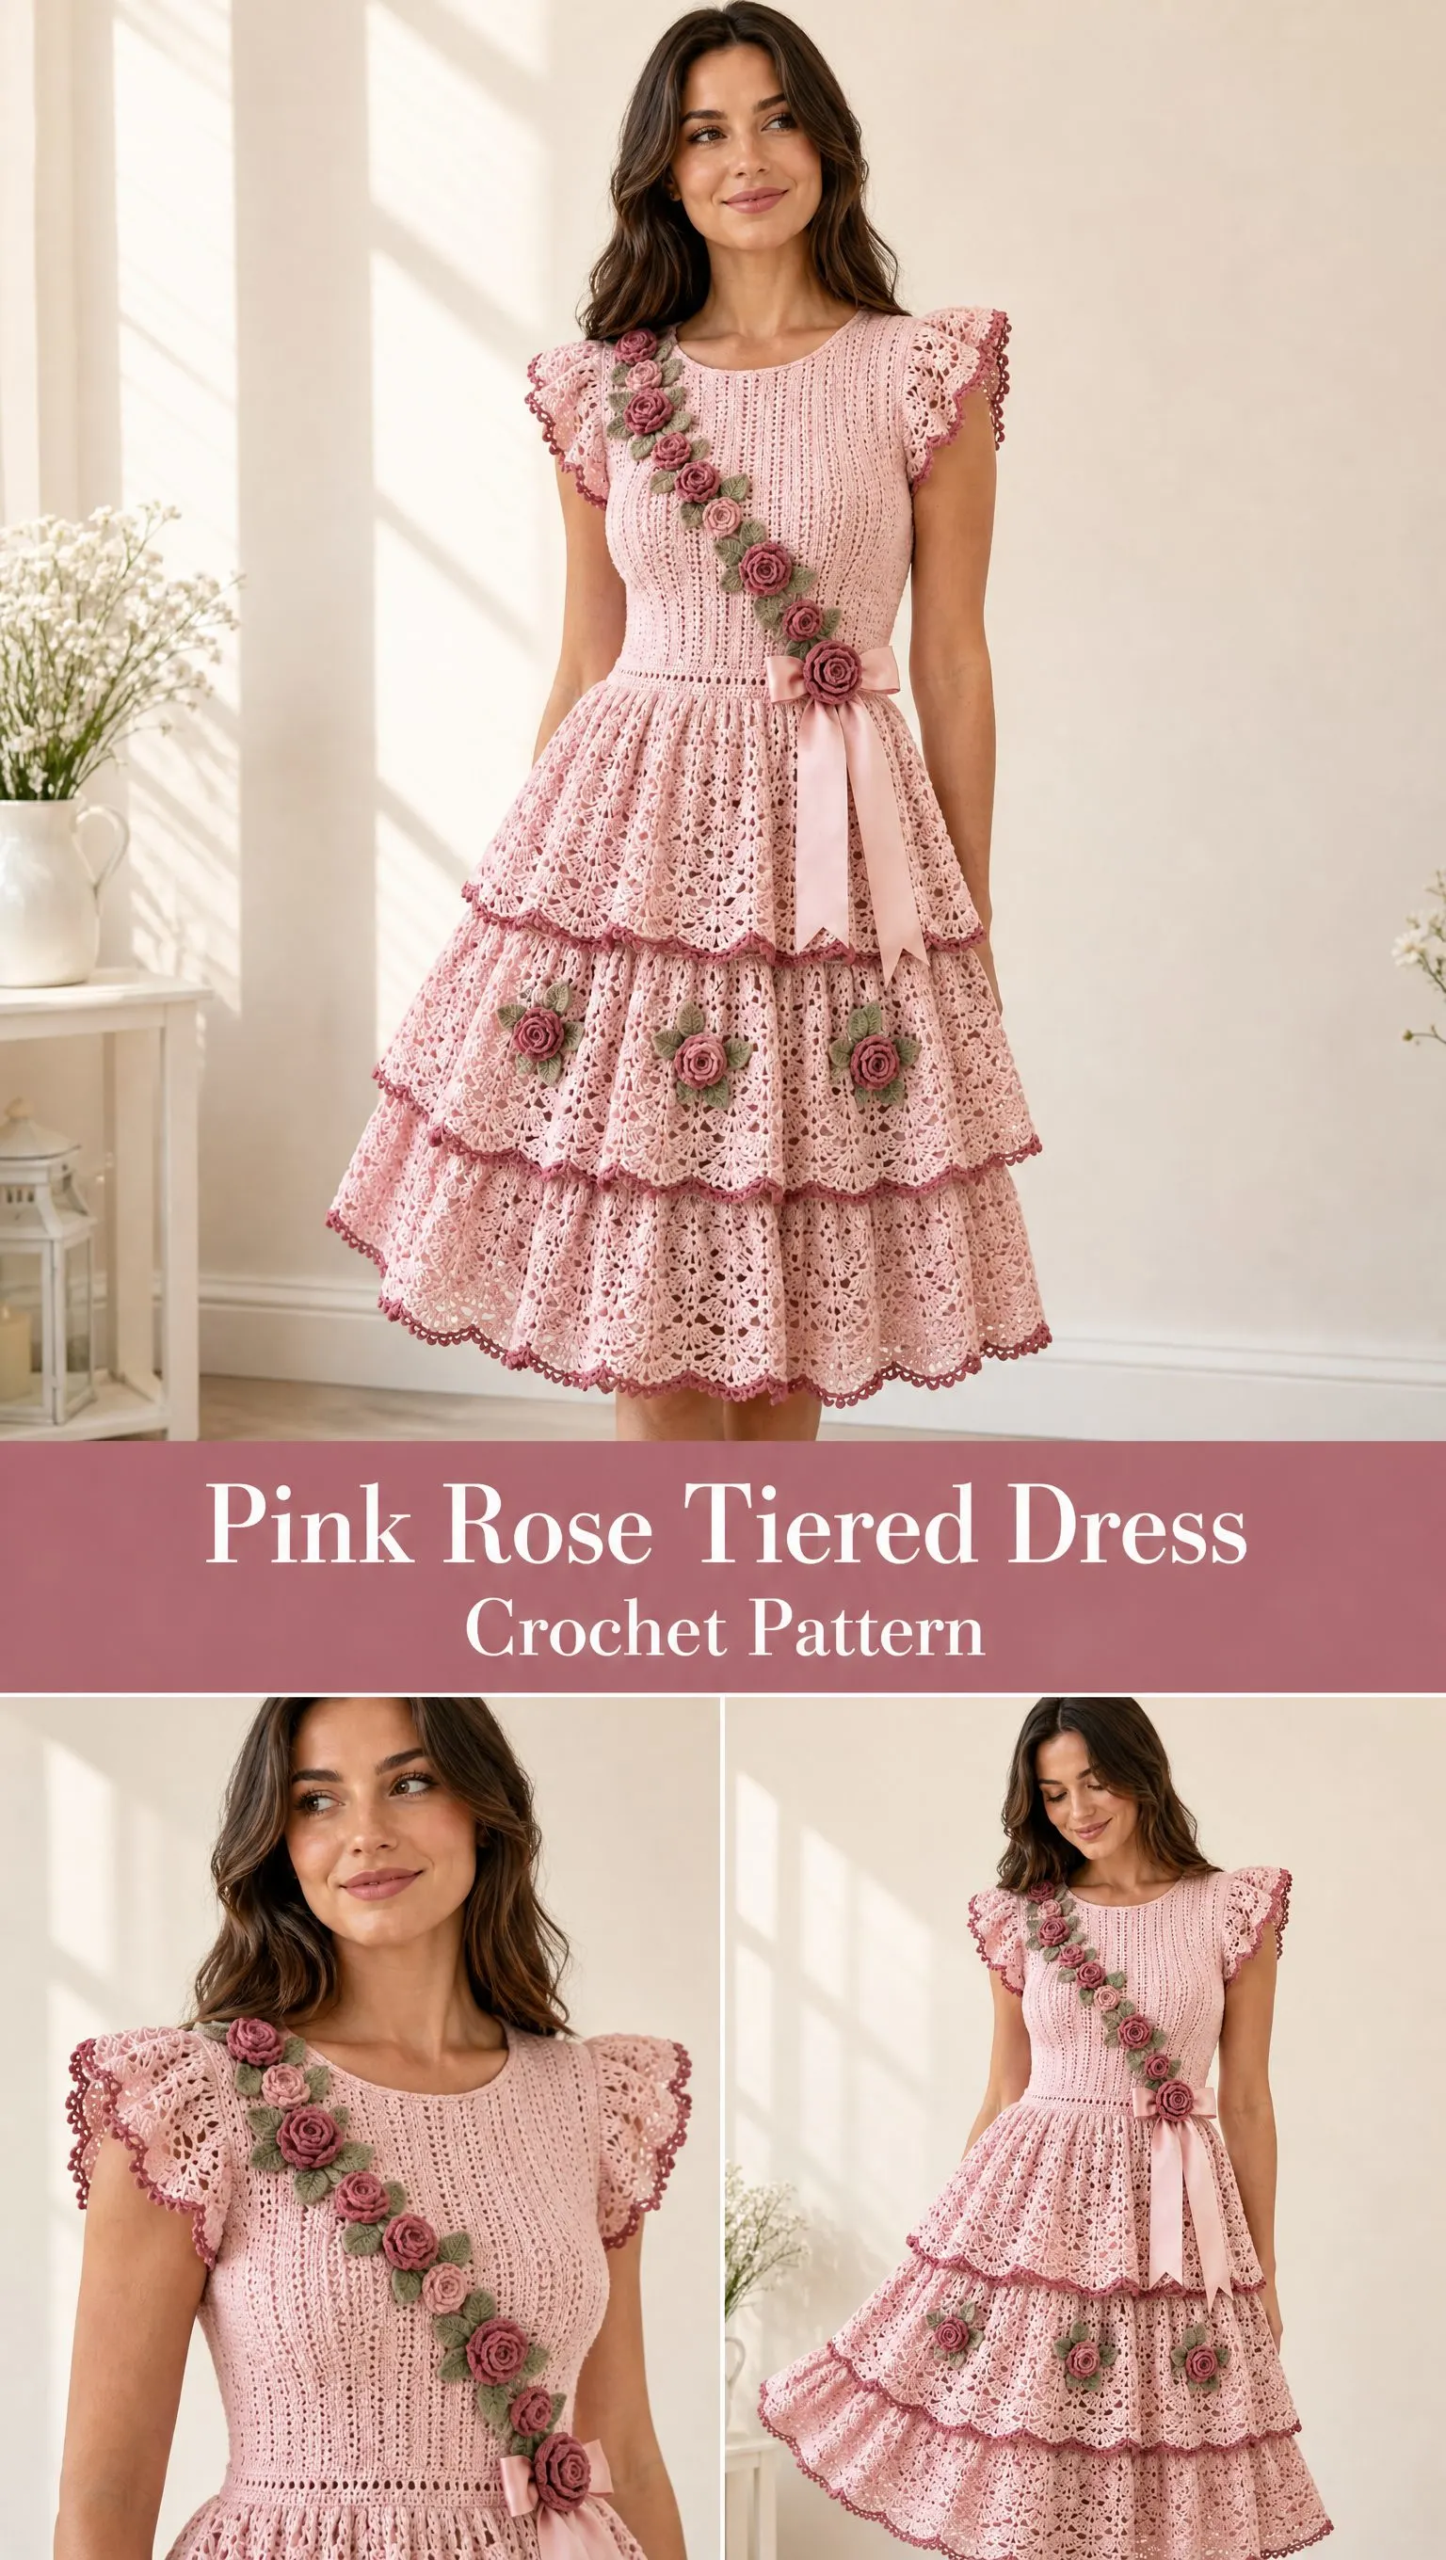
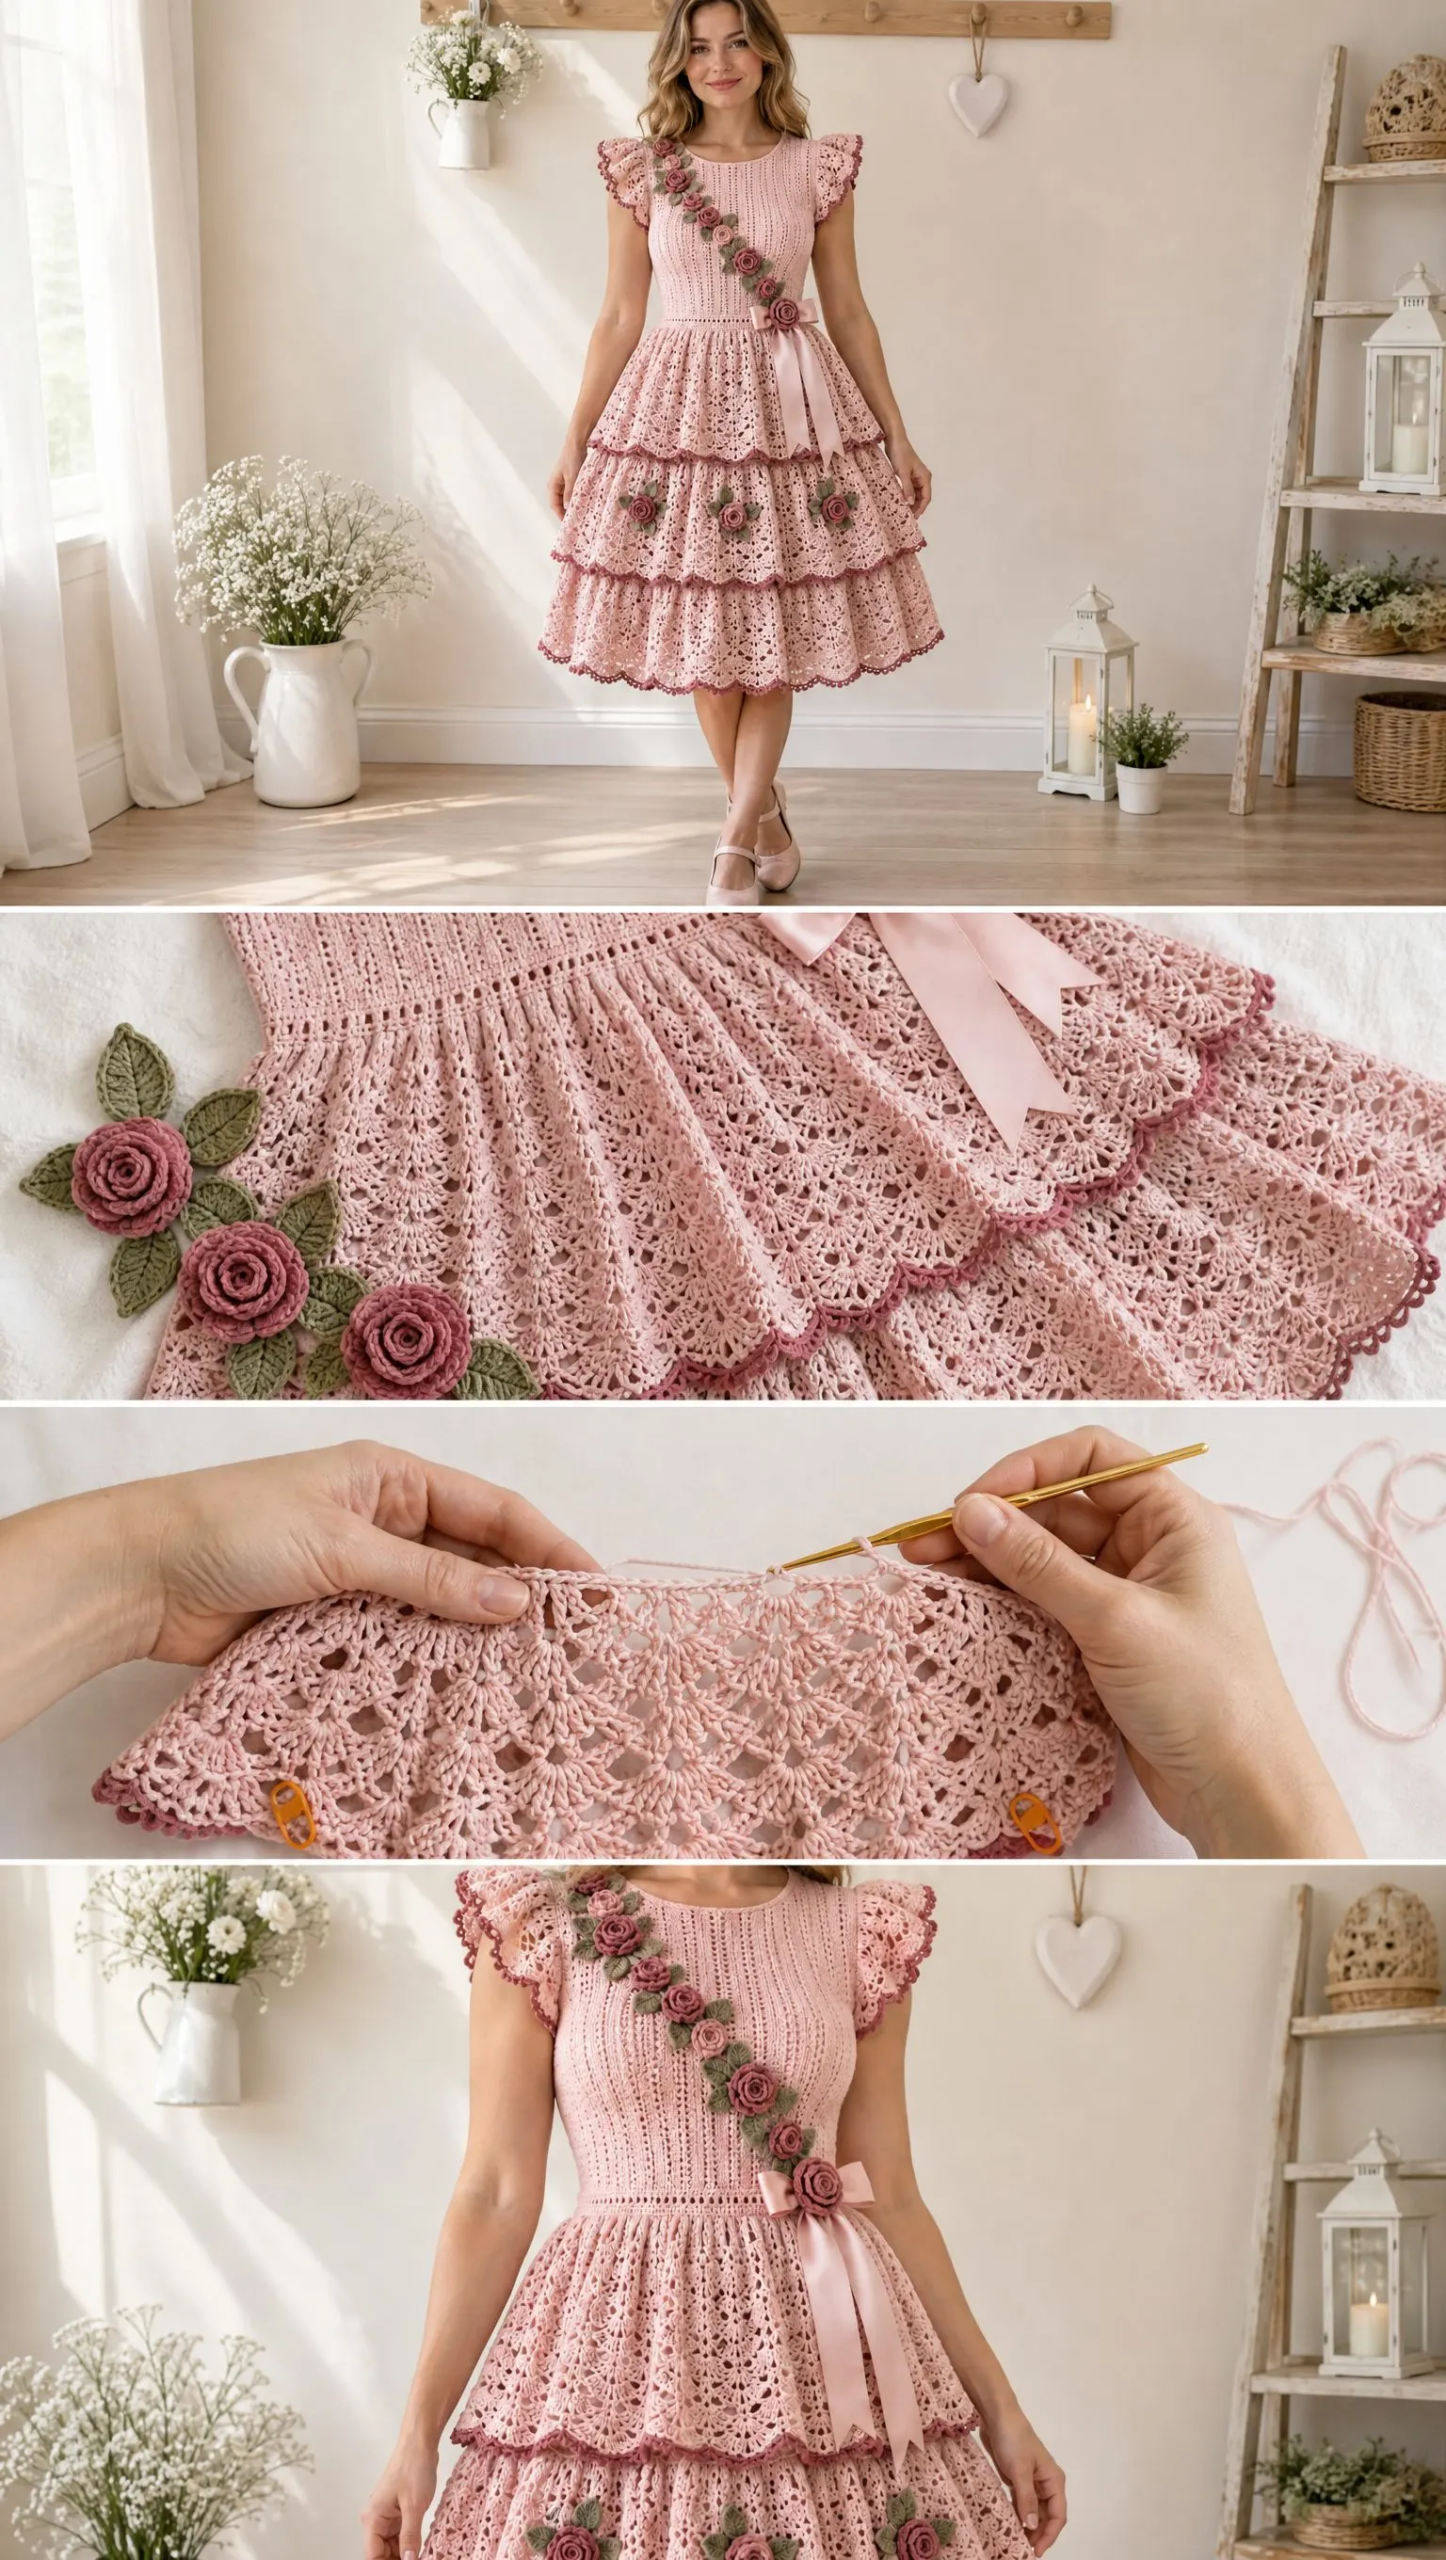
The construction here is genuinely interesting. You will work a fitted bodice with clean vertical texture, add scalloped flutter sleeves, then build three gathered shell lace tiers for that dreamy full skirt. Dimensional crochet roses and sage leaves create a diagonal vine across the bodice. It is a showstopper.
I will be honest with you. This is an advanced intermediate project. It involves garment shaping, lace repeats, gathered tiers, applied motifs, simple sewing for the lining, and careful blocking. But if you have made a few garments before and feel comfortable with shaping, you can absolutely do this. Let me walk you through every single step.
What Makes This Dress So Special
The Pink Rose Tiered Dress combines so many beautiful elements into one cohesive design. The bodice features a Bodice Column Stitch that creates tidy vertical lines without excessive bulk. Those flutter sleeves add a feminine touch with their scalloped edges and dusty rose picot trim.
But the real magic happens in the skirt. Three gathered shell lace tiers cascade down from the waist, each one fuller than the last. The tiers overlap slightly, creating that romantic layered look you see in the reference image. Each tier ends with a Rose Picot Edge in dusty rose for beautiful contrast.
And those roses! You will crochet dimensional spiral roses and flat roses, plus sage green leaves. These get arranged in a diagonal vine across the bodice and in small clusters on the middle tier. A satin bow at the waist finishes everything perfectly.
Materials You Will Need
Before you start, gather everything on this list. Having all your materials ready makes the project flow so much more smoothly.
Yarn:
Hooks:
Lining:
Ribbon:
Other supplies:
Gauge Information
Gauge is essential for garment fit. Please do not skip this step.
Work a swatch in Bodice Column Stitch: 20 double crochet (dc) = 4 inches / 10 cm and 10 rows = 4 inches / 10 cm, blocked.
For the shell lace: one 8-stitch repeat = approximately 1.6 inches / 4 cm wide, and 8 lace rows = approximately 4 inches / 10 cm.
Make at least a 6 x 6 inch (15 x 15 cm) swatch. Wash and dry it the way you plan to care for the finished dress, then measure the center 4 inches (10 cm). Adjust your hook size up or down until you match gauge.
Size Chart and Measurements
This pattern includes seven sizes from XS to 3XL. Choose your size based on your full bust measurement first.
| Measurement | XS | S | M | L | XL | 2XL | 3XL |
|---|---|---|---|---|---|---|---|
| To fit bust (inches/cm) | 30-32 / 76-81 | 34-36 / 86-91 | 38-40 / 97-102 | 42-44 / 107-112 | 46-48 / 117-122 | 50-52 / 127-132 | 54-56 / 137-142 |
| Finished bust (inches) | 32 | 36 | 40 | 44 | 48 | 52 | 56 |
| Finished waist (inches) | 26 | 30 | 34 | 38 | 42 | 46 | 50 |
| Bodice length shoulder to waist (inches) | 15.5 | 16 | 16.5 | 17 | 17.5 | 18 | 18.5 |
| Skirt length waist to hem (inches) | 22 | 22.5 | 23 | 23.5 | 24 | 24.5 | 25 |
| Approximate finished dress length (inches) | 37.5 | 38.5 | 39.5 | 40.5 | 41.5 | 42.5 | 43.5 |
If your waist differs significantly from the chart, you can grade between sizes across the lower bodice by increasing or decreasing at the side seams. For a fitted look, aim for a finished bust equal to your body bust or up to 2 inches (5 cm) larger.
Abbreviations and Stitch Definitions
Let me define every abbreviation you will encounter. Even if you know these stitches, it helps to have them all in one place.
Special Stitches
Bodice Column Stitch (multiple of 4 + 2)
This stitch pattern creates the clean vertical texture you see on the bodice.
Row 1 (RS): Dc in 4th ch from hook and in each ch across.
Row 2: Ch 3, turn. FPdc around next dc, dc in next 3 dc; rep from to last st, dc in turning ch.
Row 3: Ch 3, turn. Dc in each st across.
Repeat Rows 2-3 for pattern.
Shell Lace (multiple of 8)
This creates those gorgeous tiered flounces.
Foundation/attachment row: Sc evenly around band.
Lace Row 1: Ch 1, sc in first st, sk 3 sts, 7 dc in next st, sk 3 sts, sc in next st; rep from .
Lace Row 2: Ch 5, sc in center (4th) dc of shell, ch 5, sc in next sc, ch 5; rep from .
Lace Row 3: 7 dc in next ch-5 sp, sc in next ch-5 sp; rep from .
Alternate Rows 2 and 3, ending with a shell row.
Rose Picot Edge
This adds the beautiful dusty rose trim to each tier.
Sc in next 2 sts, ch 3, sl st in first ch made; rep from around.
Bodice Instructions
The bodice is worked in two flat panels from the waist upward. Use the same stitch count for front and back before armhole shaping.
Foundation Chain Counts Per Panel
| Size | Foundation Chains |
|---|---|
| XS | 66 |
| S | 74 |
| M | 82 |
| L | 90 |
| XL | 98 |
| 2XL | 106 |
| 3XL | 114 |
Front Panel
Step 1: With blush yarn and 3.5 mm hook, ch the foundation count for your size. Work Row 1 of Bodice Column Stitch. You should have 64 (72, 80, 88, 96, 104, 112) dc plus turning chain equivalent.
Step 2: Work in Bodice Column Stitch until panel measures 8.5 (8.75, 9, 9.25, 9.5, 9.75, 10) inches / 21.5 (22, 23, 23.5, 24, 25, 25.5) cm from waist edge.
Step 3 (Shape Armholes): At the start of the next 2 rows, sl st across 4 (4, 5, 5, 6, 6, 7) sts, then continue in pattern. On each of the next 4 rows, decrease 1 st at each armhole edge by working dc2tog over the first/last 2 workable sts. Maintain vertical column alignment where possible.
Step 4: Continue even until armhole depth measures 5 (5.5, 6, 6.5, 7, 7.5, 8) inches / 12.5 (14, 15, 16.5, 18, 19, 20.5) cm.
Step 5 (Shape Round Neck): Work across 18 (20, 22, 24, 26, 28, 30) sts for first shoulder, turn and leave center stitches unworked. Decrease 1 st at neck edge on each of next 3 rows. Continue until total bodice length reaches chart measurement. FO. Rejoin yarn at opposite shoulder and mirror shaping.
Back Panel
Step 6: Work as for Front through armhole shaping and until back measures 1.5 inches / 4 cm less than final bodice length.
Step 7: For back neck, work first shoulder over 20 (22, 24, 26, 28, 30, 32) sts, leave center stitches unworked, and complete shoulder without additional neck decreases. Repeat opposite side.
Step 8: Block both panels to schematic dimensions before seaming. Seam shoulders with mattress stitch, then seam sides from waist to underarm. Leave armhole openings clear.
Neckline and Flutter Sleeves
Round Neckline Edging
Step 9: With RS facing, join blush at back neck. Work 1 round sc evenly around neckline, placing about 2 sc per 3 row-ends and 1 sc in each stitch across horizontal sections. Join with sl st.
Step 10: Round 2: Ch 1, sc in next 3 sts, ch 3, sl st in first ch made; rep from around, adjusting spacing at center front if needed. Join and FO. Block lightly so neckline lies flat.
Scalloped Flutter Sleeves (Make 2)
Step 11: With RS facing, join blush at underarm. Work 1 round sc evenly around armhole. Count stitches and adjust on the next round to a multiple of 8.
Step 12 (Round 1): Ch 1, sc in next st, sk 3 sts, 7 dc in next st, sk 3 sts; rep from around. Join.
Step 13 (Round 2): Ch 1, sc in first dc of shell, ch 3, sc in next dc, ch 3, sc in next dc, ch 3, sc in next dc, ch 3, sc in next dc, ch 3, sc in next dc, ch 3, sc in last dc; sl st into next sc; rep from around. This creates an airy scalloped flutter.
Step 14: With dusty rose and 3.0 mm hook, work a light picot edge around the outer sleeve edge: *sc in next 2 sts/spaces, picot; rep around. FO and weave ends.
Waistband and Three-Tier Skirt
The skirt tiers are built from a stable waistband and three gathered lace tubes. Each tier is wider than the attachment band above it, creating fullness without excessive weight.
Waistband
Step 15: Join blush at bodice waist edge. Round 1: work sc evenly around, aiming for 130 (150, 170, 190, 210, 230, 250) sts. Join.
Step 16 (Rounds 2-4): Ch 1, hdc in each st around. Join. This firm band supports the skirt weight.
Step 17 (Optional): If using a zipper, leave the final 6-8 inches / 15-20 cm of the back bodice and waistband open and add the zipper after lining.
Tier 1 (Upper Flounce)
Step 18: Foundation/gather round: increase evenly around the waistband to approximately 1.55 x the waistband stitch count: 200 (232, 264, 296, 328, 360, 392) sts, adjusting to the nearest multiple of 8.
Step 19: Work Shell Lace for 10 (10, 11, 11, 12, 12, 13) rows, or until Tier 1 measures about 5.5-6.5 inches / 14-16.5 cm.
Step 20: With dusty rose, work Rose Picot Edge along the final shell row. FO.
Tier 2 (Middle Flounce)
Step 21: Create a hidden attachment band at the base of the waistband: with blush, work a round of sc into the back loops/unworked attachment line directly beneath Tier 1, using the same waistband stitch count. Work 2 rounds hdc.
Step 22: Increase evenly to about 1.75 x waistband count: 232 (264, 296, 336, 368, 400, 440) sts, adjusted to multiple of 8.
Step 23: Work Shell Lace for 12 (12, 13, 13, 14, 14, 15) rows. End with dusty-rose Rose Picot Edge. This tier should finish about 1.5-2 inches / 4-5 cm below Tier 1.
Tier 3 (Lower Flounce)
Step 24: At the lower edge of Tier 2 attachment band, work another 2-round hdc support band in blush.
Step 25: Increase evenly to about 2.0 x waistband count: 264 (304, 344, 384, 424, 464, 504) sts, adjusted to multiple of 8.
Step 26: Work Shell Lace for 14 (14, 15, 15, 16, 16, 17) rows, or until total skirt length matches the chart. End with a dusty-rose Rose Picot Edge.
Length adjustment tip: For a shorter dress, remove 2-row repeats from Tier 3 first. For a longer dress, add lace repeats to Tier 3, then Tier 2. Recheck yarn requirements after altering length.
Crochet Roses and Sage Leaves
These dimensional elements bring the whole design together. Take your time with these. They are small but worth the effort.
Dimensional Rose (Make 8-12)
Step 27: With dusty rose and 3.0 mm hook, ch 39.
Step 28 (Row 1): 2 dc in 4th ch from hook, ch 1, sk 1 ch, 3 dc in next ch; rep from across. You will create a ruffled strip.
Step 29 (Row 2): Ch 1, turn. *Sc in ch-1 sp, 5 dc in center dc of next 3-dc group, sc in next ch-1 sp; rep across. FO leaving a 14 inch / 35 cm tail.
Step 30: Starting from the small end, roll the strip into a spiral rose. Stitch through the base layers with the long tail, keeping petals loose at the top. Make some roses with ch 31 for smaller flowers.
Flat Waist Rose (Make 1)
Step 31 (Round 1): Magic ring; ch 1, work 10 sc into ring; join.
Step 32 (Round 2): *(Sc, 3 dc, sc) in next st, sl st in next st; rep 5 times. Join.
Step 33 (Round 3): Working behind petals, *ch 4, sl st around post between petals; rep 5 times. In each ch-4 loop work (sc, hdc, 4 dc, hdc, sc). FO.
Sage Leaf (Make 16-24)
Step 34: Ch 9. Working along one side of chain: sc in 2nd ch, hdc in next, dc in next 4, hdc in next, 3 sc in last ch. Rotate to work opposite side: hdc in next, dc in next 4, hdc in next, sc in final ch. Join.
Step 35 (Optional vein): Sl st loosely through the center chain from base to tip. FO leaving a sewing tail.
Appliqué Placement
Diagonal bodice vine: Arrange 6-8 roses from wearer’s left shoulder toward right waist. Alternate rose sizes. Add leaf pairs between flowers so the vine reads continuously but does not stiffen the bodice.
Middle tier: Place three small rose clusters evenly around the visible front half of Tier 2. Each cluster can be 1 rose + 2 leaves or 1 rose + 3 leaves.
Tack motifs only at their bases and leaf centers so petals and edges remain dimensional.
Lining and Opacity
For the opaque look in the reference image, line the bodice fully and add a knee-length skirt lining. The crochet shell tiers remain free over the lining.
Step 36: After blocking the crochet bodice, lay it flat on folded lining fabric. Trace front and back shapes, adding 1/2 inch / 1.3 cm seam allowance at sides/shoulders and 5/8 inch / 1.6 cm at the waist. Keep the lining neckline 1/4 inch / 6 mm lower than crochet neckline so it stays hidden.
Step 37: Sew lining shoulder and side seams. Finish raw edges with zigzag/serger. Press carefully.
Step 38: For skirt lining, cut two gently flared or gathered panels to your waist measurement plus 10-20% ease and to about 1-2 inches / 2.5-5 cm shorter than the crochet hem. Sew side seams and hem.
Step 39: Join skirt lining to bodice lining at waist. Insert the lining unit inside the crochet dress, WS together. Hand-sew lining to the inside neckline, armholes, and waist with small loose whip stitches, allowing crochet to stretch.
Step 40: If installing an invisible zipper, stabilize the center back crochet edge with narrow grosgrain or twill tape, then sew zipper through lining and stabilized crochet edge by hand or machine with a fine needle.
Satin Bow and Final Assembly
Side Waist Bow
Step 41: Cut two 13-16 inch / 33-40 cm ribbon tails and one 24-30 inch / 60-75 cm length for the bow loops, or tie one continuous 45-50 inch / 115-127 cm ribbon into a full bow.
Step 42: Heat-seal or narrowly hem ribbon ends. Position bow at wearer’s right waist. Hand-sew only the knot/center firmly to the waistband, allowing tails to fall over the upper skirt tier.
Step 43: Sew the flat crochet rose over the bow center, catching the crochet waistband beneath for strength.
Final Finishing
Customization Options
More fitted bodice: Decrease 2-4 sts total at waist, then restore those stitches gradually toward bust.
Fuller skirt: Increase tier foundation counts by another 8-15%, keeping stitch totals multiples of 8.
Less volume: Reduce tier increases, but keep at least 1.35x / 1.5x / 1.7x of waist circumference for Tiers 1/2/3.
Longer sleeve: Add one more shell round before the dusty-rose picot edge.
No satin ribbon: Crochet a 1.5 inch / 4 cm wide belt in hdc and tie at side waist.
Care Instructions
Hand wash or machine wash in a lingerie bag on a gentle cold cycle if your yarn and lining allow it. Support the garment when wet. Reshape and dry flat. Avoid hanging for long periods because the skirt weight can stretch the bodice. Store folded.
Final Fit Notes
Crochet fabric relaxes after washing. Fit the bodice slightly snug before adding the skirt and lining, then reassess once the complete dress has been blocked. If the waist stretches under the skirt weight, thread narrow elastic through the inside waistband or sew elastic to the lining waist seam.
Thank you so much for choosing this Pink Rose Tiered Dress crochet pattern! I truly hope you love making it as much as I loved designing it. If you save this pattern to your Pinterest boards, you will always be able to find it when you are ready to start. And please, leave a comment below when you finish yours. I would absolutely love to see your beautiful creations!
Want a Quick & Easy Printable Version?
Get a clean, beautifully formatted PDF of this pattern — easy to follow step by step, ready to print or save on any device. No scrolling, no distractions, just the pattern.
Get the Printable PDF →You Might Also Like
- Sage Green Rosette Barrel Bag Free Crochet Pattern
- Pink Strawberry Couple Amigurumi Free Crochet Pattern
- Coral Reef Fish Crochet Beach Tote Free Pattern
- Dusty Rose Cable Cuff Slipper Boots Free Crochet Pattern