
I’ve been searching for the perfect mini backpack pattern for months now. Something with that effortlessly chic boho vibe, sturdy enough for everyday use, but still soft and handmade looking. This sage green beauty is exactly what I was hoping to find, and I’m thrilled to share it with you today.
Get the Ad-Free PDF Pattern
You can find the free pattern below, or you can purchase the ad-free printable PDF from my shop.
Get the Printable PDF →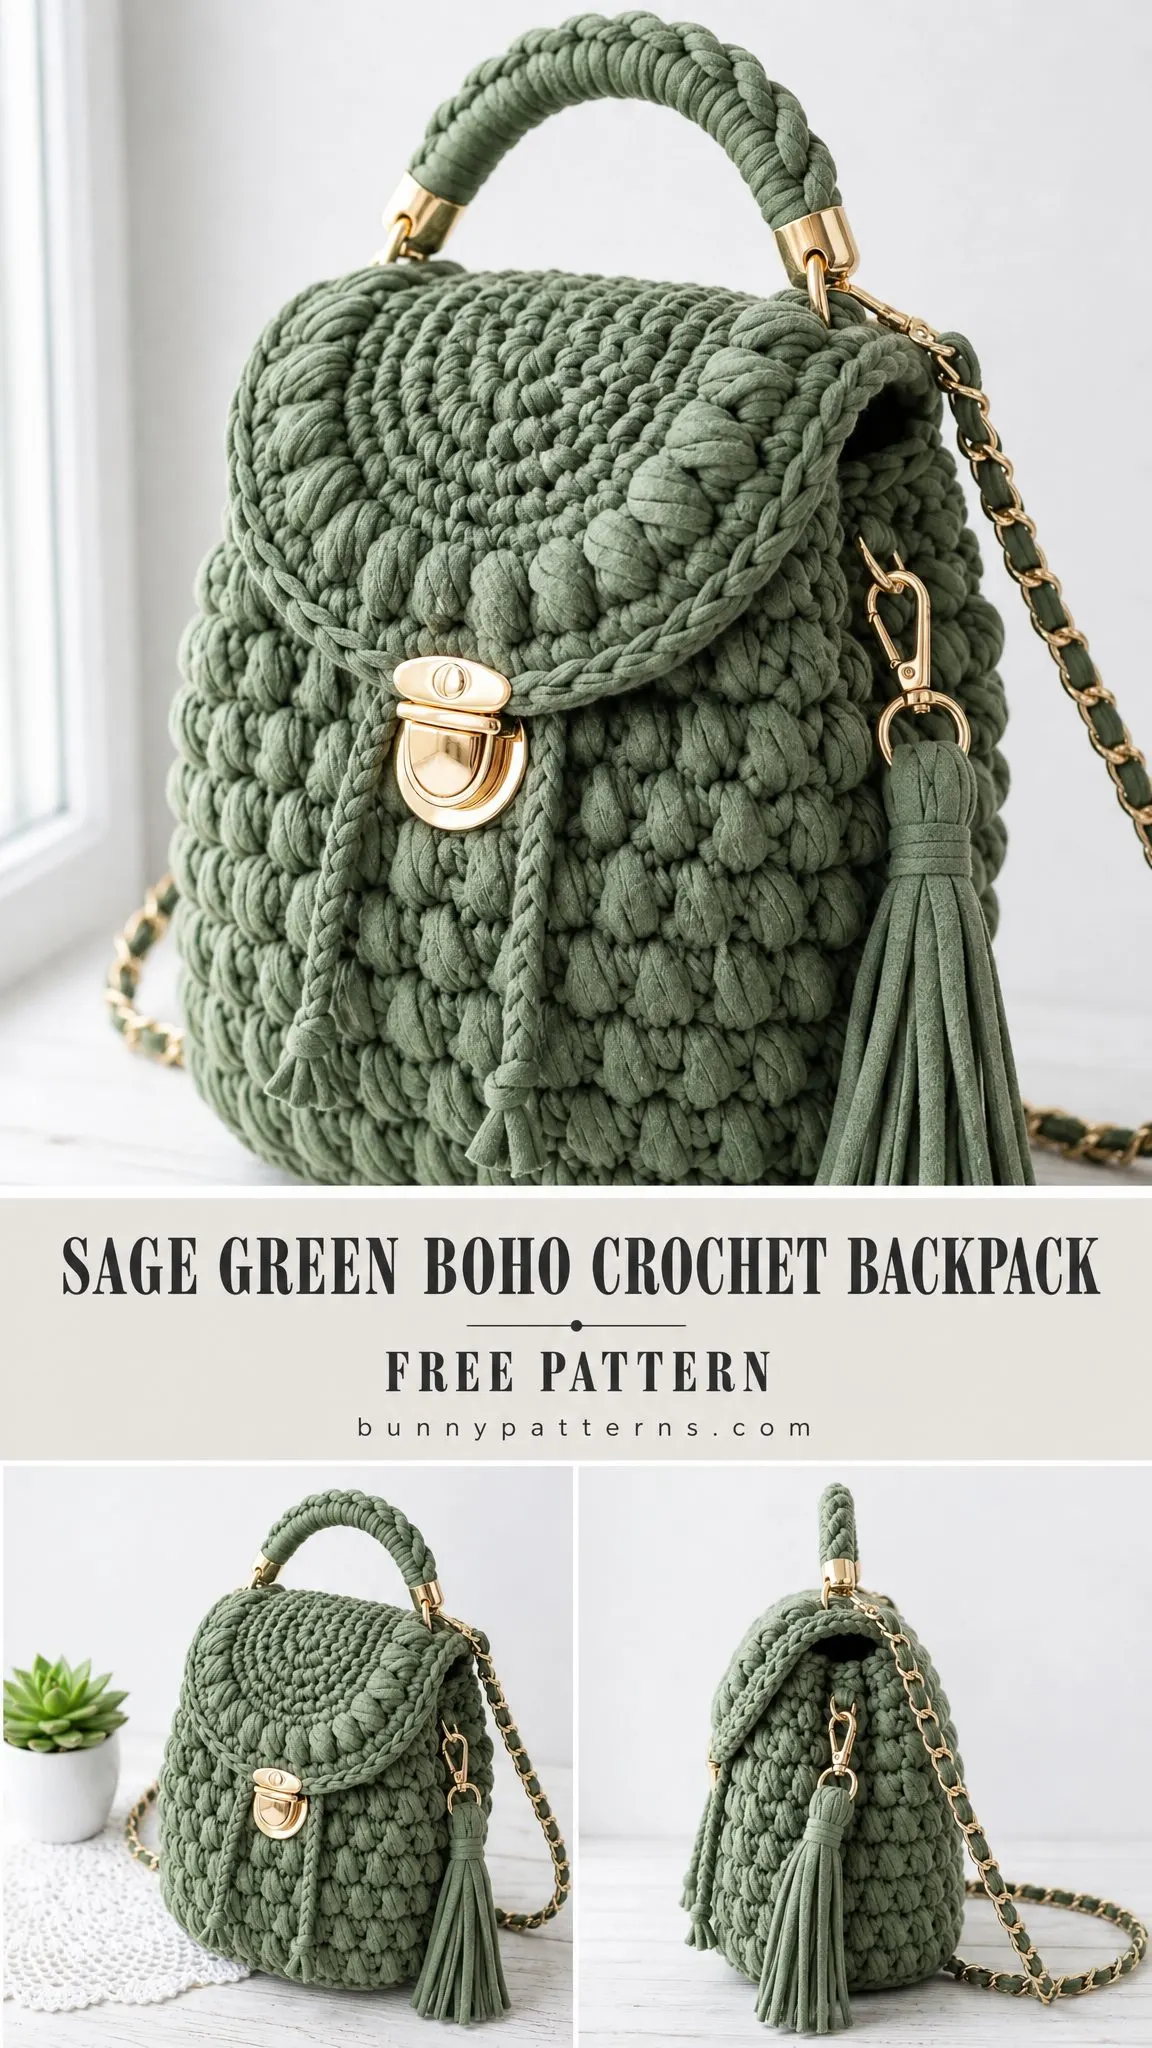
The chunky puff-bobble texture gives this bag so much personality. Those plush little bumps catch the light beautifully and create a high-end boutique look that you’d expect to see in a trendy shop window. But here’s the best part: you can make it yourself with just a few evenings of focused crocheting.
Whether you’re looking for a statement accessory for yourself or dreaming up a handmade gift that will genuinely impress, this pattern delivers. The gold hardware, braided top handle, chain strap, and tassel all work together to create something truly special. Let me walk you through everything you need to know.
About This Crochet Backpack Pattern
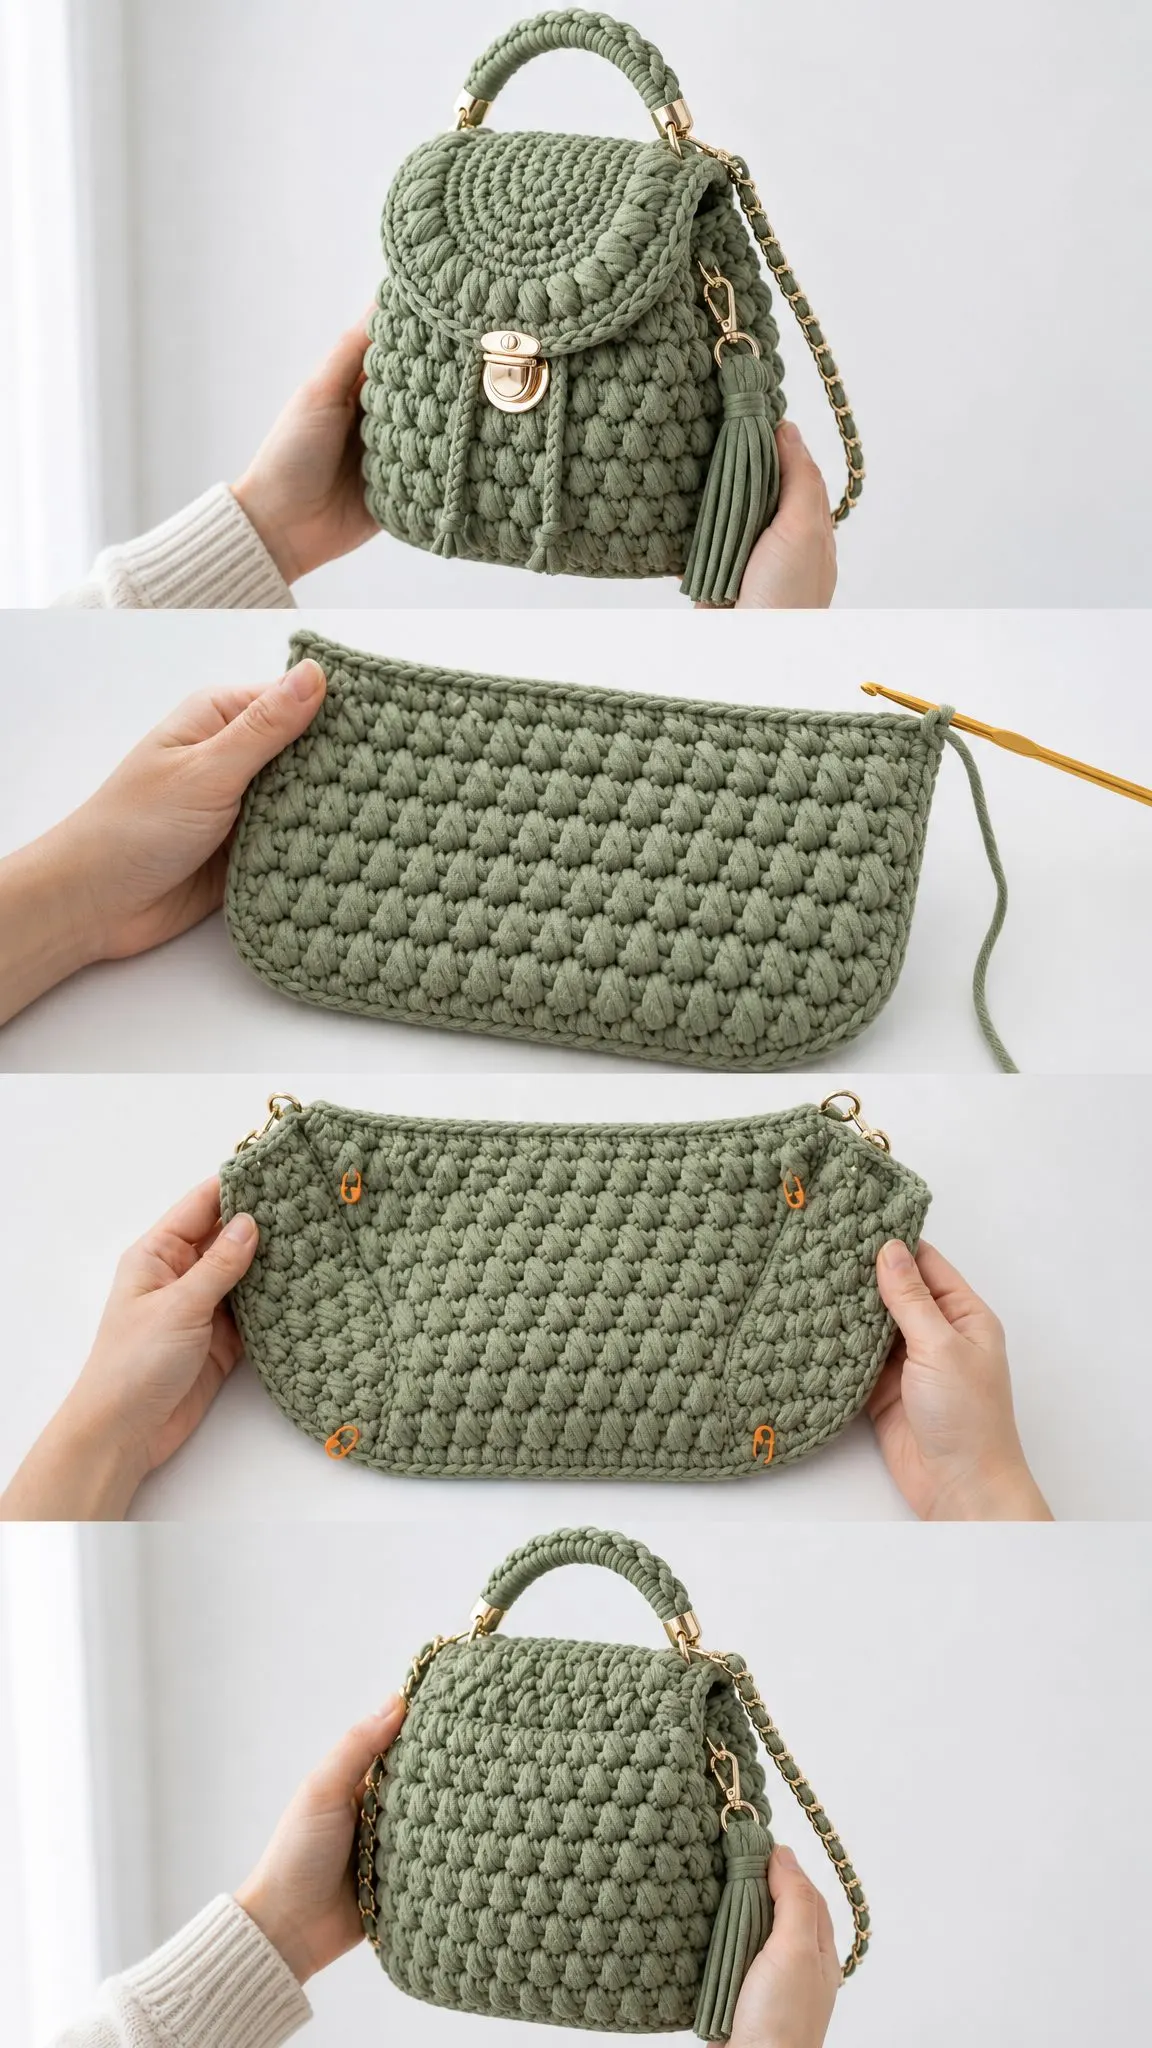
This mini boho backpack is worked in thick cord-style yarn for a plush, bobbled texture that really pops. The construction is straightforward once you understand the components. Two flat textured panels form the front and back. A narrow gusset wraps around the sides and bottom. A separate rounded flap folds over the front and closes with a tuck lock or magnetic clasp.
The wrapped top handle, chain strap, drawcords, and tassel complete that boutique finish we’re going for.
Skill level: Confident intermediate. You should be comfortable maintaining stitch counts, working puff-bobbles, seaming bulky pieces, attaching hardware, and finishing a structured accessory. If you’ve made a few bags before and aren’t afraid of a little assembly work, you’ll do great.
Time estimate: 8 to 12 hours, plus blocking and drying time. I know that sounds like a lot, but the chunky yarn works up quickly. Most of that time is in the details and finishing.
Finished Size
The completed backpack measures approximately 9 inches wide by 9.5 inches tall by 3.25 inches deep (23 x 24 x 8 cm). This does not include the handle, tassel, or strap.
The flap depth is approximately 4.5 inches (11.5 cm), and the handle rise is approximately 3 inches (7.5 cm).
This is a true mini backpack size. Perfect for carrying your phone, wallet, keys, sunglasses, and a few small essentials.
Materials You’ll Need
Yarn
Use a firm bulky or super bulky cord yarn that holds its shape. Choose sage green for the design shown in this pattern, or any deep botanical shade you love.
You’ll need approximately 180 to 220 yards (165 to 200 m) of bulky tube, braided cotton cord, or soft t-shirt yarn.
Sample-friendly options include:
Substitution tip: Choose a smooth cord that gives a firm fabric at gauge. Avoid very limp yarn unless you’re planning to add a lining for structure.
Tools and Hardware
Gauge
10 stitches and 8 rows = 4 inches (10 cm) in blocked single crochet/puff-bobble texture.
Swatch at least 5 inches (13 cm) square and measure after the fabric relaxes. This is important because the bag needs to hold its shape.
A note about gauge: This pattern is designed to help you create a similar crochet project, but individual results may vary depending on your yarn, tension, hook size, and finishing technique. You may need to make small adjustments on your side to achieve the closest possible result to the finished project shown.
Stitch Abbreviations and Definitions
Before we dive into the pattern, let’s go over the stitches you’ll be using.
UK crocheters: US single crochet (sc) = UK double crochet (dc).
How to Work the Puff-Bobble Stitch
This stitch creates all that gorgeous texture on your backpack. Here’s how to do it:
1. Insert hook in next stitch, yarn over, pull up a loop.
2. Repeat step 1 two more times in the same stitch. You will have 7 loops on the hook.
3. Yarn over and pull through all 7 loops.
4. Chain 1 to secure.
Important: The closing chain does not count as a separate stitch.
Don’t panic if this feels awkward at first. After a few repeats, your hands will remember the motion automatically.
Pattern Notes Before You Begin
Read these carefully. They’ll save you frustration later.
Tips for Firm Single Crochet Fabric
Keep stitches snug, not tight. The bag depends on a dense fabric.
If your panel feels floppy, go down a hook size. If your edges cup sharply, go up a hook size or relax your tension.
Left-handed note: Work the same instructions, reading placement from your dominant direction. For assembly, mirror the clasp, tassel, and strap placement so the finished bag hangs comfortably for you.
Front and Back Panels
Make 2 identical panels. Work flat.
Target size after Row 19: Approximately 8.75 inches wide by 9.5 inches tall (22 x 24 cm).
Foundation: Ch 23.
Row 1 (WS): Sc in 2nd ch from hook and in each ch across. Ch 1, turn. (22 sc)
Row 2 (RS): Puff-bobble in next st, sc in next st; rep from across. Ch 1, turn. (11 puff-bobbles, 11 sc; 22 sts)
Row 3: Sc in each st across. Ch 1, turn. (22 sc)
Rows 4 through 18: Rep Rows 2 and 3 seven more times, then rep Row 2 once. Ch 1, turn after each row. (22 sts each row)
Row 19: Sc in each st across. Fasten off on first panel. Do not fasten off second panel if you want to work the top edging immediately. (22 sc)
Top edging: With RS facing, sc evenly across the top edge. Fasten off. (22 sc)
Checkpoint: Each panel has 22 top stitches and 19 rows. The edges should be square, plush, and firm enough to stand softly when held at the bottom.
Side and Bottom Gusset
The gusset forms one side, the bottom, and the second side in one long strip.
Target size: Approximately 3.25 inches wide by 27.5 inches long (8 x 70 cm).
Foundation: Ch 9.
Row 1: Sc in 2nd ch from hook and across. Ch 1, turn. (8 sc)
Rows 2 through 55: Sc across. Ch 1, turn after each row. (8 sc each row)
Fasten off, leaving a long seaming tail.
Checkpoint: Gusset length should match the panel path from upper side edge, around bottom, to opposite upper side edge. You can ease a difference of up to 0.5 inch (1.3 cm) during seaming if needed.
Rounded Flap
Work flat. The straight edge attaches to the back top edge. The shaped edge folds to the front.
Foundation: Ch 23.
Row 1: Sc in 2nd ch from hook and across. Ch 1, turn. (22 sc)
Row 2: Puff-bobble, sc; rep from across. Ch 1, turn. (22 sts)
Row 3: Sc across. Ch 1, turn. (22 sc)
Row 4: Rep Row 2. Ch 1, turn. (22 sts)
Row 5: Sc2tog, sc 18, sc2tog. Ch 1, turn. (20 sc)
Row 6: Sc2tog, puff-bobble, sc; rep from 8 times, sc2tog. Ch 1, turn. (18 sts)
Row 7: Sc2tog, sc 14, sc2tog. Ch 1, turn. (16 sc)
Row 8: Sc2tog, puff-bobble, sc; rep from 6 times, sc2tog. Ch 1, turn. (14 sts)
Row 9: Sc2tog, sc 10, sc2tog. Do not turn. (12 sc)
Edging: Sc along first side edge with 1 sc in each row end (9 sc), place 2 sc at the lower curve, sc across Row 9 (12 sc), place 2 sc at the opposite lower curve, then sc along the second side edge with 1 sc in each row end (9 sc). Sl st to join, fasten off. (34 sc)
Assembly Instructions
This is where your backpack really comes together. Take your time with this section.
Join Front to Gusset
With right side of front panel facing out, pin the center of the gusset to the center bottom of the front.
Use a mattress stitch or whipstitch through edge loops. Seam from one upper side edge down around the bottom and up the other side. Leave the top edge open.
Join Back
Repeat with the back panel, matching bottom centers and side tops. Keep seams firm but not puckered.
Weave in bulky ends inside the bag. Nobody wants to see those tails peeking out.
Attach Flap
Center the straight 22-stitch edge of the flap along the top edge of the back panel.
Sew through both layers across all 22 stitches. Add a second line of stitching 0.25 inch (6 mm) below the first for strength. This flap needs to withstand daily opening and closing.
Top Rim Edging
Join yarn at a back corner. Sc evenly around the open top rim: 22 sts across front, 8 sts across one gusset top, 22 sts across back under the flap, and 8 sts across the other gusset top. Sl st to join. (60 sc)
Fasten off.
Checkpoint: The top opening has 60 sc. The front and back sit flat, the gusset is centered at the bottom, and the flap reaches roughly halfway down the front.
Details and Hardware
These finishing touches transform your crocheted pieces into a polished, professional-looking accessory.
Braided Top Handle
Crochet a firm cord approximately 12 inches (30 cm) long, or wrap yarn tightly around a rope core.
Sew or clamp each end to the top corners with gold handle caps or D-rings. Finished handle rise should be approximately 3 inches (7.5 cm).
Drawcords
Make two cords approximately 13 inches (33 cm) each using chain stitches, i-cord, or Romanian cord.
Thread each cord down the front under the flap. Knot the ends or add small tassel ends. These are decorative and help echo the vertical lines on the bag.
Tassel
Cut 12 strands approximately 10 inches (25 cm) long. Fold over a swivel clasp or ring. Wrap tightly 1 inch (2.5 cm) below the fold. Knot securely and trim ends evenly.
Attach to one side D-ring.
Chain Strap
Attach a chain strap to the side D-rings with swivel clasps.
Alternative: To crochet a matching shoulder strap instead, make a cord 36 to 42 inches (91 to 107 cm) long and sew it securely to the side D-rings.
Closure
Position the tuck lock or magnetic clasp so the flap closes without pulling.
Reinforce the wrong side with felt, plastic canvas, or lining fabric before attaching the hardware. This prevents the hardware from pulling through the crocheted fabric over time.
Safety and strength tip: Test the handle, strap, and clasp before use. Add a fabric lining if the bag will carry keys, a phone, or other heavy items.
Size Customization Tips
Want to adjust the size? Here’s how to do it without throwing off the whole pattern.
Width: Add or subtract stitches in multiples of 2 so puff-bobble rows remain even.
Height: Add or remove Rows 2 and 3 repeats on the panels, then adjust gusset length to match side + bottom + side.
Depth: Add or subtract gusset stitches. Each 2 stitches changes depth by approximately 0.75 inch (2 cm) at gauge.
Flap: Begin with the same stitch count as the panel top. Keep decreases balanced at both edges.
Troubleshooting Common Issues
Panel is too wide: Use a smaller hook or remove 2 stitches from the foundation.
Panel cups or ruffles: Check tension and do not add stitches at row ends.
Gusset will not fit: Pin bottom centers first, then ease evenly along both sides.
Flap twists: Block flat before attaching and sew the straight edge evenly to the back top.
Blocking and Finishing
Steam lightly from a distance or wet block only if your yarn label allows it.
Shape panels square, smooth the flap curve, and allow to dry completely. Do not flatten the puff-bobbles with heavy pressure. You worked hard for that texture.
Care Instructions
Spot clean with cool water and mild soap. Dry flat. Avoid soaking metal hardware.
Store stuffed with tissue to preserve shape. This will help your backpack look beautiful for years to come.
Final Thoughts on This Boho Crochet Backpack Pattern
This backpack pattern combines so many elements I love: that satisfying puff-bobble texture, the elegant gold hardware, and a practical design that actually works for everyday life. Every time I look at the finished piece, I’m reminded why handmade accessories are worth the extra effort.
The construction might seem complex at first glance, but once you break it down into individual components, it’s really quite manageable. Two panels, one gusset, one flap, and then assembly. You’ve got this.
I hope you love making this backpack as much as I enjoyed putting together this pattern walkthrough for you. Thank you so much for being here and for trusting me to guide you through this project.
If you make this boho backpack, I would absolutely love to see it. Save this pattern to your Pinterest boards so you can find it when you’re ready to start, and please leave a comment below to share your progress or finished photos. Happy crocheting!
Want a Quick & Easy Printable Version?
Get a clean, beautifully formatted PDF of this pattern — easy to follow step by step, ready to print or save on any device. No scrolling, no distractions, just the pattern.
Get the Printable PDF →You Might Also Like
- Sage Green Textured Clutch Bag Free Crochet Pattern
- Wildflower Meadow Crochet Pot Free Crochet Pattern
- Champagne Gold Bell Sleeve Crochet Top Free Pattern
- Sage Green Summer Tote with Cream Tassels Free Crochet Pattern