
Last summer, I attended my cousin’s garden party wearing a basic tank top and spent the entire afternoon admiring what everyone else was wearing. One guest had on this incredible one-shoulder top with crocheted flowers cascading down the strap, and I could not stop thinking about it. I went home that night, pulled out my sketchbook, and started drafting what would eventually become this pattern.
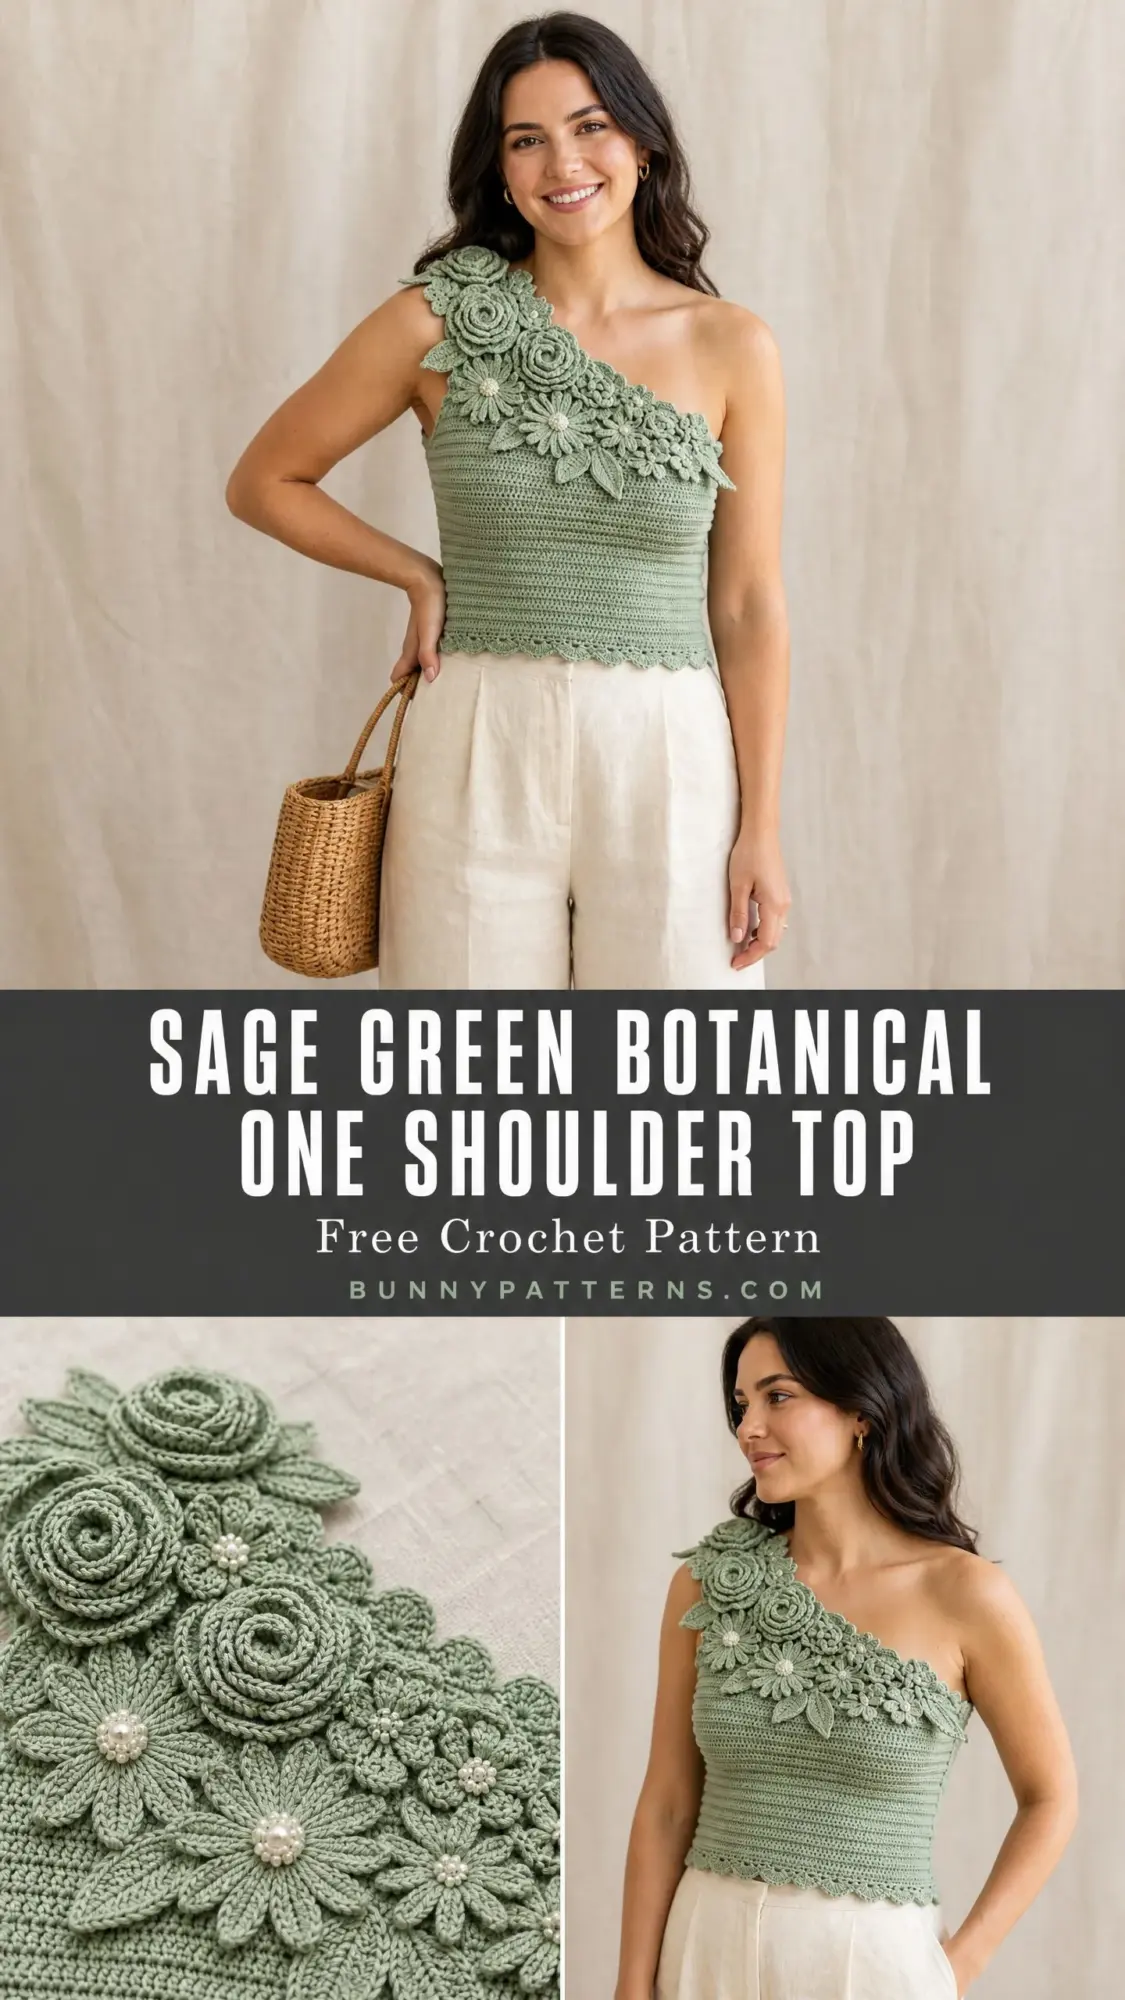
The thing is, I wanted something that looked like it belonged in a high-end boutique but was actually achievable for someone with intermediate crochet skills. After about a dozen prototypes and more frogging than I care to admit, I finally landed on this design. The fitted bodice, the asymmetrical neckline, the three-dimensional botanical cluster, it all came together in this beautiful sage green that feels fresh and sophisticated at the same time.
If you have been searching for a summer crochet project that will genuinely impress people, this is it. Fair warning though, this one takes some time and patience. But I promise the finished piece is worth every single stitch.
About This One Shoulder Crochet Top Pattern
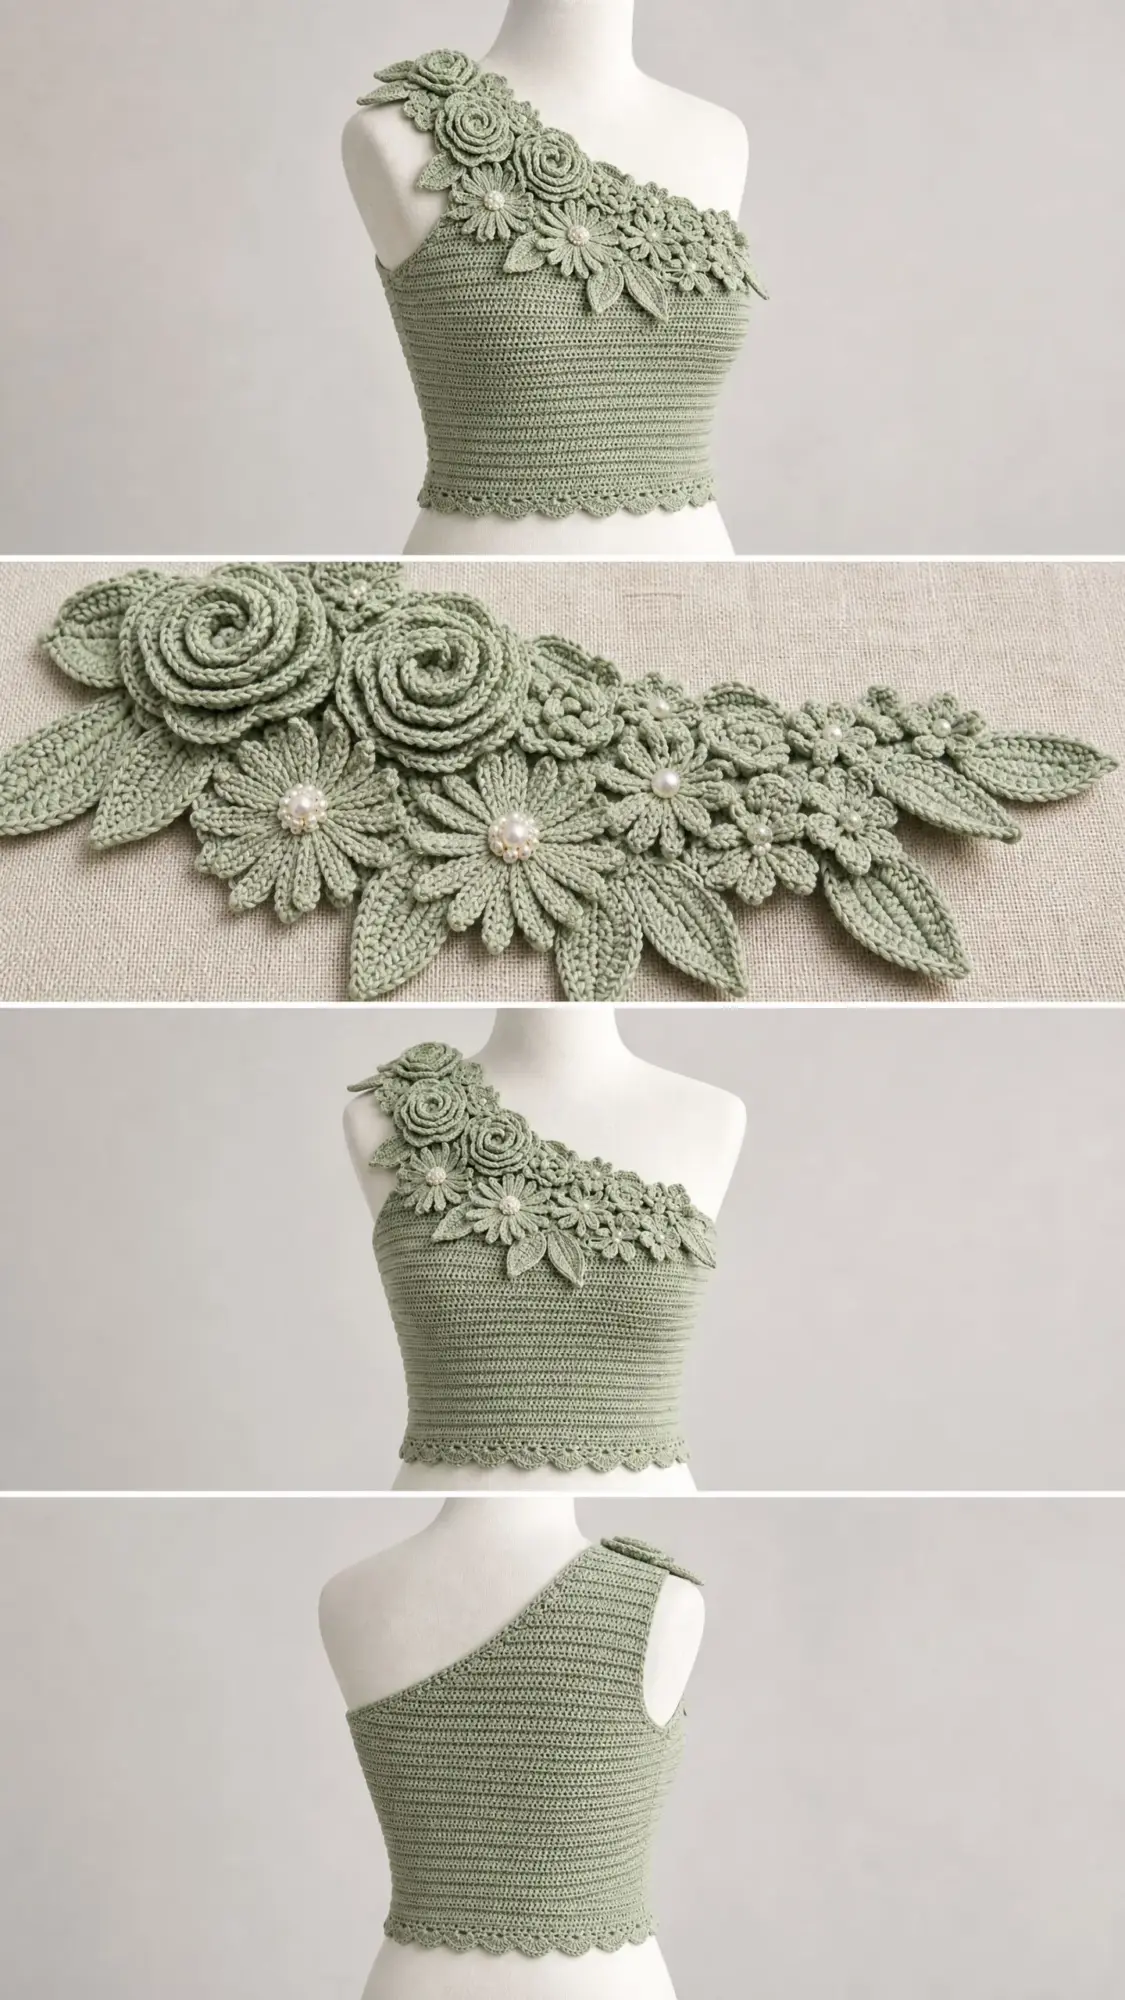
This sage green botanical one shoulder top combines structural garment construction with decorative applique work. The bodice is worked as a tube in continuous rounds using single crochet, which creates a dense, supportive fabric perfect for a fitted crop top. The asymmetrical design features a wide strap on the left shoulder that tapers as it crosses diagonally to attach at the right underarm.
What makes this top truly special is the botanical cluster. You will create spiral roses, daisy flowers with pearl bead centers, and individual leaf motifs, all crocheted separately and then sewn onto the strap and upper chest area. The effect is stunning and surprisingly wearable.
The lower hem features a scallop border that adds a feminine finishing touch without overwhelming the clean lines of the bodice. This pattern is sized for Small, Medium, and Large, with finished bust measurements of 30, 34, and 38 inches respectively. The design intentionally includes 1 to 2 inches of negative ease for that snug, flattering fit.
Skill Level and Time Commitment
I am going to be honest with you. This is an advanced intermediate project. If you have never worked a garment in the round, shaped a neckline, or created three-dimensional crochet motifs, you might want to practice those skills first on smaller projects.
That said, if you are comfortable with basic garment construction and willing to take your time, you can absolutely do this. The bodice itself is just single crochet worked in a spiral, which is repetitive and meditative once you get going. The trickier parts are the upper edge shaping and the botanical motifs, but I will walk you through every step.
Expect to spend approximately 20 to 30 hours on this top for a size Medium, including blocking and applique assembly. I recommend breaking it into sessions rather than trying to power through. Your hands will thank you.
Materials You Will Need
Yarn
You will need approximately 400 (450, 500) yards of DK weight yarn (CYCA 3) in sage green. Cotton or cotton-blend yarn works best because it holds stitch definition beautifully and keeps those botanical motifs dimensional without flopping over.
Here are three yarn options I recommend:
Paintbox Yarns Simply DK in Spearmint Green is my top pick. It is 100% cotton with 137 yards per 50g skein, and you will need 3 (4, 4) skeins depending on your size. The stitch definition is excellent.
Drops Safran in color 11 (light green) is another great choice. Also 100% cotton with 175 yards per 50g skein. You will need 3 (3, 3) skeins. It has a slightly lighter twist that drapes beautifully.
Lion Brand 24/7 Cotton DK in Succulent gives a subtle sheen thanks to its mercerized finish. At 186 yards per 100g skein, you will need 2 (3, 3) skeins.
If you substitute yarn, avoid anything fuzzy or textured. It will obscure your stitches and make the applique motifs difficult to shape. Wool blends will work but expect more stretch, so consider sizing down.
Hooks
You will need two hook sizes:
Notions
Gather these before you start:
Gauge
Getting gauge right is critical for fit. With your E-4 / 3.5 mm hook in single crochet worked in the round:
20 stitches x 24 rounds = 4 inches x 4 inches / 10 cm x 10 cm
Make a swatch in the round, not flat, since gauge can differ between the two methods. If your swatch is too big, go down a hook size. Too small, go up. Do not skip this step unless you enjoy frogging entire garments.
For the applique pieces, exact gauge is less important, but the motifs should feel firm, not floppy. If your petals curl too much or the fabric looks too open, switch to the D-3 / 3.25 mm hook.
Abbreviations and Stitch Definitions
Let me define every abbreviation you will encounter. I know some of these are familiar, but I want to make sure we are all on the same page.
ch = chain. Wrap yarn over hook, pull through loop on hook.
sl st = slip stitch. Insert hook, yarn over, pull through both loops at once.
sc = single crochet. Insert hook, yarn over, pull up a loop, yarn over, pull through both loops.
sc2tog = single crochet two together. This is a decrease. Insert hook into first stitch, pull up a loop, insert hook into next stitch, pull up a loop, yarn over, pull through all three loops on hook. You have turned two stitches into one.
dc = double crochet. Yarn over, insert hook, yarn over, pull up a loop, yarn over, pull through two loops, yarn over, pull through remaining two loops.
hdc = half double crochet. Yarn over, insert hook, yarn over, pull up a loop, yarn over, pull through all three loops.
MR = magic ring. An adjustable starting ring for working in the round.
BLO = back loop only. Work into just the back loop of the stitch below.
FLO = front loop only. Work into just the front loop of the stitch below.
RS = right side. The side that faces outward when worn.
WS = wrong side. The side that faces your body when worn.
pm = place marker.
st(s) = stitch(es).
rnd = round.
Special Stitches
Scallop Stitch (for the hem border)
This creates the pretty shell edge at the bottom of the bodice. Skip 2 stitches, work 5 double crochets into the next stitch, skip 2 stitches, slip stitch into the next stitch. That sequence creates one complete scallop over 6 stitches. Your total stitch count must be divisible by 6 for this to work out evenly.
Spiral Rose
This creates those gorgeous three-dimensional roses for the botanical cluster.
Step 1: Chain 36 loosely.
Step 2: Starting in the 2nd chain from hook, work 2 dc in each chain across, turning the work as you go to encourage curling. (70 dc)
Step 3: Fasten off, leaving a 12-inch tail.
Step 4: Thread the tail on a tapestry needle. Roll the crocheted strip tightly from one end, stitching through the base as you roll to hold the spiral together. The finished rose measures approximately 1.5 inches in diameter.
Daisy Flower
Step 1: Make a magic ring.
Step 2: Round 1: Ch 1, work 6 sc into the ring, pull ring closed, sl st to first sc to join. (6 sc)
Step 3: Round 2 (petals): [Chain 6, sl st back into the 2nd ch from hook, sc in next ch, hdc in next ch, dc in next 2 ch, sl st back into same sc at base of petal] 6 times. (6 petals)
Step 4: Fasten off. A pearl bead gets sewn to the center after assembly.
Leaf Motif
Step 1: Chain 12.
Step 2: Starting in the 2nd ch from hook, sc in next 4 ch, hdc in next 2 ch, dc in next 2 ch, hdc in next ch, sc in next ch, 3 sc in last ch (tip of leaf). Do not turn. Working along the opposite side of the foundation chain: sc in next ch, hdc in next ch, dc in next 2 ch, hdc in next 2 ch, sc in next 4 ch, sl st to first sc to close. (27 sts around)
Step 3: Fasten off. The leaf measures approximately 2 inches long.
Pattern Instructions
Section 1: Bodice Tube
Foundation: Chain 151 (171, 191). Taking care not to twist, slip stitch to the first chain to form a ring. (150, 170, 190 sts in ring)
Place a stitch marker at the joining slip stitch. This marks the center back.
Round 1: Ch 1 (does not count as st, now and throughout), sc in each ch around, do not join, work in continuous spiral. (150, 170, 190 sc)
Rounds 2 through 6: Sc in each st around. (150, 170, 190 sc)
After Round 6, your hem band is approximately 1 inch tall.
Rounds 7 through 48 (S), 7 through 50 (M), 7 through 52 (L): Sc in each st around, maintaining continuous spiral. (150, 170, 190 sc)
Checkpoint: Your tube should measure approximately 8 (8.5, 9) inches tall from the base.
Section 2: Upper Bodice Shaping
This section creates the asymmetrical neckline. You will transition from working in the round to working flat.
Preparation Round (all sizes): Sl st in next 75 (85, 95) sts to mark the front/back divide. Place marker. The first 75 (85, 95) sts form the back, the next 75 (85, 95) sts form the front.
Joining Slip Stitch: At center back, sl st into the next st.
Rounds 49 through 52 (S), 51 through 54 (M), 53 through 56 (L): Sc in each st around in continuous spiral. (150, 170, 190 sc)
Now begin shaping:
Upper Shaping Row 1 (RS, working flat): Sl st in first 15 (17, 19) sts (held for strap), ch 1, sc across next 120 (136, 152) sts. Turn. (120, 136, 152 sc)
Upper Shaping Row 2 (WS): Ch 1, sc2tog, sc across to last 2 sts, sc2tog. Turn. (118, 134, 150 sc)
Upper Shaping Row 3: Ch 1, sc2tog, sc across to last 2 sts, sc2tog. Turn. (116, 132, 148 sc)
Upper Shaping Row 4: Ch 1, sc2tog, sc across to last 2 sts, sc2tog. Turn. (114, 130, 146 sc)
Upper Shaping Row 5: Ch 1, sc2tog, sc across to last 2 sts, sc2tog. Turn. (112, 128, 144 sc)
Upper Shaping Row 6: Ch 1, sc2tog, sc across to last 2 sts, sc2tog. Turn. (110, 126, 142 sc)
Fasten off.
Section 3: Strap
Strap Pick-Up: With RS facing, attach yarn at the left-front upper corner. Pick up and sc across 30 (34, 38) sts along the left upper edge. (30, 34, 38 sc)
Strap Row 1 (WS): Ch 1, turn, sc in each st across. (30, 34, 38 sc)
Strap Row 2 (RS): Ch 1, turn, sc2tog, sc across to last 2 sts, sc2tog. (28, 32, 36 sc)
Strap Row 3: Ch 1, turn, sc in each st across. (28, 32, 36 sc)
Strap Row 4: Ch 1, turn, sc2tog, sc across to last 2 sts, sc2tog. (26, 30, 34 sc)
Strap Rows 5 through 12: Sc in each st every row. (26, 30, 34 sc)
Strap Row 13: Ch 1, turn, sc2tog, sc across to last 2 sts, sc2tog. (24, 28, 32 sc)
Strap Rows 14 through 18: Sc in each st every row. (24, 28, 32 sc)
Strap Row 19: Ch 1, turn, sc2tog, sc across to last 2 sts, sc2tog. (22, 26, 30 sc)
Strap Rows 20 through 24: Sc in each st every row. (22, 26, 30 sc)
Fasten off.
Attaching the Strap: Align the free end with the right underarm inner edge. Whipstitch securely to the bodice, distributing the width across approximately 3 to 4 inches.
Section 4: Upper Edge Finishing
With RS facing, attach yarn along the open upper edge. Work 1 round of sc evenly around the entire upper edge including strap tops. Sl st to join. Fasten off.
Section 5: Hem Scallop Border
Check your stitch count. For the scallop stitch, you need a number divisible by 6.
For Size M only: Work 1 rnd of sc, working sc2tog at 2 evenly spaced points to reduce to 168 sts.
For Size L only: Work 1 rnd of sc, working sc2tog at 4 evenly spaced points to reduce to 186 sts.
Working counts: 150 (168, 186) sts.
Scallop Border Round: With RS facing, sl st into first st. [Skip 2 sts, work 5 dc into next st, skip 2 sts, sl st into next st] repeat around. You will have 25 (28, 31) scallops. Fasten off.
Section 6: Botanical Applique Motifs
Using your D-3 / 3.25 mm hook, make:
Assembling the Cluster:
Position 2 spiral roses at the top of the shoulder. Place 1 rose slightly below, overlapping. Arrange 2 to 3 daisy flowers below the roses, fanning toward the right. Tuck 4 to 5 leaf motifs among the roses and daisies. Add remaining pieces at the lower-right edge.
The finished cluster should measure approximately 8 to 10 inches tall and 5 to 6 inches wide. Pin everything in place, then sew each piece securely using the yarn tails. Attach pearl beads to daisy centers last.
Finishing and Blocking
Weave in all ends, weaving at least 1 inch in two directions.
Wet block the bodice before attaching botanicals. Submerge in cool water for 10 to 15 minutes. Press out excess water in a towel without wringing. Pin to blocking mat at finished dimensions, stretching scallops gently so they open evenly. Allow to dry completely.
Block botanical motifs individually, pinning petals and leaves into their final shapes.
For optional hem support, thread clear elastic through the inside of the bodice at the second round from the lower edge.
Care Instructions
Hand wash in cool water with gentle detergent. Do not wring. Lay flat to dry. Do not tumble dry. If pressing is needed, use a pressing cloth on low heat on the reverse side only. Store folded rather than hung to prevent strap stretching.
Final Thoughts on This Crochet Top Pattern
This sage green botanical one shoulder top is one of those projects that feels like a genuine accomplishment when you finish it. Every time I wear mine, someone asks where I got it. And honestly? Telling them I made it never gets old.
The combination of the clean, fitted bodice with the romantic botanical cluster creates something truly special. It works beautifully for summer parties, garden events, or anywhere you want to feel a little extra polished. Pair it with high-waisted linen pants like in the reference photo, or try it with a flowy midi skirt.
Take your time with this one. Enjoy the process. And when you are done, you will have a handmade piece that looks like it came straight from a designer boutique.
If this pattern is calling your name, go ahead and save it to your Pinterest boards so you can find it when you are ready to cast on. And please, if you make this top, drop a comment below or tag me on social media. I would absolutely love to see your version and hear how the project went for you!
You Might Also Like
- Rose Gold Monarch Crochet Mini Dress Free Pattern
- Ocean Breeze Granny Square Tote Free Crochet Pattern
- Rainbow Pastel Granny Square Poncho Free Crochet Pattern
- Lavender Butterfly Baby Dress Free Crochet Pattern