
I don’t know about you, but I absolutely melt over vintage-inspired baby clothes. There’s something about those heirloom details that makes a handmade gift feel extra meaningful.
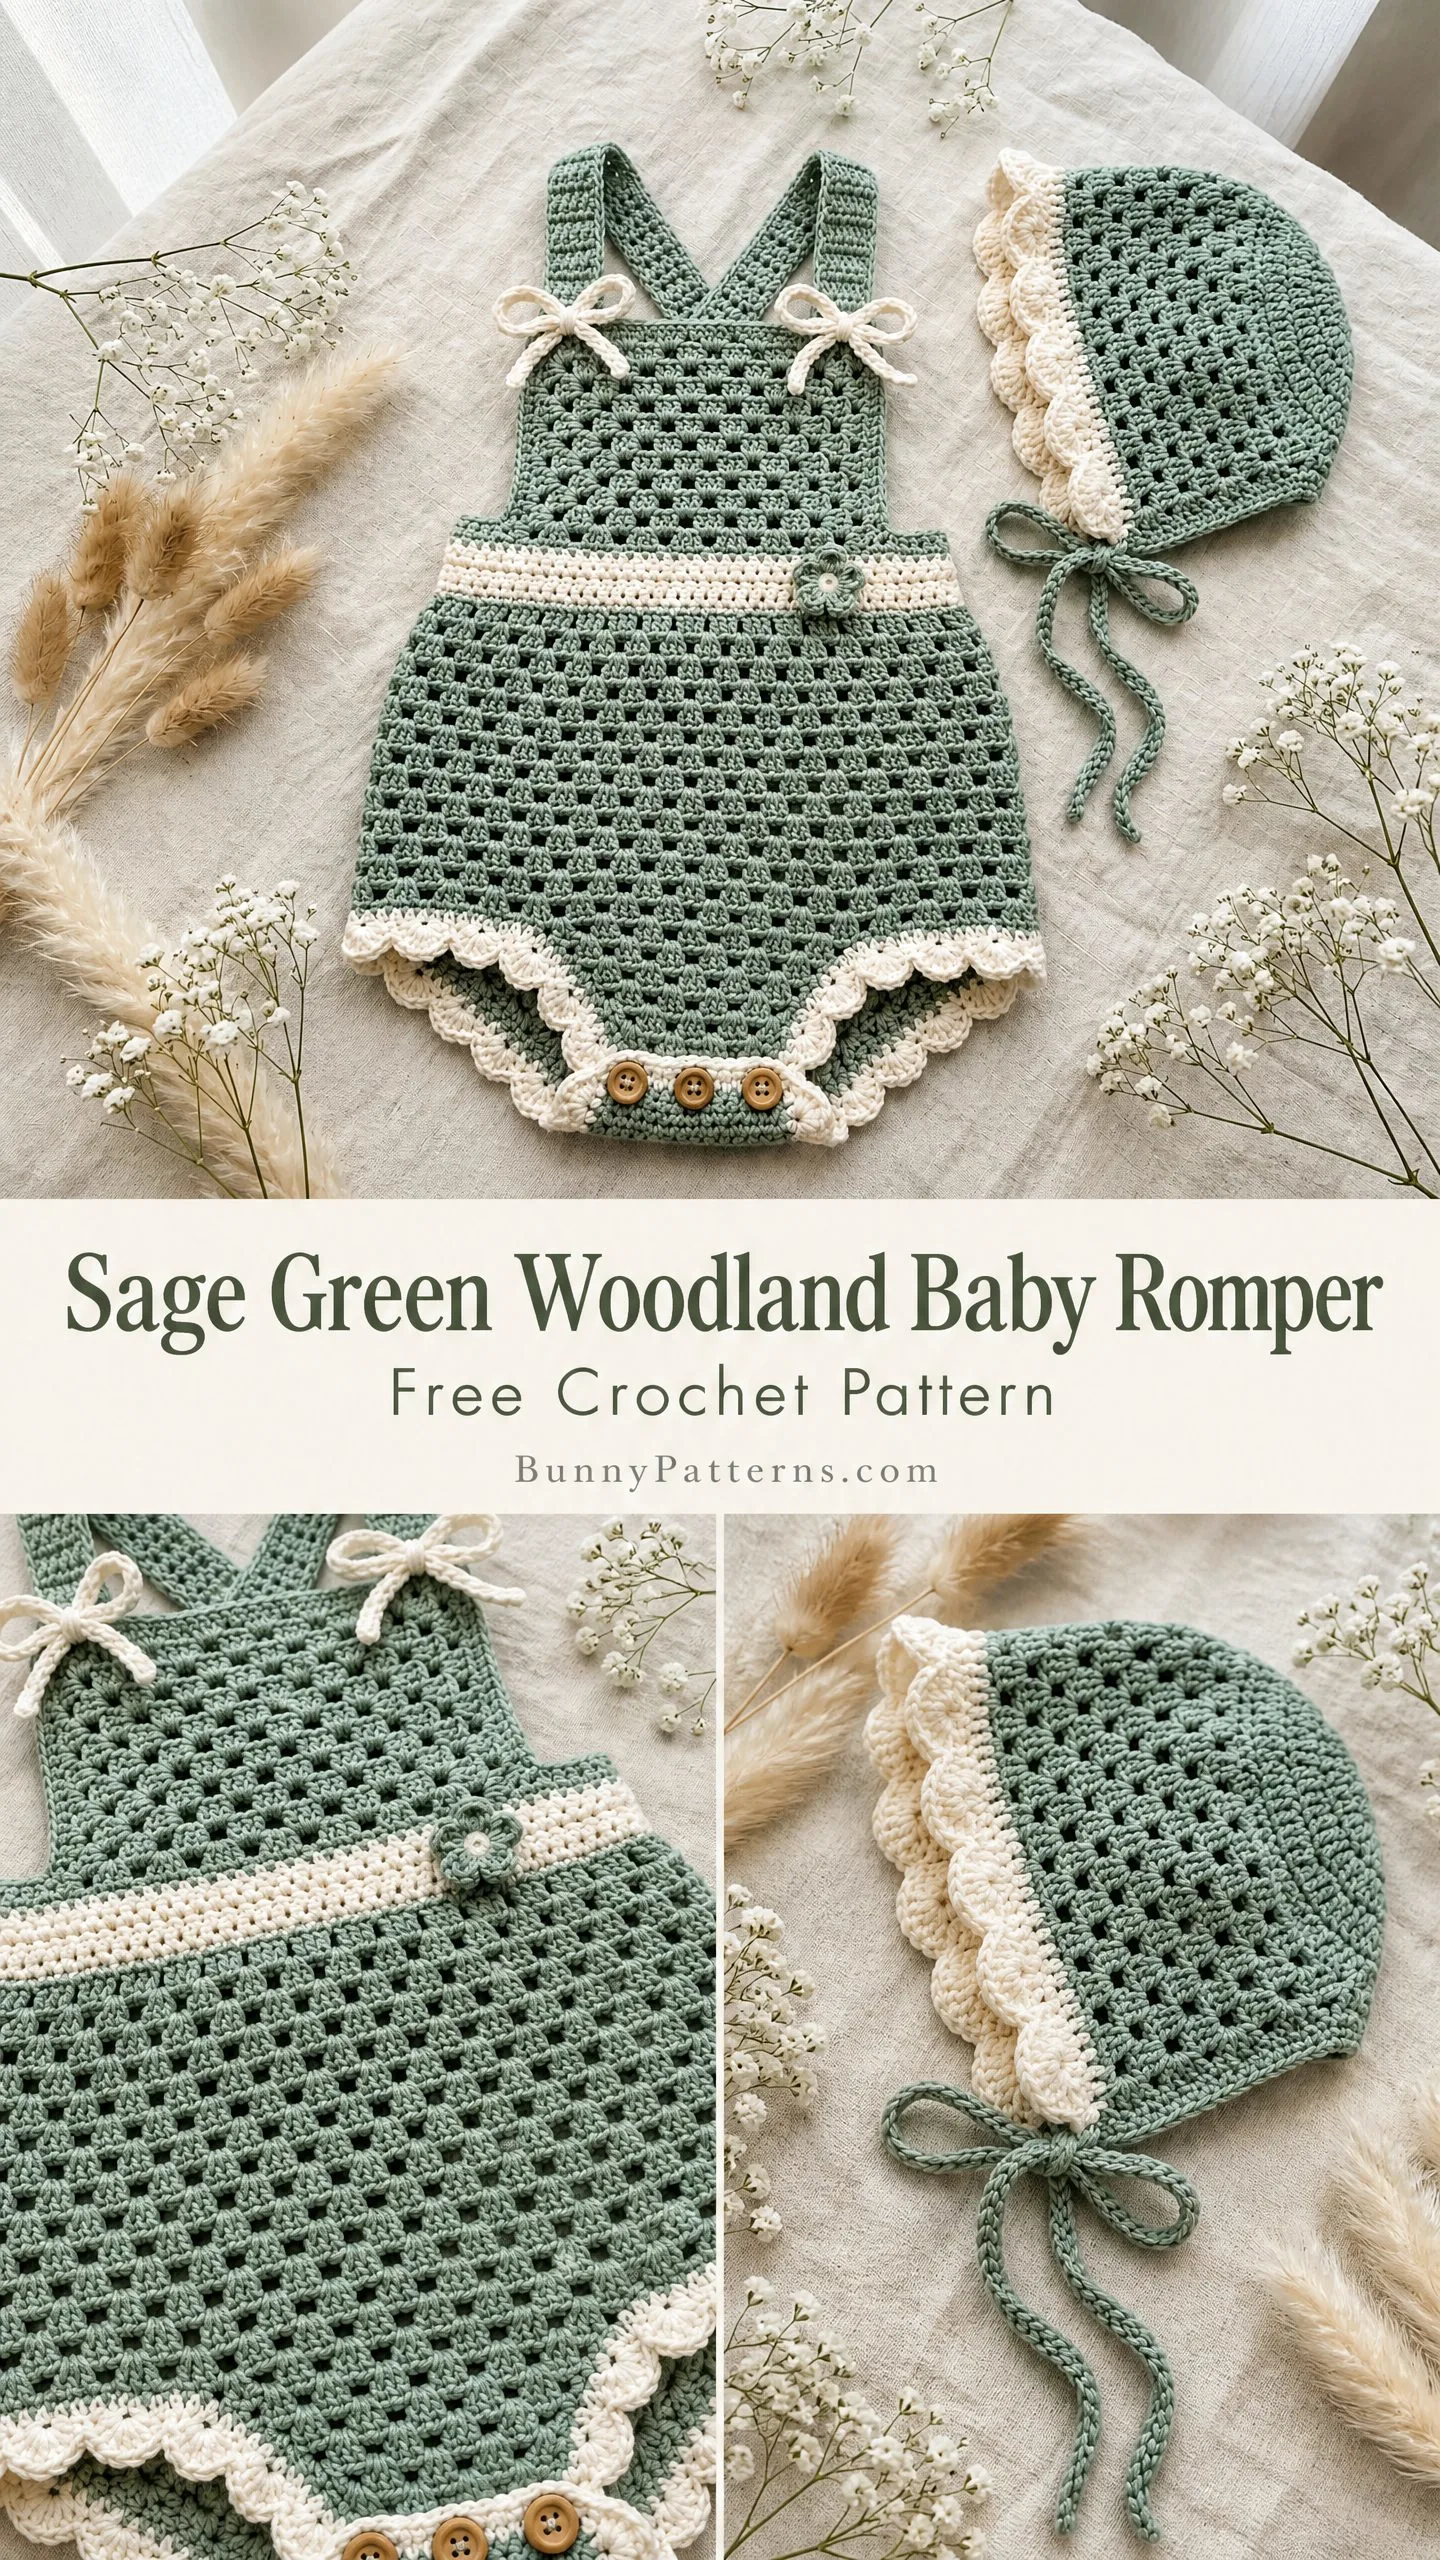
This sage green romper and bonnet set has all the charm of something you’d find in a vintage shop, but you get to make it yourself. Crossed straps, tiny wooden buttons, scalloped edges, and a matching bonnet? Yes please.
If you’ve been looking for a baby shower gift that will make everyone gasp, this is the one. It looks incredibly intricate, but I promise the construction is more straightforward than it appears once you understand the main stitch pattern.
About This Crochet Baby Romper Pattern
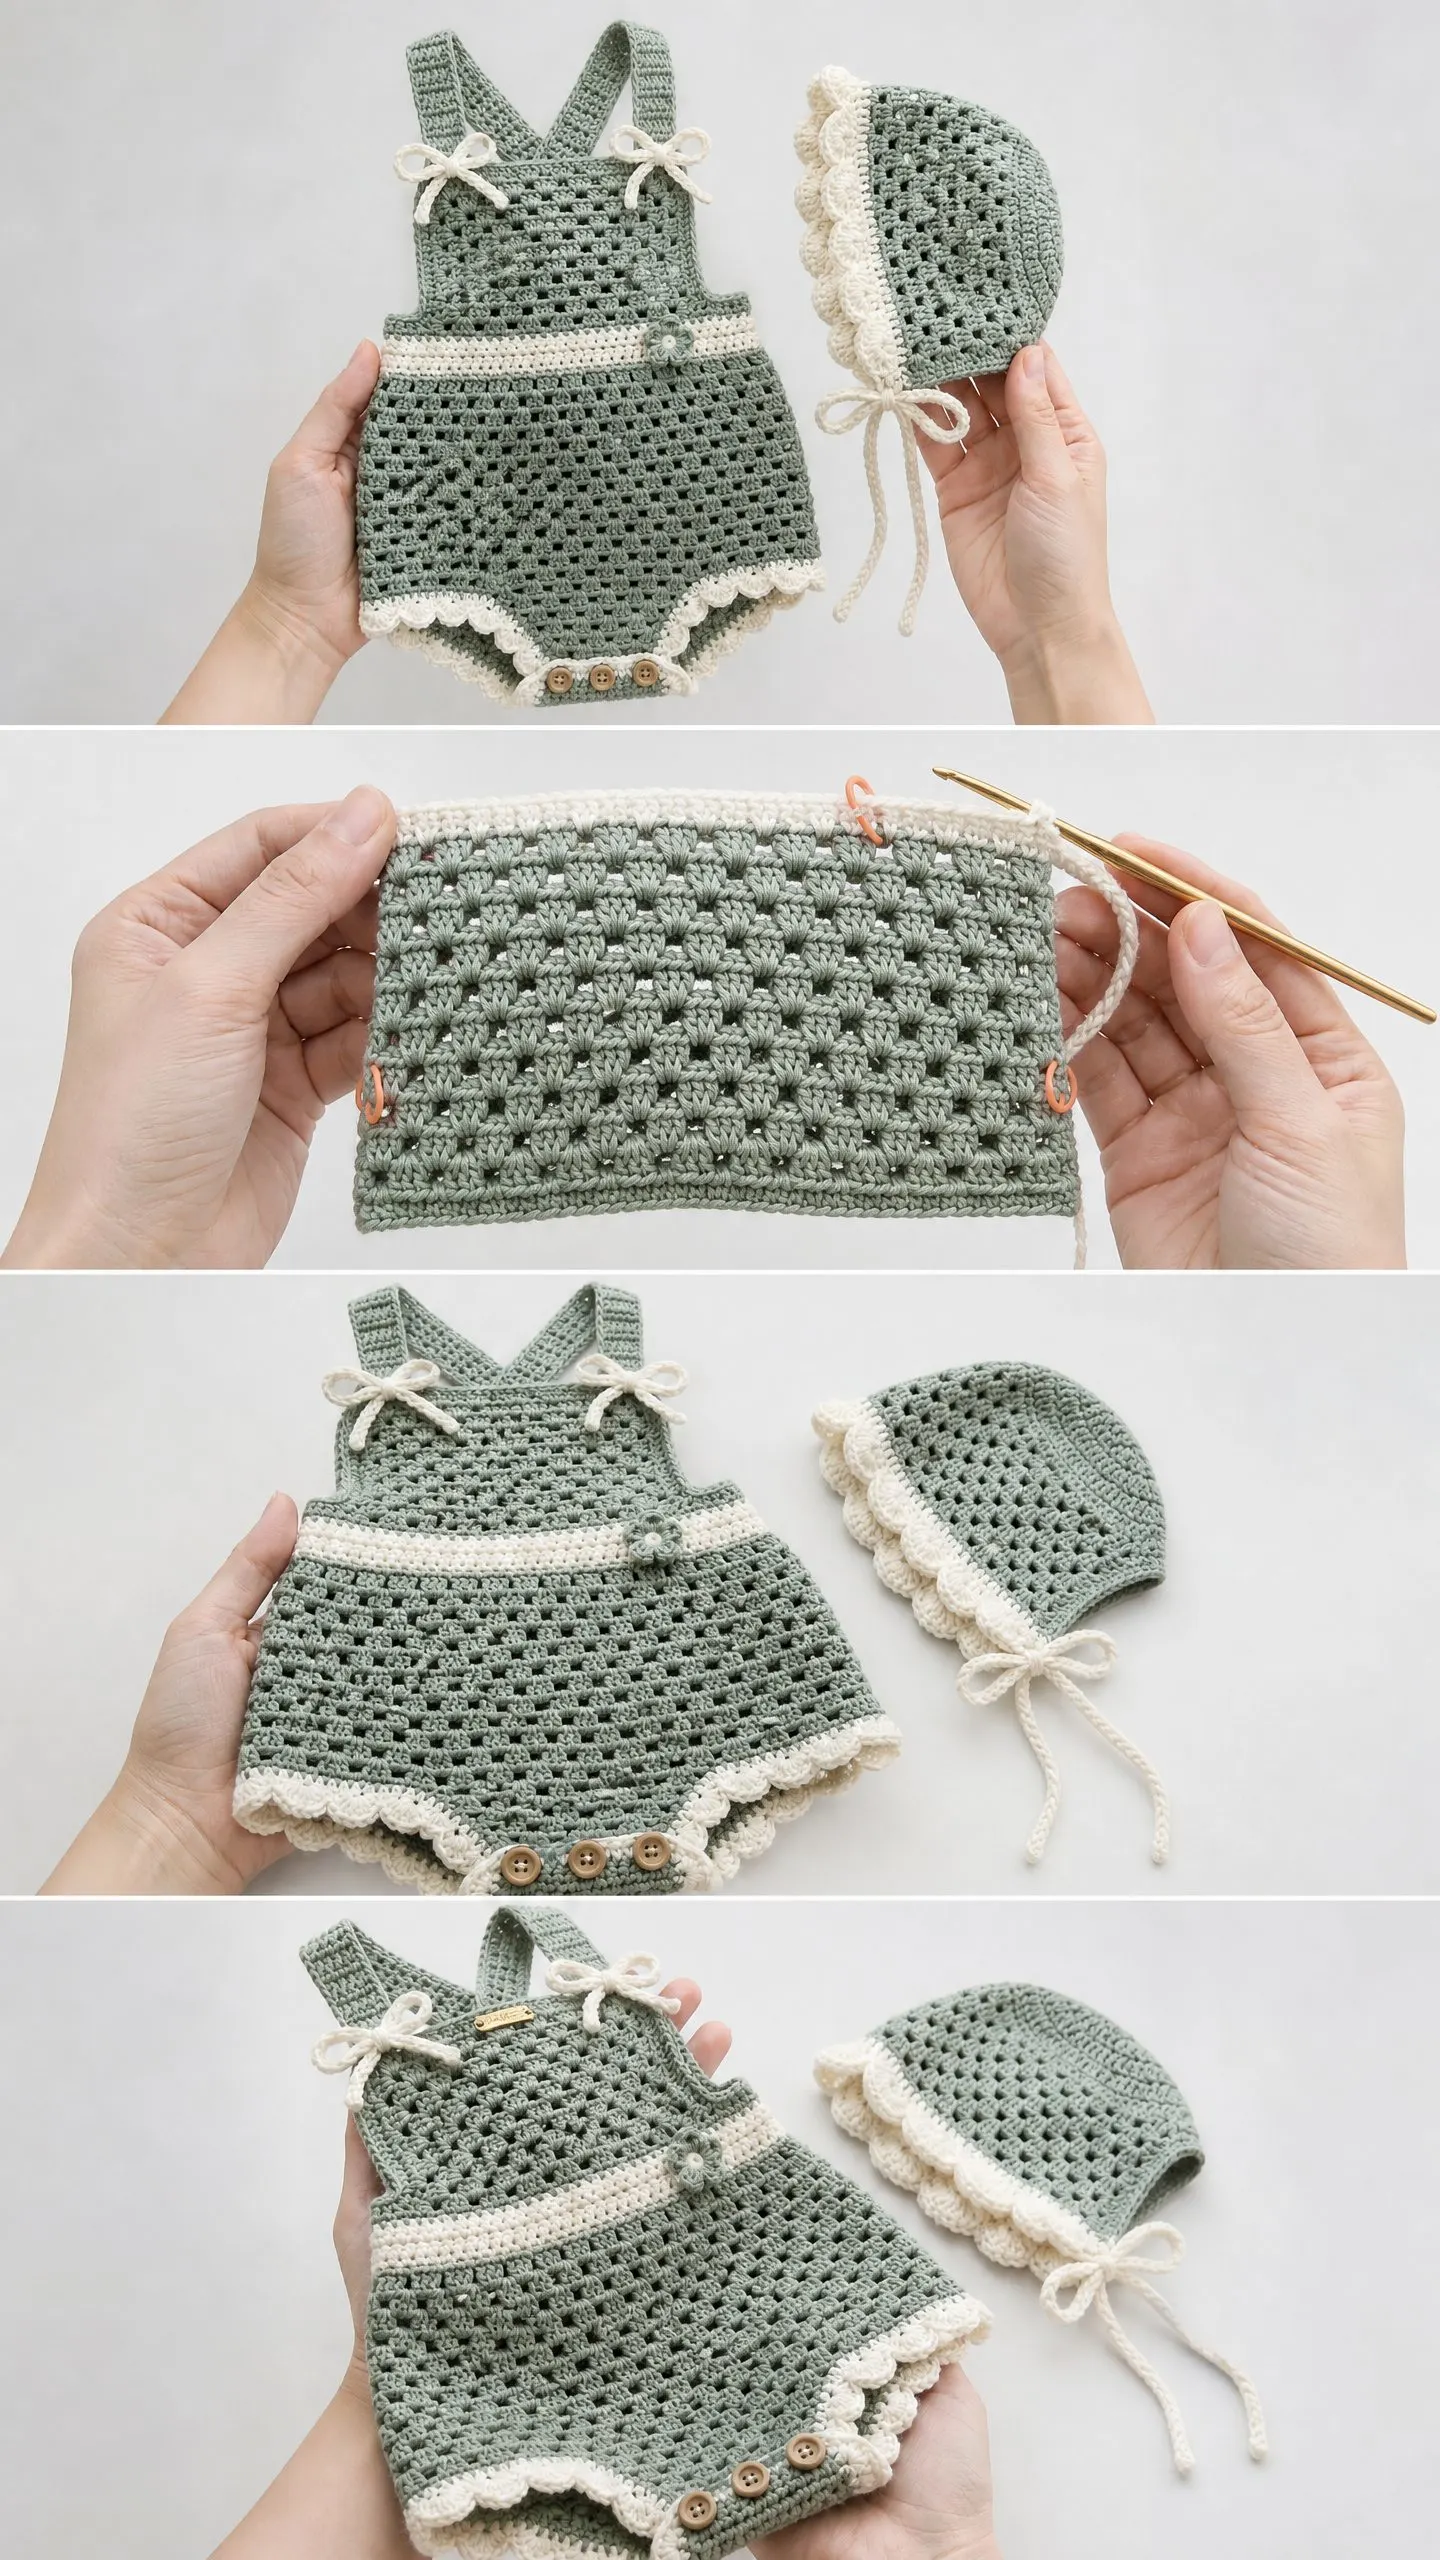
This heirloom-quality baby romper set features a crossback sundress-style romper paired with a matching bonnet. The color palette combines a soft sage green with cream accents for that timeless, gender-neutral look that photographs beautifully.
The romper is constructed from the top down. You’ll start at the bodice, work through a cream waistband, then expand into an adorable bloomer-style bottom. Those crossback straps tie at the shoulders with sweet cream bows. Scalloped cream trim finishes the leg openings and waistband, and three wooden buttons fasten the crotch placket for easy diaper changes.
The primary texture throughout is what I call a granny grid stitch. Think of it as a modified granny stitch worked in rows and rounds to create a square lattice effect. The result is open but structured fabric that’s perfect for warmer weather.
Skill Level
I’d call this an intermediate crochet pattern. You’ll need comfort with working in the round, following stitch pattern repeats, basic garment shaping with increases and decreases, joining yarn for colorwork, and applying an edging trim.
That said, if you’re a determined beginner who has completed two or three projects and really wants to tackle this, study the special stitches section carefully before starting. The construction order and stitch count tracking are what make this more challenging than a simple blanket or scarf.
Time Estimate
Plan for 12 to 18 hours total for the complete set. The romper alone averages 10 to 14 hours depending on your speed and familiarity with the stitch pattern. The bonnet adds approximately 2 to 3 additional hours.
This is definitely a labor of love, but spread over a few evenings or a weekend, it’s completely manageable.
Finished Measurements
Size: 3 to 6 months
Size customization notes appear at the end of this crochet tutorial for 0 to 3 months, 6 to 12 months, and 12 to 18 months.
Materials Needed
Yarn:
Hook: US size E-4 / 3.5 mm crochet hook, or size needed to obtain gauge
Notions:
Yarn Suggestions
Option 1: Paintbox Yarns Cotton DK in Pistachio Green (MC) and Champagne White (CC). This is 100% cotton with 137 yards per 50g skein. You’ll need 2 skeins in the green and 1 skein in cream. Cotton gives excellent stitch definition for the grid pattern and is gentle on baby skin.
Option 2: Lion Brand 24/7 Cotton in Sage (MC) and Linen or Ecru (CC). This is also 100% cotton with 186 yards per 100g skein. It’s widely available and affordable with excellent washability.
Option 3: Scheepjes Catona 4ply used doubled in color 395 Willow (MC) and color 105 Bridal White (CC). This 100% cotton is luxuriously soft with a slight sheen. Doubling the 4ply gives you a DK-weight equivalent with beautiful drape.
Substitution tip: Choose yarn with a smooth, tightly plied structure so the grid stitch reads clearly. Avoid fuzzy or textured yarns, which will obscure the lattice pattern. Cotton or cotton-blend yarns are strongly recommended for breathability and washability in baby garments.
Gauge
In Granny Grid Stitch Pattern: 16 stitches and 10 rows = 4 inches (10 cm), blocked
Gauge swatch instructions: Chain 22. Work the Granny Grid Stitch for 14 rows. Wet block your swatch, pin it flat, and let it dry fully. Measure the center 4 inches, avoiding the edges. Adjust your hook size up for looser fabric or down for tighter fabric as needed.
Please don’t skip the swatch for a fitted garment. Baby clothes need to actually fit!
In single crochet (for straps): 18 sc and 20 rows = 4 inches (10 cm)
Abbreviations
Special Stitches
Granny Grid Stitch (GGS)
This stitch creates a square lattice fabric by grouping double crochets separated by chain-1 spaces. It works over a multiple of 3 stitches plus 2. Don’t let this intimidate you. Once you get the rhythm, it flows beautifully.
Foundation Row (Row 1, RS): Starting in the 4th chain from hook, work 1 dc in that same chain. Skip 1 ch, sc in next ch. Skip 1 ch, work 2 dc in next ch. Continue the pattern of skip 1, sc, skip 1, 2 dc across to last ch, 1 dc in last ch.
Row 2 (WS): Ch 2, turn. 1 dc in first st. (Sc in space between next 2-dc group, 2 dc in next sc-sp) repeat across, ending 1 dc in t-ch sp.
Row 3 (RS): Ch 2, turn. 1 dc in first st. (Sc between next 2-dc group, 2 dc in next sc-sp) repeat across, ending 1 dc in t-ch.
Repeat Rows 2 and 3 for pattern.
Important: The ch-2 turning chain does NOT count as a stitch in this pattern. Always work the first dc into the actual first stitch.
Scallop Edging
This creates that beautiful wavy edge you see in the photos. It works along any finished edge with a stitch count that is a multiple of 6.
Setup: Join CC with sl st in designated edge stitch. Ch 1.
Row 1: Sc evenly across edge.
Row 2: Ch 1, turn. Sl st in first sc. (Skip 2 sc, 5 dc in next sc, skip 2 sc, sl st in next sc) repeat to end. Fasten off.
Small Flower (for waistband embellishment)
With CC, make a magic ring.
Rnd 1: Ch 1, 6 sc into ring, sl st to first sc to join. (6 sc)
Rnd 2: Ch 1. (Sc in next sc, ch 3, sl st back into first ch of ch-3 to make picot petal) 6 times, sl st to first sc. (6 petals)
Fasten off, leaving an 8-inch tail for sewing. Flatten and sew to center front of waistband.
Pattern Notes Before You Begin
1. The romper bodice is worked flat in two separate front and back panels, then joined at the sides. The bloomer section is worked in the round after joining.
2. The straps are single crochet strips attached at the back and crossing to tie at the front shoulders with cream bows.
3. Construction order: Front Bodice Panel, Back Bodice Panel, side seam joins, Waistband, Bloomer Section, Crotch Placket, Leg Edging, Straps, Bonnet.
4. Join and fasten off yarn at each color change. Weave in ends as you go to avoid a mountain of tails at the end.
5. The right side of the GGS fabric has a slightly more defined ridge on the 2-dc groups. Keep RS facing out consistently after joining panels.
6. All stitch counts in parentheses represent the total working stitch count for that row or round.
7. Block all pieces before seaming for the best results.
Step by Step Instructions
Front Bodice Panel
With MC, chain 51.
Row 1 (RS): Starting in 4th ch from hook, work 1 dc in same ch. (Skip 1 ch, sc in next ch, skip 1 ch, 2 dc in next ch) 11 times. Skip 1 ch, sc in next ch, skip 1 ch, 1 dc in last ch. Turn. (48 sts)
Row 2 (WS): Ch 2, turn. 1 dc in first st. (Sc between next 2-dc pair, 2 dc in sc-sp) 11 times. Sc between last 2-dc pair, 1 dc in last st. (48 sts)
Row 3 (RS): Ch 2, turn. 1 dc in first st. (Sc between next 2-dc pair, 2 dc in sc-sp) 11 times. Sc between last 2-dc pair, 1 dc in last st. (48 sts)
Rows 4 through 12: Repeat Row 2 and Row 3 alternately, continuing the GGS pattern. (48 sts each row)
After Row 12, the front bodice panel should measure approximately 4.5 inches tall. Do not continue until this height is achieved.
Checkpoint: Front bodice panel complete. 48 stitches across, approximately 4.5 inches tall.
Do not fasten off. Set aside.
Back Bodice Panel
Work exactly as Front Bodice Panel, Rows 1 through 12. (48 sts)
Fasten off. Weave in ends.
Side Seam Join
Hold front and back panels with right sides together (RS facing inward). Using MC and a yarn needle, whipstitch the left side seam together along the full 12-row height. Repeat for the right side seam. Turn right side out.
You now have a tube of 96 stitches (48 front plus 48 back), approximately 4.5 inches tall and 17 inches in circumference when laid flat.
Waistband
The waistband is worked in the round in CC using single crochet. It adds structure and creates the color stripe visible in the finished piece.
Join CC with sl st to the bottom edge of the joined bodice tube at a side seam. Ch 1.
Rnd 1: Sc evenly around the bottom edge of the bodice tube. Work 1 sc per stitch end and 1 sc per row end as needed to achieve 96 sc evenly distributed. Sl st to first sc to join. (96 sts)
Rnds 2 through 4: Ch 1. Sc in each sc around. Sl st to first sc to join. (96 sts)
Fasten off CC. The waistband is 4 rounds of single crochet, approximately 0.75 inches tall.
Sew the small flower embellishment to the center front of the waistband now.
Bloomer Section
Join MC with sl st to the bottom of the waistband at the side seam (right side facing). Ch 1.
Rnd 1: Join MC to first sc of waistband bottom. Ch 2. 2 dc in same st. (Sk 1 sc, sc in next sc, sk 1 sc, 2 dc in next sc) 31 times. Sk 1 sc, sc in next sc, sk 1 sc, sl st to top of first 2-dc group. (96 sts)
Rnd 2: Ch 2. Sc in sp between 2-dc group just made and next 2-dc group. (2 dc in next sc-sp, sc between next 2-dc pair) 31 times. 2 dc in last sc-sp, sl st to first sc. (96 sts)
Rnd 3: Ch 2. 2 dc in sc just made. (Sc between next 2-dc pair, 2 dc in next sc-sp) 31 times. Sc between last 2-dc pair, sl st to top of first 2-dc. (96 sts)
Rnds 4 through 14: Alternate Rnds 2 and 3. (96 sts each round)
After Rnd 14, the bloomer section should measure approximately 5 inches tall from the bottom of the waistband.
Do not fasten off.
Scallop Trim on Bloomer Hem
Without fastening off, begin scallop trim in CC directly on the live stitches at the bottom of the bloomer.
Join CC with sl st in any st. Ch 1. Sc in each st around the bottom edge of bloomer. (96 sc)
Next rnd (scallop): Ch 1. Sl st in first sc. (Sk 2 sc, 5 dc in next sc, sk 2 sc, sl st in next sc) 16 times. (16 scallops)
Fasten off CC. Weave in ends.
Crotch Placket
The crotch placket separates the front and back of the bloomer at the bottom to form two separate leg openings and a button zone.
Mark the center front and center back of the bloomer at the base. From the center front point, count 12 stitches to the left and place a marker. Count 12 stitches to the right and place a marker. This 24-stitch span is the front crotch placket.
Repeat for the center back: 12 stitches left and 12 stitches right, marking a 24-stitch rear placket.
Front Button Band:
Join MC to the right-hand marker of the front placket. Work flat.
Row 1: Ch 1. Sc across the 24 front placket stitches. Turn. (24 sts)
Rows 2 through 4: Ch 1. Sc across. Turn. (24 sts each)
Fasten off MC. Join CC.
Row 5 (button loop row): Ch 1. Sc in first 3 sts. (Ch 2, sk 2 sts, sc in next 6 sts) twice. Ch 2, sk 2 sts, sc in last 3 sts. Turn. (24 sts including ch-2 as 2 sts each)
Row 6: Ch 1. Sc in each st and 2 sc in each ch-2 sp across. (24 sts)
Fasten off CC.
Back Crotch Panel:
Join MC to the right-hand marker of the back placket. Work flat.
Row 1: Ch 1. Sc across the 24 back placket stitches. Turn. (24 sts)
Rows 2 through 6: Ch 1. Sc across. Turn. (24 sts)
Fasten off MC.
Overlap the front button band over the back crotch panel. Align and sew the side edges of the plackets to the leg opening edges using MC and yarn needle.
Sew three wooden buttons to Row 3 of the back crotch panel aligned with the three ch-2 button loops on the front band.
Leg Opening Edging
Each leg opening has approximately 48 stitches total around.
Join CC to the leg opening edge.
Rnd 1: Sc evenly around leg opening to achieve 48 sc. Sl st to join. (48 sts)
Rnd 2 (scallop): Ch 1. Sl st in first sc. (Sk 2 sc, 5 dc in next sc, sk 2 sc, sl st in next sc) 8 times. (8 scallops)
Fasten off CC. Repeat for second leg opening.
Shoulder Straps (make 2)
With MC, chain 5.
Row 1: Sc in 2nd ch from hook and each ch across. Turn. (4 sts)
Rows 2 through 50: Ch 1, sc in each sc across. Turn. (4 sts each row)
After Row 50, the strap measures approximately 10 inches.
Fasten off, leaving a 12-inch tail for sewing.
Make 2 straps.
Strap Attachment and Bows
Lay the romper flat with RS facing up. The straps cross at the back.
On the back: Sew the end of Strap 1 to the upper right back bodice corner. Sew the end of Strap 2 to the upper left back bodice corner. The straps cross each other diagonally across the back.
On the front: Each strap comes over the shoulder and crosses to the opposite front corner.
Cream Bows:
With CC, chain 24.
Row 1: Sc in 2nd ch from hook and each ch across. (23 sts)
Fasten off leaving a 6-inch tail. Tie the strip into a bow shape and cinch the center with the tail. Wrap the tail around the center 3 times and knot to secure. Trim.
Sew one bow to the front shoulder attachment point of each strap.
For adjustable tie loops: With CC, chain 8, sl st to form a small ring. Sew the ring securely to each front upper bodice corner. Thread strap end through ring and tie a bow. This allows strap length adjustment as the baby grows.
Checkpoint: Romper complete. Total length from shoulder strap top to crotch placket base is approximately 13 inches.
Bonnet Instructions
Crown:
With MC, make a magic ring.
Rnd 1: Ch 2. 12 dc in ring. Sl st to top of first dc to join. (12 sts)
Rnd 2: Ch 2. 2 dc in each dc around. Sl st to join. (24 sts)
Rnd 3: Ch 2. (2 dc in next dc, 1 dc in next dc) 12 times. Sl st to join. (36 sts)
Rnd 4: Ch 2. (2 dc in next dc, 1 dc in each of next 2 dc) 12 times. Sl st to join. (48 sts)
Rnd 5: Ch 2. (2 dc in next dc, 1 dc in each of next 3 dc) 12 times. Sl st to join. (60 sts)
Rnd 6: Ch 2. (2 dc in next dc, 1 dc in each of next 4 dc) 12 times. Sl st to join. (72 sts)
Body of Bonnet:
Rnd 7: Ch 2. 2 dc in first dc. (Sk 2 dc, sc in next dc, sk 2 dc, 2 dc in next dc) 11 times. Sk 2 dc, sc in next dc, sk 2 dc. Sl st to first 2-dc group. (72 sts)
Rnd 8: Ch 2. Sc between 2-dc group. (2 dc in sc-sp, sc between next 2-dc pair) 11 times. 2 dc in last sc-sp. Sl st to first sc. (72 sts)
Rnd 9: Ch 2. 2 dc in first sc. (Sc between 2-dc pair, 2 dc in sc-sp) 11 times. Sc between last 2-dc pair. Sl st to first 2-dc. (72 sts)
Rnds 10 through 14: Alternate Rnds 8 and 9. (72 sts each round)
Brim:
Turn work so you are working the front 36 stitches flat.
Row 1 (RS): Join CC. Ch 1. Sc in each of the 36 front-facing sts across the opening edge. Turn. (36 sts)
Row 2: Ch 1. Sc in first sc. (2 sc in next sc, sc in next sc) 17 times. 2 sc in last sc. (54 sts)
Row 3 (scallop): Ch 1. Sl st in first sc. (Sk 2 sc, 5 dc in next sc, sk 2 sc, sl st in next sc) 9 times. (9 scallops)
Fasten off CC.
Bonnet Neckline Edging:
Join MC to the right-back nape edge of the bonnet. Sc evenly along the nape edge and down both side edges of the brim.
Bonnet Ties:
With MC, attach yarn to the right front lower corner of the bonnet brim.
Chain 50 (approximately 8 inches). Sl st back down the chain for a twisted cord tie effect. Fasten off. Repeat on the left side.
Size Customization Tips
For 0 to 3 months: Reduce the starting chain for each bodice panel by 6 (chain 45, giving 42 working stitches). Reduce bloomer circumference to 84 sts (28 GGS repeats). Reduce strap length by approximately 5 rows.
For 6 to 12 months: Increase starting chain to 57 (54 working stitches). Increase bloomer circumference to 108 sts (36 GGS repeats). Add 2 to 3 extra bloomer rounds for length. Increase strap length by 5 to 8 rows.
For 12 to 18 months: Starting chain 63 (60 working stitches). Bloomer 120 sts (40 GGS repeats). Add waistband round for coverage.
General rule: GGS stitch counts must always be a multiple of 3. Scallop trim stitch counts must always be a multiple of 6.
Finishing and Blocking
Weave in all remaining ends securely using a tapestry needle. Travel through at least 6 stitches in two directions before trimming.
Wet block both the romper and the bonnet. Submerge in cool water, squeeze gently without wringing, roll in a towel to remove excess water, then lay flat on a blocking mat. Pin to finished measurements. Allow to dry completely, typically 8 to 12 hours. Cotton yarns respond especially well to wet blocking.
After blocking, attach buttons using a sewing needle and matching thread. Sew through the back placket fabric, stitching each button through all thicknesses securely.
Trim any yarn tails that escaped weaving.
Care Instructions
Machine wash on the gentle or delicate cycle in cool water. Lay flat to dry. Do not tumble dry, as heat will cause shrinkage and damage to cotton fibers over time.
Thank you so much for choosing this pattern for your next project. I truly hope you enjoy every stitch of creating this sweet little set. If you make one, I would absolutely love to see it! Tag me on Instagram or share a photo in my Facebook group. Your finished projects genuinely make my day.
If this pattern has caught your eye but you’re not quite ready to start, go ahead and pin it to your Pinterest boards so you can find it easily later. And please drop a comment below if you have any questions or when you finish your romper. I love hearing from you!
You Might Also Like
- Sunset Gradient Floral Heart Halter Free Crochet Pattern
- Sage Green Shell Stitch Lounge Set Free Crochet Pattern
- Pastel Rainbow Granny Square Bucket Bag Free Crochet Pattern
- Daisy Meadow Crochet Tote Free Pattern