
Got a gorgeous skein of sport-weight cotton you’ve been saving for something special? This is the project. The Sea Glass Diamond Dress brings together open diamond mesh, elegant shaping, and a stunning scalloped hem that will make all that beautiful yarn sing.
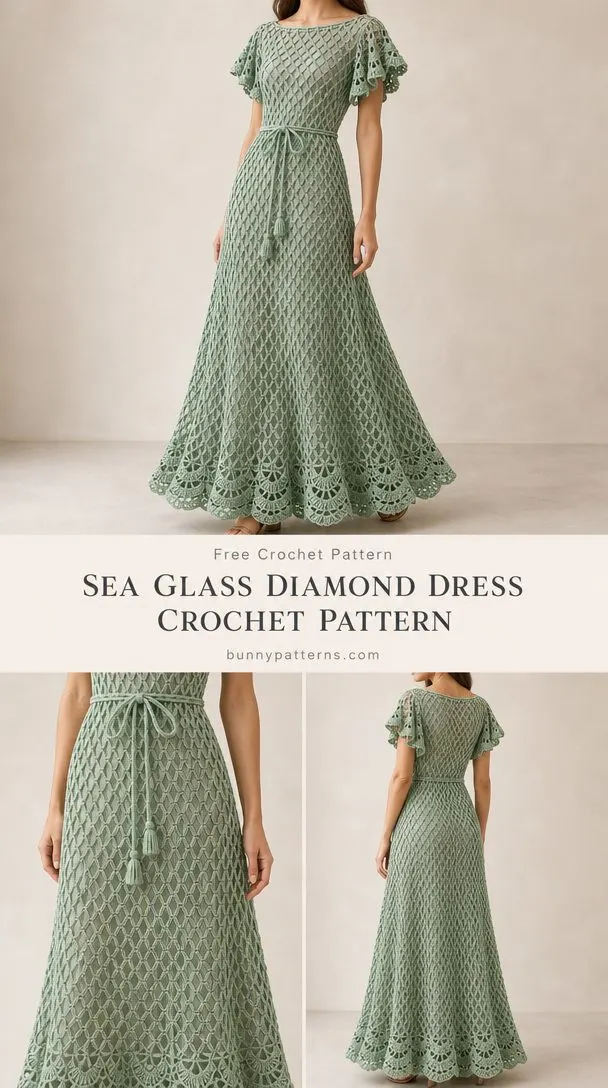
The construction here is genuinely interesting. You’ll work two flat bodice panels from waist to shoulder, join them, then pick up stitches and crochet the flared skirt downward in the round. The diamond lattice creates an airy, romantic look while the gradual increases give you that perfect A-line silhouette. It’s an intermediate-level project that rewards patience with a truly wearable piece.
Fair warning: this is a commitment project. You’re looking at approximately 650 grams of yarn and a full-length gown. But if you’ve been wanting to level up your garment-making skills and create something genuinely show-stopping, keep reading.
Why This Diamond Mesh Dress Pattern Works
The diamond mesh stitch creates that signature lattice effect you see in the photos. Unlike solid fabric, this open construction drapes beautifully and stays breathable, making it perfect for layering over a slip dress. The mesh also means the dress won’t feel heavy despite its length.
What makes this pattern clever is the shaping. The bodice uses strategic increases every few rows to transition from a fitted waist (90 cm finished) to a comfortable bust (100 cm finished). Then the skirt flares gradually through eight increase rounds, ending at a generous 150 cm hem circumference. The result is a silhouette that flatters without clinging.
The scalloped fan border at the hem transforms a simple mesh dress into something special. Those 7-dc fans create a dramatic edge that catches the light and adds visual weight where you want it.
Materials You’ll Need
Before you begin, gather everything so you can work uninterrupted:
Yarn:
- Sport-weight smooth cotton, 160 m per 50 g
- Seafoam green (or your preferred color)
- Total needed: 650 g / 2080 m
Hooks:
- Main hook: 3.5 mm (or size needed to obtain gauge)
- Edging hook: 3 mm
Notions:
- Tapestry needle
- 12 stitch markers
- Measuring tape
- Blocking mat and pins
- One 20 cm invisible zipper in matching color
- Matching sewing thread and needle
The cotton yarn choice matters here. Smooth cotton shows off the diamond mesh beautifully and has enough body to hold the dress shape. Avoid anything too fuzzy or textured, as it will obscure the lacework.
Gauge (Don’t Skip This)
Getting gauge right is essential for a garment this size. Work your swatches after blocking, not fresh off the hook.
Diamond mesh gauge: 8 ch-3 arches and 8 rows = 10 x 10 cm
Square mesh gauge: 8 cells and 8 rows = 10 x 10 cm (1 cell = 1 dc plus 1 ch-1 space)
Shell lace gauge: 4 shell repeats and 8 rows = 10 x 10 cm
Swatch at least 16 arches wide and 16 rows deep. Wash your swatch, dry it flat, then measure the central 10 cm. If your measurements don’t match, adjust your hook size and try again. This step saves heartbreak later.
Finished Measurements
This pattern is written for one size with the following finished dimensions:
| Measurement | Target |
|---|---|
| Bust circumference | 100 cm |
| Waist circumference | 90 cm |
| Hip circumference (10 cm below waist) | 110 cm |
| Hem circumference | 150 cm |
| Shoulder-to-hem length | approximately 145 cm |
| Armhole depth | 20 cm |
Fits body measurements: Bust 90-94 cm, waist 80-84 cm
To resize: Add or subtract 4 mesh units to each bodice panel for every 10 cm circumference change. Divide the neckline proportionally and sketch a new schematic before starting.
Abbreviations and Special Stitches
Here’s every stitch term you’ll encounter, defined clearly:
Basic abbreviations:
- ch = chain
- sl st = slip stitch
- sc = single crochet (insert hook, yarn over, pull through, yarn over, pull through both loops)
- hdc = half double crochet
- dc = double crochet (yarn over, insert hook, pull through, yarn over, pull through 2 loops, yarn over, pull through remaining 2 loops)
- tr = treble crochet
- st(s) = stitch(es)
- sp = space
- sk = skip
- rep = repeat
- RS/WS = right side/wrong side
- BLO = back loop only
- yo = yarn over
- rnd = round
Special stitches:
FPdc (front post double crochet): Work a dc around the post of the next stitch, inserting your hook from front to back to front.
BPdc (back post double crochet): Work a dc around the post of the next stitch, inserting your hook from back to front to back.
dc2tog (double crochet 2 together): Work 2 incomplete dc over the next 2 stitches (yarn over, insert, pull through, yarn over, pull through 2 loops for each), then yarn over and pull through all 3 loops on hook. This decreases 2 stitches to 1.
Picot: Ch 3, sl st into first chain. Creates a small decorative bump.
Understanding the Mesh Patterns
This pattern offers two mesh options. Choose one and use it throughout.
Square Mesh M(C)
This creates C cells between C+1 dc posts.
Foundation: Ch (2C+3), dc in 5th ch from hook, [ch 1, sk 1 ch, dc in next ch] (C-1) times.
Turning: Ch-4 counts as first dc plus first ch-1. Dc in second post, then [ch 1, dc in next post] across.
Increase row MI(C): Ch 4, dc in first post, [ch 1, dc in next post] C times, ch 1, dc again in last post. Result: C+2 cells.
Diamond Mesh D(C)
This creates C arches that drift into a diamond lattice.
Foundation: Ch (4C+2), sc in 2nd ch from hook, [ch 3, sk 3 ch, sc in next ch] C times.
Next row: Ch 1, sc in first sc, [ch 3, sc in next ch-3 arch] (C-1) times, ch 3, sc in last sc. Result: C arches.
Increase row DI(C): Ch 1, sc in first sc, ch 3, sc in same sc, work [ch 3, sc in next arch] (C-1) times, ch 3, sc in last sc, ch 3, sc in same last sc. Result: C+2 arches.
Pattern Notes Before You Begin
Read these carefully. They’ll save you confusion later.
- All measurements are after washing and blocking, not fresh off the hook
- Yarn amounts include approximately 15% allowance
- Turn after every flat row
- Ch 1 for sc/hdc and ch 2 for dc/post-stitch fabric do NOT count as stitches
- Work the first stitch in the first stitch (mesh turning chains are the exception)
- Joined rounds are not turned unless stated
- End every joined round with sl st to the first stitch (the join doesn’t count)
- Square brackets [ ] group a repeat
- Repeat counts and final counts refer only to the active piece
- Do not crochet over abandoned neckline or armhole stitches
- Right and left refer to the wearer
Instructions for the Back Bodice
The bodice works from waist to shoulder in flat rows.
Row 1: Make M(36) for square mesh, or D(36) for diamond fabric. [36 units]
Rows 2-4: Work selected mesh even. [36 units]
Row 5: Work MI(36) or DI(36). [38 units]
Rows 6-8: Work even. [38 units]
Row 9: Work increase row again. [40 units]
Rows 10-28: Work even. Rows 17-28 form the lower armhole zone. [40 units]
Row 29 (First shoulder): Work first 12 units, leave middle 16 and last 12 unworked. [12 units]
Rows 30-32: Work first shoulder even, then fasten off. [12 units]
Second shoulder Rows 29-32: Rejoin yarn at outer edge of final 12 units. Work even and fasten off. [12 units]
Instructions for the Front Bodice
The front bodice is nearly identical, with an earlier neckline split.
Rows 1-16: Repeat back Rows 1-16. [40 units]
Rows 17-24: Work even. [40 units]
Row 25 (First shoulder): Work first 12 units and turn. Leave middle 16 and opposite 12 unworked. [12 units]
Rows 26-32: Work first shoulder even, then fasten off. [12 units]
Second shoulder Rows 25-32: Rejoin at opposite outer edge. Work the other 12 units even and fasten off. [12 units]
Assembly (Complete Before Starting Skirt)
You’ll need seafoam green yarn, 3.5 mm hook, tapestry needle, and markers.
Seam pass 1: Mattress-stitch each shoulder across the 12 matching units. [2 seams x 12 units]
Seam pass 2: Join right side across Rows 1-16. Join left side across Rows 9-16 only, leaving Rows 1-8 open for the zipper. [16 right + 8 left row ends]
Checkpoint: Waist circumference should measure 90 cm. Bust circumference should measure 100 cm. The neck and both armholes should lie flat. Try the bodice over your intended underlayer before adding the skirt.
Instructions for the Skirt
Join yarn at the left waist opening on the lower foundation edge. The skirt begins with flat rows to create the zipper opening, then transitions to joined rounds.
Important: Work skirt Rounds 1-8 as FLAT ROWS, turning each row and leaving the left side open. This creates the lower half of a 20 cm side zipper opening. From Round 9 onward, join and work in closed rounds.
For square mesh, pick up one cell for each original cell (front and back each contribute 36). For diamond mesh, pick up one ch-3 arch per original arch. At the right seam, the shared post counts once. The two left-edge posts remain separate until Round 9 joins them.
Round 1: Work evenly around the waist. [72 units]
Place 8 markers equally spaced (9 units apart at Round 1).
On increase rounds:
- Square mesh: Work (dc, ch 1, dc) into each marked post
- Diamond mesh: Work (sc, ch 3, sc) into each marked arch
This adds one unit per marker. Move markers to the first new unit at each position.
Round 4: Increase once at all 8 markers. [80 units]
Round 8: Increase once at all 8 markers. [88 units]
Round 12: Increase once at all 8 markers. [96 units]
Round 16: Increase once at all 8 markers. [104 units]
Round 20: Increase once at all 8 markers. [112 units]
Round 24: Increase once at all 8 markers. [120 units]
All other rounds through Round 80: Work selected mesh even. [120 units after Round 24]
Instructions for the Sleeves (Make Two)
Row 1: Make 32 units of selected mesh for a 40 cm upper-arm edge. [32 units]
Rows 2-8: Work even. [32 units]
Zipper Installation
Seam pass 3: After completing the skirt, pin the zipper into the left opening (8 bodice row ends + 8 skirt row ends). Hand-backstitch each tape to the wrong side, 5 mm from the teeth. Reinforce both ends and test the opening. [1 zipper / 20 cm]
Seam pass 4: If using sleeves, close each sleeve’s long edge and ease its 32-unit top around the 32 row-end armhole edge. [2 sleeves]
Edgings and Details
Switch to your 3 mm edging hook for all finishing work.
Neckline Edging
Neck Round 1: Sc once into each post and once into each ch-1 space (or 3 sc per ch-3 arch). At side row ends, use 2 sc per square-mesh row or 3 sc per diamond row. Record total as E. Ease the rate only if needed to lie flat. [E sc]
Neck Round 2: Sc in every sc. For V-neck, work sc3tog at the point (work 3 incomplete sc then pull through all loops). [E sc, or E-2 sc for V-neck]
Hem Border
Hem preparation Round 1: For square mesh, work 2 sc per cell. For diamond, work 3 sc per arch. For shell version, sc in each existing dc/sc. [240 sc for square mesh, 360 sc for diamond]
Hem Round 2: [Sk 2 sc, 7 dc in next sc, sk 2 sc, sl st in next sc] around. [40 fans on 240 sc, or 60 fans on 360 sc]
Sleeve Cuffs
Cuff preparation Round 1: Work 2 sc per square cell or 3 sc per diamond arch. Add 0-5 sc evenly so count is divisible by 6. Record as C. [C sc]
Cuff Round 2: Repeat hem fan over each group of 6 sc. [C/6 fans per sleeve]
Waist Tie
Tie: Ch 180, sl st back along every chain (179 sl st). Thread through waist mesh and knot both ends.
Checkpoint: Hem and cuffs should remain flat, with no tight ridges or accidental increases. All embellishments should withstand a gentle tug. The neck opening should pass over your head comfortably.
Finishing Your Crochet Dress
You’ll need your yarn ends, tapestry needle, cool water, towels, and blocking pins.
Finishing pass 1: Weave each tail through at least 5 cm of stitches, reverse direction and repeat. [0 loose tails]
Finishing pass 2: Wash gently in cool water, squeeze in a towel, and pin to the measurements listed above without stretching the neckline. [1 blocked garment]
Final checkpoint: After drying, bust should measure 100 cm, waist 90 cm, length approximately 145 cm. Let the dress hang for 24 hours over your intended underlayer and check hem level before trimming any remaining ends.
Care Instructions
Follow your yarn label for best results. Hand wash gently in cool water with mild detergent. Do not wring. Support the wet garment to prevent stretching, reshape on a towel, and dry flat away from direct heat. Store folded rather than hung to maintain the shape.
A Note About Fit and Styling
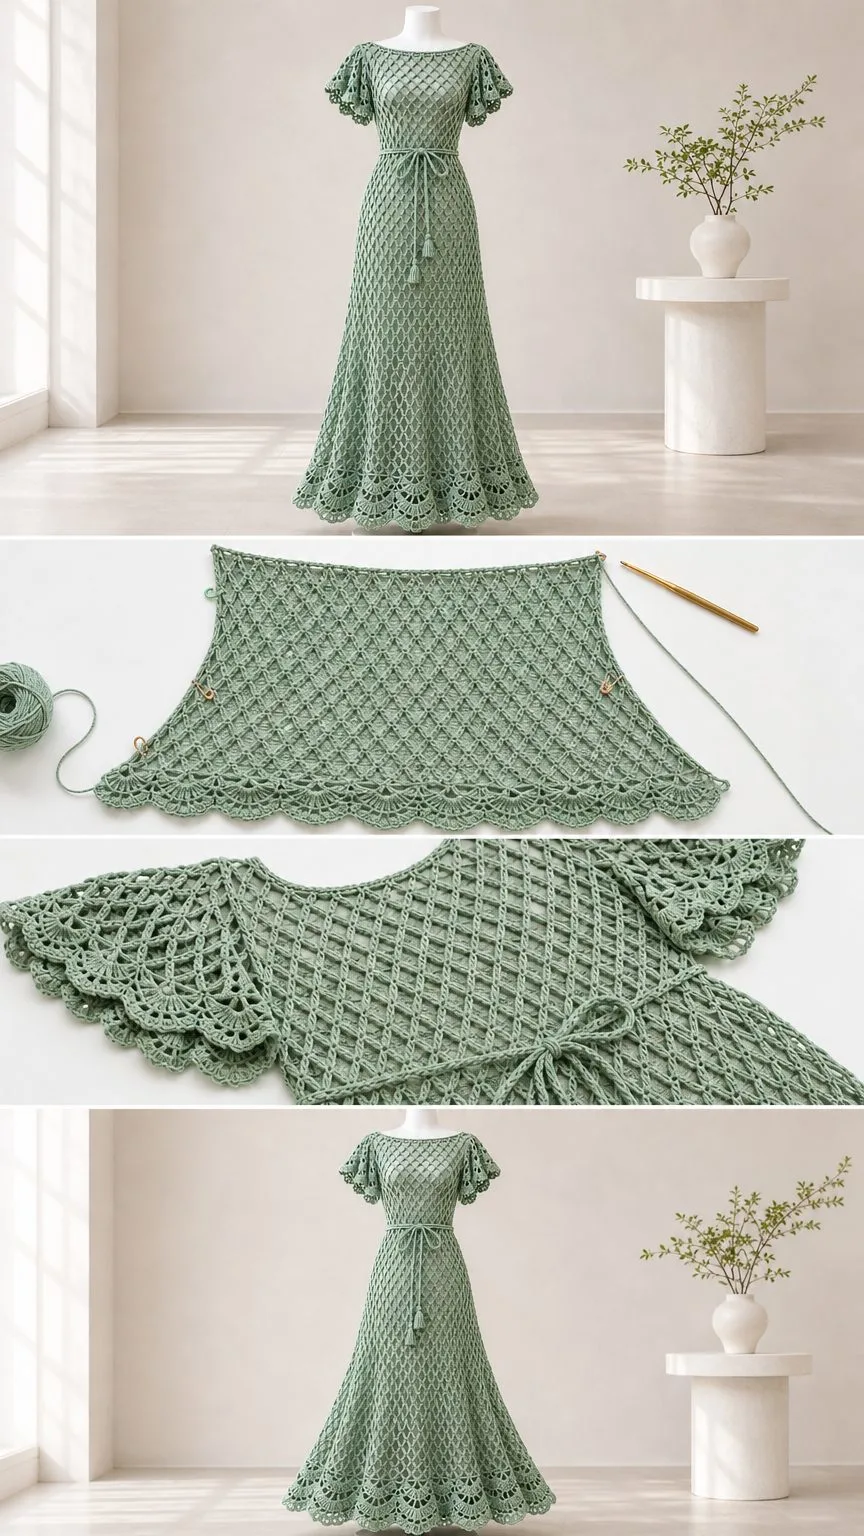
This is a mesh garment, which means it needs an opaque layer underneath for everyday wear. A simple slip dress in a matching or contrasting color works beautifully. The fitted bodice and flared skirt create a universally flattering silhouette, and the waist tie lets you adjust the fit to your preference.
The seafoam green shown in the reference images has a romantic, vintage-inspired feel. But this pattern would look equally stunning in white for a beach wedding cover-up, deep navy for evening elegance, or warm coral for a summer garden party.
Tips for Success
Don’t skip the swatch. A full-length garment magnifies any gauge issues. What seems like a small discrepancy in a 10 cm swatch becomes a significant fit problem over 145 cm of length.
Block aggressively. Cotton mesh opens up beautifully with wet blocking. Pin it out to full measurements and let it dry completely.
Try it on as you go. The pattern suggests checking the bodice over your underlayer before adding the skirt. This is excellent advice. It’s much easier to adjust at this stage than after you’ve committed another 400 g of yarn to the skirt.
Take your time with the zipper. A well-installed invisible zipper makes the dress look professional. Use plenty of pins, work slowly, and test the zipper before finishing the seam.
This Sea Glass Diamond Dress pattern is a labor of love, but the finished result is genuinely stunning. The kind of piece you pull out for special occasions and receive compliments on for years. If you’ve been wanting to push your crochet skills and create something truly memorable, this is your project.
If you make this dress, I’d love to see it! Share your finished photos on Instagram or Facebook and tag us. And if you want to come back to this pattern later, save it to your Pinterest boards so it’s easy to find. Drop a comment below if you have questions or just want to share your excitement about starting this project. Happy crocheting!
You Might Also Like
- Blush Pink Floral Crochet Gladiator Sandals Free Pattern
- Sage Garden Lace Cardigan Free Crochet Pattern
- Soft Pink Shell Stitch Baby Set Free Crochet Pattern
- Sage Green Floral Bucket Bag Free Crochet Pattern