
A crochet daisy granny square top turns a handful of small white-and-yellow flowers into a cropped summer camisole that feels like a meadow you can wear. Pale blue squares, thin straps and a scalloped hem do the rest.

The Crochet Daisy Granny Square Top
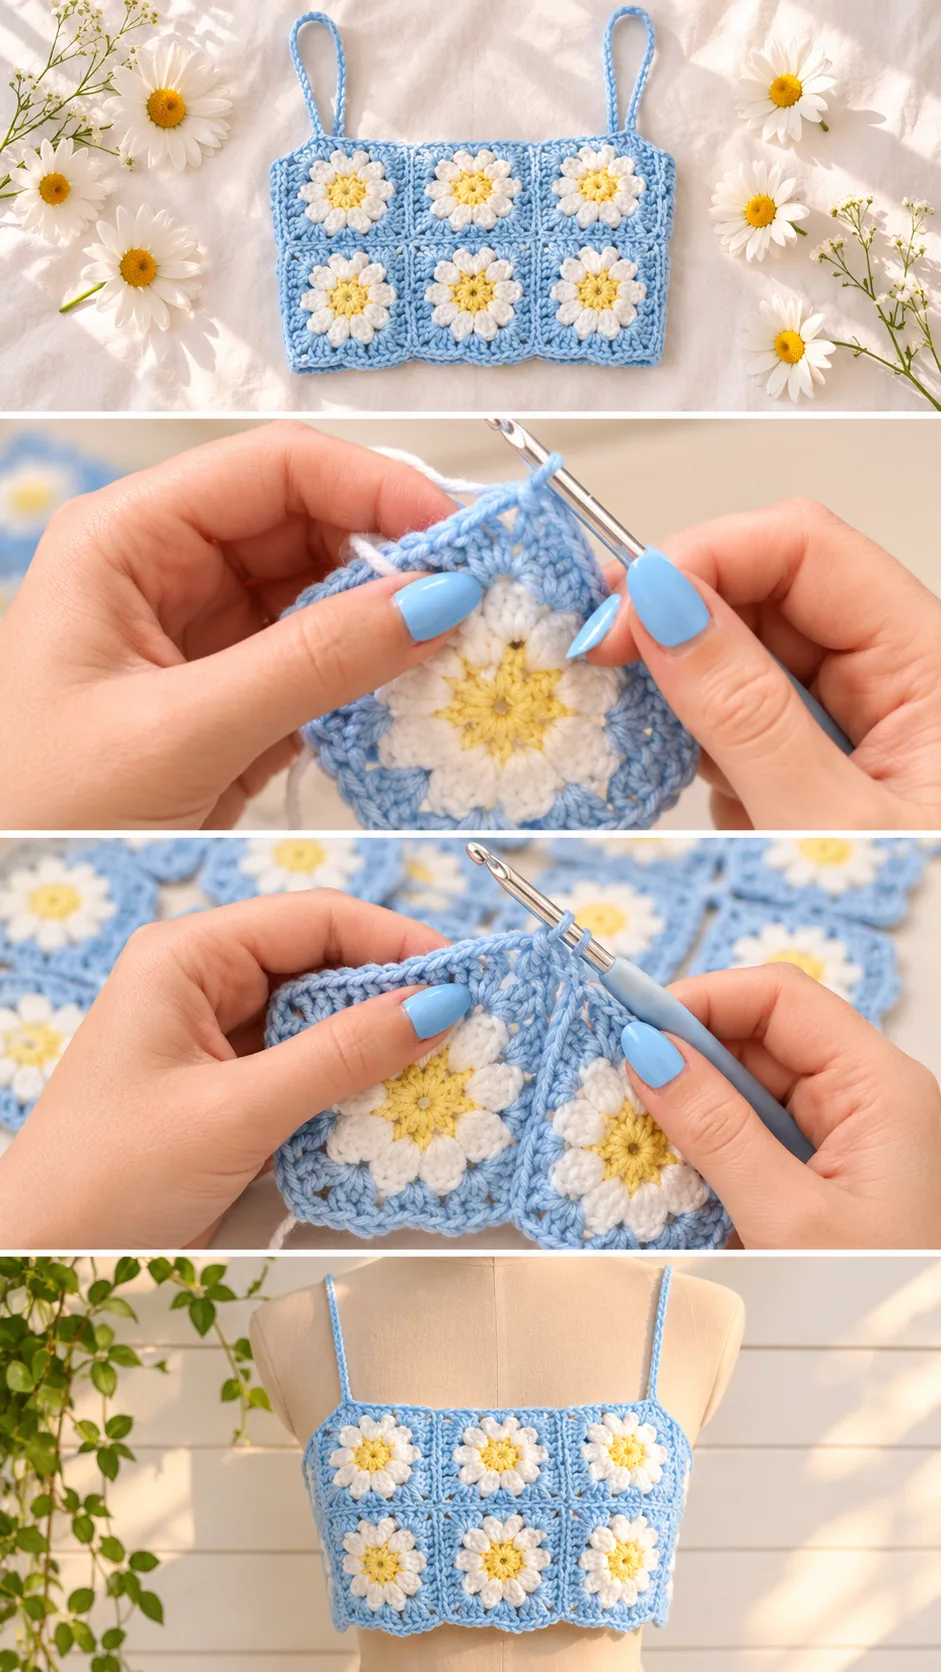
The crochet daisy granny square top is built from small square motifs, each with a raised white-petalled daisy and a butter-yellow centre. The flowers sit on a soft sky-blue ground, so every square reads like a tiny garden bed. Joined in a neat grid, the squares form a fitted, cropped bodice with a straight neckline. Two slim straps hold it up, and the lower edge finishes in gentle scallops instead of a hard line. The petals have real volume, which gives the fabric a three-dimensional, tactile surface. It is a top for sunny days, picnics, farmers’ markets and holiday evenings. Worn with a white skater skirt, the whole look feels fresh and a little nostalgic.
Part of the charm is how forgiving the format is. Each square is a small, finishable task, so progress shows quickly. The motifs also make the top easy to resize by adding or removing squares. It suits anyone who likes portable projects and wants a garment that is not a long slog.
Square Top Related Posts:
- Crochet Throw Pillow: A Warm and Timeless accent
- Crochet Granny Triangle Shawl: A Warm Bohemian Wrap
- Crochet Mandala Doily: A Timeless Decorative Accent
- Crochet Lace Doily: A Timeless Table Accent
Materials
For a crochet daisy granny square top you need smooth cotton or a cotton-blend yarn in three colours: a light sky blue for the backgrounds, edging and straps, a creamy white for the petals, and a soft pastel yellow for the centres. Cotton is the sensible choice here because it breathes against the skin, holds the petal shapes crisply and does not stretch out of shape across the bust. A hook that matches the yarn label, or half a size smaller for a firmer fabric, will keep the squares dense enough to wear without a lining. You will also need a yarn needle for weaving ends and seaming, scissors, and a tape measure to check the fit against your own body before joining. Stitch markers are handy for lining up the squares during assembly. Choose a mercerized cotton if you want a little sheen, or a matte cotton if you prefer a soft, homespun look.
Understanding the Motif Construction
Each square starts at the flower. The yellow centre is worked first, then the white petals are built around it, and finally the blue is added to turn the round flower into a square. That change of colour is what makes the daisy pop.
The top itself looks like a grid of about three rows of squares, with the squares along each side showing partial flowers where the panel wraps toward the back. That suggests the squares are joined into a rectangle and then shaped around the body, rather than crocheted as one continuous piece.
Joining can be done by seaming or by a join-as-you-go method. The video shows how the creator handles it, so watch that part closely and pause when the squares meet. A flat, tidy join keeps the grid looking intentional.
Daisy Puffs: The Detail That Makes the Top
The signature of this design is the daisy itself. The petals look like plump, rounded clusters that stand slightly proud of the fabric, which is why the surface has such a pretty, bumpy texture. Their softness against the flat blue ground is the whole point of the top.
The main choice is petal colour. Pure bright white gives high contrast and a classic daisy look. A creamy off-white gives a gentler, vintage feel and blends better with the pale yellow centres. Either way, keep the white and yellow yarn the same weight so the petals sit evenly.
The common mistake is uneven tension on the petals. Too loose and they flop and gape. Too tight and the square cups instead of lying flat. If a square starts to curl, relax your tension on the blue rounds, or block the finished square lightly with steam.
Weave in the yellow and white tails as you go if you can. A top made of many motifs has dozens of ends, and leaving them all until the end becomes a chore. Because the squares are small, a loose tail on a white petal can also show through the blue, so tuck it into the same colour.
Fit and Shaping
A fitted crop like this depends on measurements more than most garments. Measure around the fullest part of the bust and around the ribcage, then compare those numbers to the width of your joined panel. Granny squares have a little give, but cotton will not stretch generously, so aim for a snug fit rather than a loose one.
Because the top is a grid, adjusting the size means adding or removing whole squares, or working a slightly bigger or smaller square. If the panel comes out too narrow, an extra column of squares at the back is the easiest fix. If it comes out too wide, tighten the tension on the border instead of frogging the whole thing.
The straight neckline sits across the chest, and the straps attach at the top corners. Try the panel on before adding straps so you can place them where they sit comfortably on your shoulders. Straps that are too wide-set will slide off, while straps set too close will pull at the neckline.
Edges, Scallops and Straps
The lower edge ends in soft scallops, a small decorative touch that stops the hem from looking like the cut-off edge of a grid. The scallops follow the squares, with each curve sitting under a motif. They also add a tiny bit of weight, which helps the hem hang neatly.
The straps are thin cords in the same sky blue. A simple crocheted chain or a slim worked cord is enough, and it keeps the look delicate. If you want durable straps, work them a little tighter than the body, since they carry the weight of the top.
If the scalloped edge ripples or flares, you have likely added too many stitches into each curve. Rework the border with fewer stitches or a smaller hook. If the top edge gapes away from your chest, run a row of single crochet along it to firm it up.
How to Style a Crochet Daisy Granny Square Top
The most natural pairing is the one shown: a white flared skater skirt at the waist, with the crop ending just above the waistband. The pale blue and white read as one soft palette, and the yellow centres add a small hit of sunshine. Keep the proportions the same and the outfit stays balanced.
For a casual version, wear it with high-waisted light denim shorts and flat sandals. The blue squares echo the denim without matching it exactly. A thin white tee underneath turns it into a layered vest for cooler evenings.
For something dressier, pair it with a long flowy skirt in cream or soft green, or with wide-leg linen trousers. Add a thin gold necklace and let the daisies be the only pattern in the outfit. Because the top is so decorative, simple bottoms always work best.
It also makes a lovely handmade gift for someone who loves florals or spring colours. Choose their favourite palette: a lilac ground with white daisies, or a sunny yellow ground with white petals and a blue centre.
Tips for a Neat Finish
Block each square before joining. A light mist of water and a pin-down on a flat surface evens out the petals and squares the corners, which makes seaming much easier. Skipping this step is the usual reason a grid ends up wavy.
Join the squares with a consistent method and the same blue yarn. If you whip stitch, keep the stitches small and the tension relaxed so the seam does not pucker. If a seam looks tight, loosen it, because a tight seam pulls the squares inward.
Try the top on at least twice before finishing: once after the panel is joined, and once after the straps are added. Small adjustments at those stages are easy, while changes after the border is done are not.
Wash it gently by hand in cool water and dry it flat. Cotton shrinks with heat, and a hot machine cycle could flatten the daisy puffs and tighten the fit. Reshape the petals with your fingers while it is damp.
Following the Video Tutorial
Watch the video once through before touching your hook. The creator’s hand position on the daisy petals is worth studying, so pause and replay that section until the movement feels natural. Then make a single test square and check it against the video.
Pay particular attention to how the blue is added around the flower and how the corners are formed. Those are the points where beginners most often lose the square shape. Replaying the join and the border sections will save you from unpicking later.
Work in a sensible order: squares first, then blocking, then joining, then the border and scallops, then the straps. Making a few extra squares in the same dye lot of yarn means you can always replace one that came out uneven.
A Sunny Handmade Wardrobe Piece
The crochet daisy granny square top is a small garden of motifs turned into a cropped, scalloped camisole. Its charm comes from plump daisy petals on soft blue, joined neatly and finished with delicate straps.
Four things decide how well it turns out: even tension on the petals, careful blocking, a fit checked against your own measurements, and a tidy join. Get those right and the piece looks polished rather than homemade in the wrong way.
Pick your colours, make one square, and the rest follows.
Follow us on Pinterest and subscribe to the Newsletter so you don’t miss a thing!
Tutorial and photos of this daisy granny square top by: Krystal Everdeen.