
Last summer, I found myself wandering through a farmers market with produce spilling out of my arms and no bag in sight. Again. I had forgotten my reusable totes at home for probably the hundredth time, and I remember thinking, "I need to make something so cute that I actually remember to grab it." That evening, I sketched out the first version of what would become this strawberry tote, and honestly, it has become one of my favorite things I have ever crocheted.
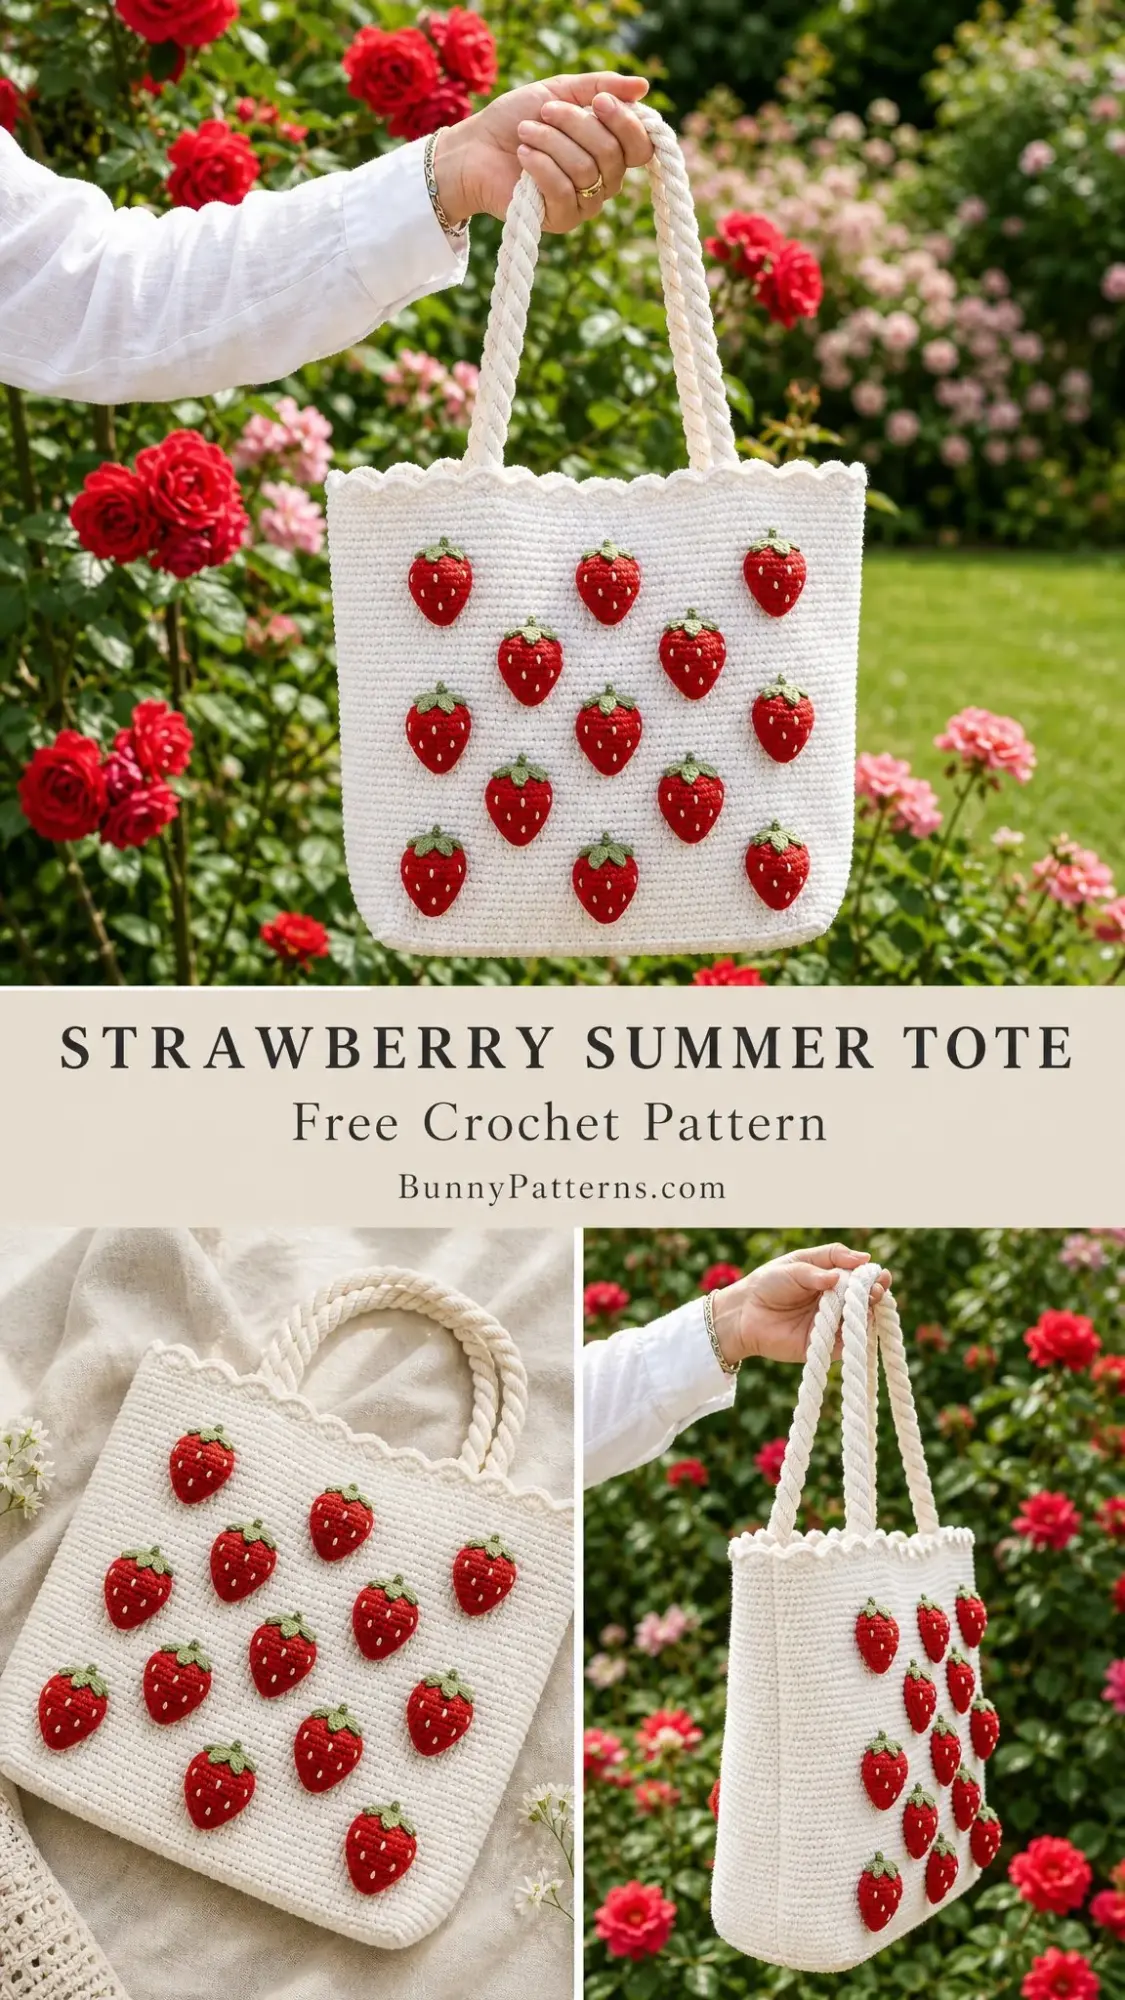
There is just something about carrying a handmade bag covered in tiny stuffed strawberries that makes grocery shopping feel like an event. Every time I use it, someone stops me to ask where I got it. The answer is always the same: I made it myself, and you can too.
This pattern is perfect for confident beginners who want a project that looks impressive but uses only basic stitches. We are talking chains, single crochet, and a simple shell border. If you can work in the round and follow a straightforward increase pattern, you have got everything you need to make this sweet summer tote.
About This Strawberry Summer Tote Pattern
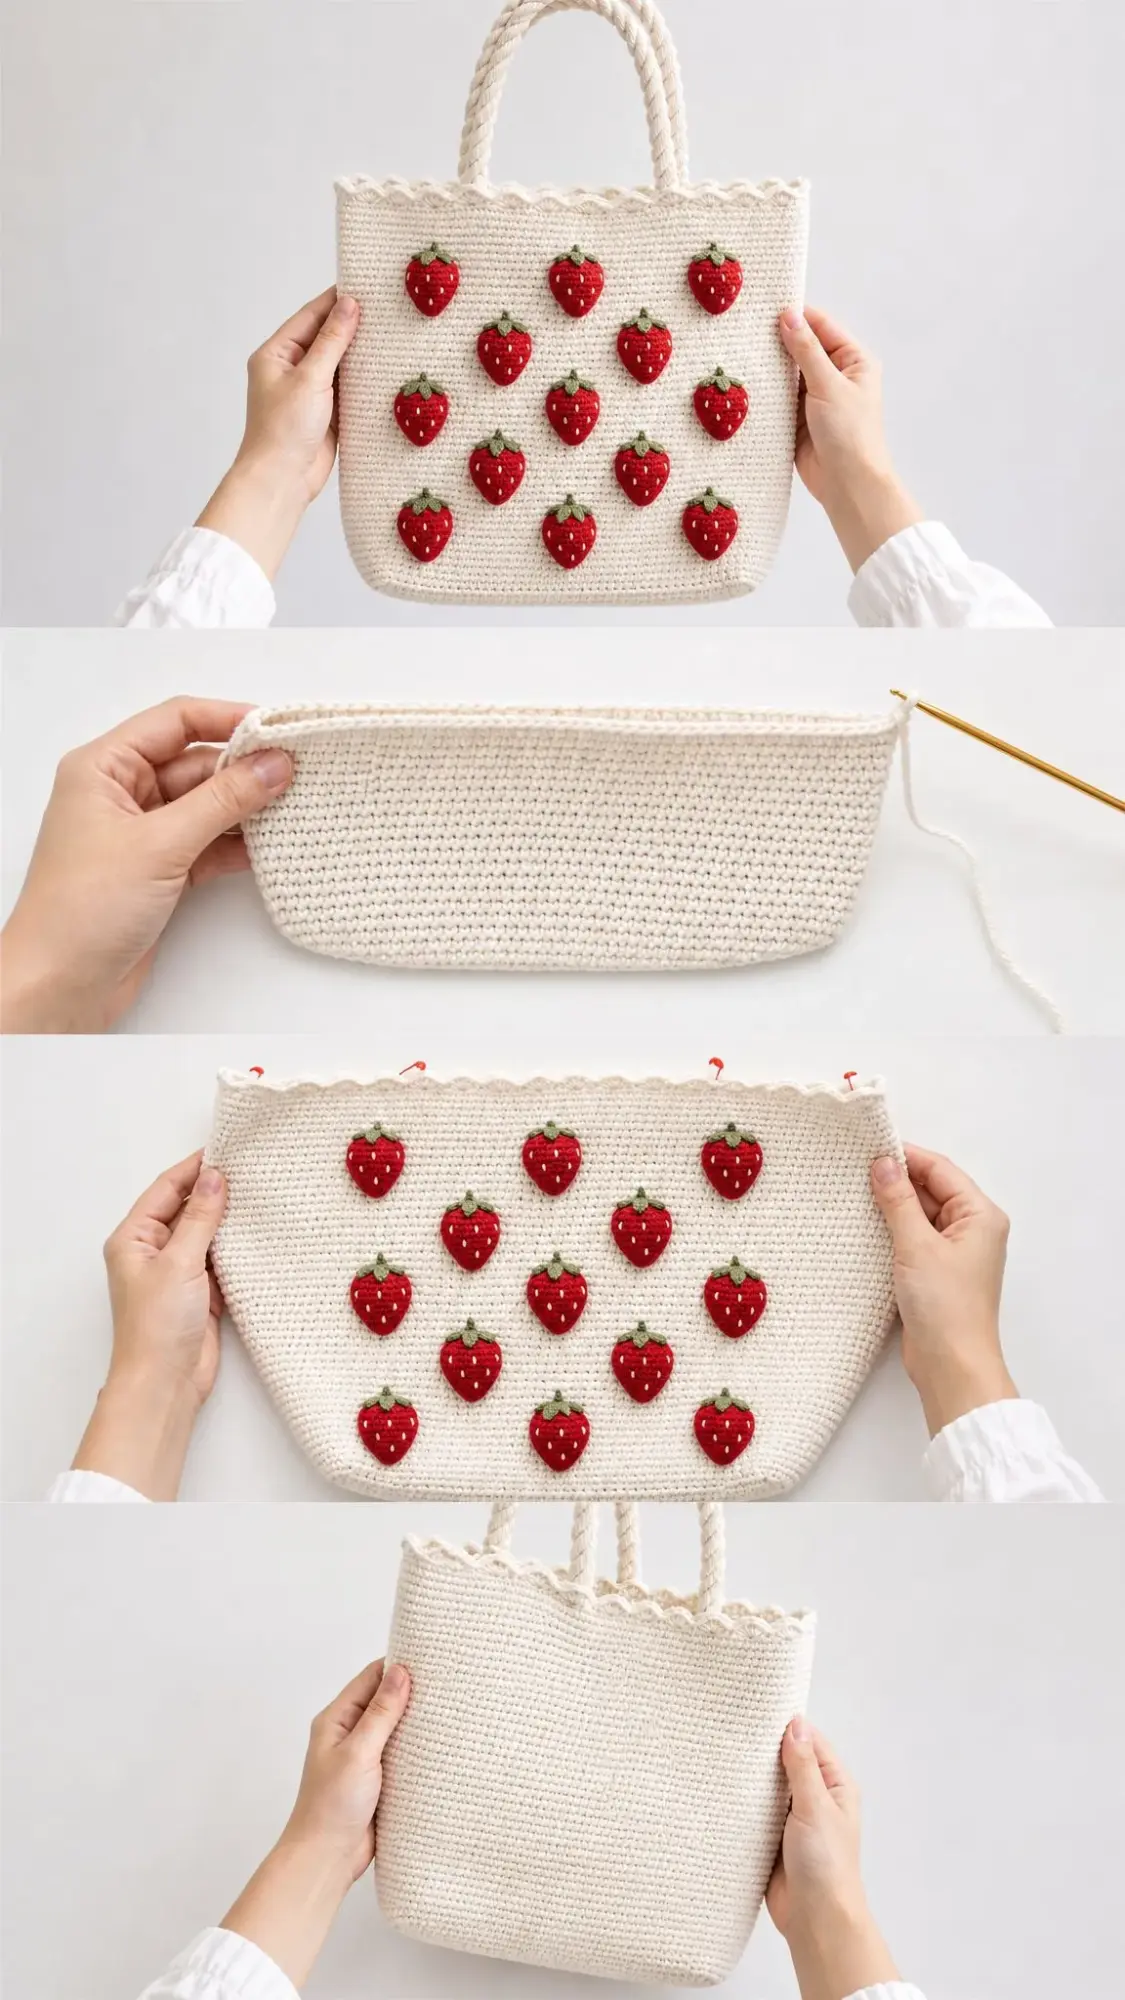
This adorable market bag features a sturdy rectangular base, a body worked in continuous spiral rounds, a scalloped top edge, crocheted rope handles, and 26 hand-stitched stuffed strawberries scattered across both sides. The berries are worked separately and sewn on at the end, complete with green leaf tops and embroidered white seeds.
The finished tote measures approximately 12 inches wide by 13 inches tall by 4 inches deep (30 x 33 x 10 cm), with handles that add a comfortable 9-inch (23 cm) drop. It is the perfect size for a trip to the market, a day at the beach, or just carrying your current crochet project around town.
Skill level: Confident Beginner. This pattern uses only chains, single crochet, simple increases and decreases, and a small shell edge stitch.
Time estimate: About 8 to 12 hours, depending on your speed and how many berries you add.
Materials You Will Need
Yarn
You will need worsted weight or aran weight cotton yarn in the following amounts:
Yarn suggestions that work beautifully for this project:
Cotton yarn is essential here. It gives the bag structure, holds up to regular use, and the dense fabric keeps the strawberry stuffing from peeking through.
Hooks and Notions
Gauge
16 single crochet stitches by 17 rows equals 4 inches (10 cm) in single crochet with the 5.0 mm hook, worked firmly.
A snug, dense fabric helps the tote hold its shape. If your gauge is off, try going up or down a hook size until you match.
Abbreviations and Special Stitches
Before we dive in, let me walk you through the abbreviations used in this pattern. United States crochet terms are used throughout, with UK equivalents noted where they differ.
Special Stitches
Shell (scallop edge): Work 5 double crochet stitches into the same stitch. This creates the pretty wavy edge at the top of the bag.
Invisible decrease: Insert your hook through the front loops only of the next 2 stitches, yarn over and draw through both front loops, yarn over and complete the single crochet as normal. This technique keeps your strawberries smooth and hides the decrease lines.
Pattern Instructions
Step 1: The Base
The base is worked flat as a firm rectangle using your 5.0 mm hook and cream yarn.
Foundation: Chain 49.
Row 1: Single crochet in the 2nd chain from hook and in each chain across. Turn. (48 sc)
Rows 2 through 17: Chain 1 (this does not count as a stitch), single crochet in each stitch across. Turn. (48 sc)
Your finished base should measure about 12 inches by 4 inches (30 x 10 cm). Do not fasten off after Row 17. You will continue straight into the body. Chain 1 and rotate your work to crochet around the entire outer edge.
Pro tip: For a sturdier, free-standing tote, hold a strand of cotton thread together with your yarn for the base only. Alternatively, you can work the base in back loops only to reduce stretch.
Step 2: The Body and Scallop Trim
Now we will build up the walls of the bag by working around the rectangular base in a spiral.
Round 1: Working around the base, work 48 single crochet across one long edge, 16 single crochet across the short edge, 48 single crochet across the other long edge, and 16 single crochet across the last short edge. Join with a slip stitch to the first single crochet, then continue working in a spiral. (128 sc)
Rounds 2 through 53: Single crochet in each stitch around, working in a continuous spiral for 52 rounds. (128 sc)
At the end of Round 53, your bag body should stand about 12 inches (30 cm) tall. Slip stitch in the next stitch to even out the spiral before starting the trim.
Scallop Top Edge
Round 54: Single crochet in next stitch, skip 1 stitch, work 5 double crochet in next stitch (this is your shell), skip 1 stitch. Repeat from * around. Slip stitch to first single crochet. (32 shells)
The 128 stitches divide evenly into 32 four-stitch repeats, so your scallops will meet perfectly with no gap. Fasten off and weave in your ends.
Step 3: The Rope Handles
Make 2 firm cord handles using your 5.0 mm hook and cream yarn.
Foundation: Chain 70.
Pass 1: Single crochet in the 2nd chain from hook and in each chain across. (69 sc)
Pass 2: Without turning your work, continue along the opposite side of the foundation chain by working single crochet in each chain back to the start. This draws the work into a round cord shape. Slip stitch to join. (69 sc on this side, 138 sc total)
Each handle measures about 17 inches (43 cm). For extra firmness, lay a length of cotton cord or piping inside before closing the second pass. Leave a long tail for sewing.
Handle Placement: On the front of the bag, count in from each side and pin the handle ends about 3 inches (7.5 cm) apart, positioned just below the scallop edge. Mirror this placement on the back. Stitch each handle end firmly to the inside of the bag, sewing through several stitches so the handle can bear weight evenly. A 9-inch (23 cm) drop should remain when properly attached.
Step 4: The Strawberries
Make 26 berries (13 for the front and 13 for the back) using your 3.5 mm hook and red yarn. The strawberries are worked from the bottom point upward.
Round 1: Work 6 single crochet in a magic ring. (6 sc)
Round 2: [Single crochet, increase] repeat 3 times. (9 sc)
Round 3: [Single crochet in next 2 stitches, increase] repeat 3 times. (12 sc)
Round 4: Single crochet in each stitch around. (12 sc)
Round 5: [Single crochet in next 3 stitches, increase] repeat 3 times. (15 sc)
Rounds 6 and 7: Single crochet in each stitch around. (15 sc)
Round 8: [Single crochet in next 3 stitches, decrease] repeat 3 times. Lightly stuff your strawberry at this point. (12 sc)
Round 9: [Single crochet in next 2 stitches, decrease] repeat 3 times. (9 sc)
Fasten off, leaving a long tail. Thread the tail through the final 9 stitches but do not pull fully closed. The slightly open top will sit neatly under the leaves. Each finished berry is about 1¼ inches (3 cm) tall.
Important tip: Add only a wisp of stuffing. Over-stuffed berries will pull at the bag fabric and show white stuffing between your red stitches.
Step 5: Leaves, Seeds, and Placement
Leaf Top (Calyx)
Make 26 leaf tops using your 3.5 mm hook and green yarn.
Round 1: Work 6 single crochet in a magic ring. (6 sc)
Round 2: [Single crochet, increase] repeat 3 times. (9 sc)
Leaves: Chain 4, slip stitch in the 2nd chain from hook and in the next 2 chains, slip stitch in the next stitch of the round. Repeat from * around. (5 leaf points)
Fasten off, leaving a tail for sewing. Center each leaf top over the open top of a strawberry and stitch it in place, letting the leaf points splay outward naturally.
Seeds
Using white yarn and a tapestry needle, embroider 7 to 9 tiny straight stitches (or French knots if you prefer) scattered over each red strawberry. Knot off securely on the inside.
Berry Placement
Arrange your 13 strawberries on the front of the bag in five offset rows following this pattern: 3, 2, 3, 2, 3. Each row sits in the gaps of the row above, creating that classic scattered strawberry look. Repeat the same arrangement on the back.
Pin all your berries first and step back to check your spacing before committing. Once you are happy with the layout, sew each strawberry down securely around its base using matching thread.
Step 6: Assembly and Finishing
1. Weave in all remaining ends on the body and handles. Block the bag lightly to square up the corners if needed.
2. Sew both rope handles to the inside of the bag, with front and back placement mirrored, maintaining a 9-inch drop.
3. Make sure all 26 strawberries have their leaf tops attached and white seeds embroidered.
4. Pin your berries in the 3-2-3-2-3 layout on both the front and back, then sew each one down around its base with matching thread.
5. Give the whole tote a final light steam to settle the stitches and scallops.
Optional fabric liner: For a polished interior, cut two fabric panels to match the bag’s inner dimensions plus a seam allowance. Sew them into a pouch and hand-stitch the liner just below the scallop edge. This creates a tidy, stronger interior and prevents small items from poking through your stitches.
Care Instructions for Your Strawberry Tote
Hand wash your tote in cool water with mild soap. Do not wring it out. Reshape while damp and lay flat to dry. Tuck a folded towel inside while drying to help the bag hold its form.
Cotton may relax a bit with regular use, but a quick steam will restore the shape beautifully.
Customization Ideas
This pattern is wonderfully flexible. Here are some ways to make it your own:
To make it wider: Add stitches to the base foundation chain in multiples of 4 to keep the scallop trim even. Each additional 4 stitches adds approximately 1 inch (2.5 cm) of width.
To make it taller: Work more or fewer body rounds. About 4 rounds equals 1 inch (2.5 cm).
To make it deeper: Lengthen the short edges of the base while keeping the total round count a multiple of 4.
Berry variations: Use fewer strawberries for a minimalist look, or extend a column of berries onto the side panels for extra charm.
Color play: Try a blush pink or sage green body instead of cream. You could also cluster all the berries toward the bottom like a basket. The pattern stays exactly the same, but the placement changes the whole mood.
Why Cotton Yarn Matters
I want to emphasize how important it is to use cotton yarn for this project. Cotton has the structure and weight needed to help your tote stand up on its own. It also creates a dense enough fabric that your strawberry stuffing stays hidden inside where it belongs.
Acrylic yarn might be tempting because it is often cheaper, but it tends to stretch over time and can make the bag look droopy after a few uses. Trust me on this one. Cotton is worth it.
Perfect for Gifts and Market Days
This strawberry tote makes an absolutely wonderful gift. It is personal, practical, and shows real effort and love. I have made several of these for friends and family, and every single one has been met with squeals of delight.
It is also genuinely useful. The sturdy base sits flat, the handles are comfortable to carry, and it holds more than you would expect. I use mine for everything from groceries to library books to picnic supplies.
I hope you have as much fun making this strawberry summer tote as I did designing it. It is one of those projects that looks complicated but is really just a bunch of simple techniques combined into something special.
If you make one, I would absolutely love to see it. Tag me on Instagram or share a photo in our Facebook group. Seeing your finished projects honestly makes my whole day.
Do not forget to save this pattern to your Pinterest boards so you can find it easily when you are ready to start. And if you have any questions or want to share your progress, drop a comment below. I always love hearing from you, and I am happy to help if you get stuck on any step. Happy crocheting!
You Might Also Like
- Gray and Pink Heart Granny Square Blanket Free Crochet Pattern
- Dusty Rose Mesh Crochet Sneaker Boots Free Pattern
- Midnight Blue Floral Bell Sleeve Top Free Crochet Pattern
- Coral Reef Fish Crochet Beach Tote Free Pattern