
You know that gorgeous skein of DK cotton sitting in your stash? The one you’ve been saving for something truly special? This is the project it’s been waiting for.
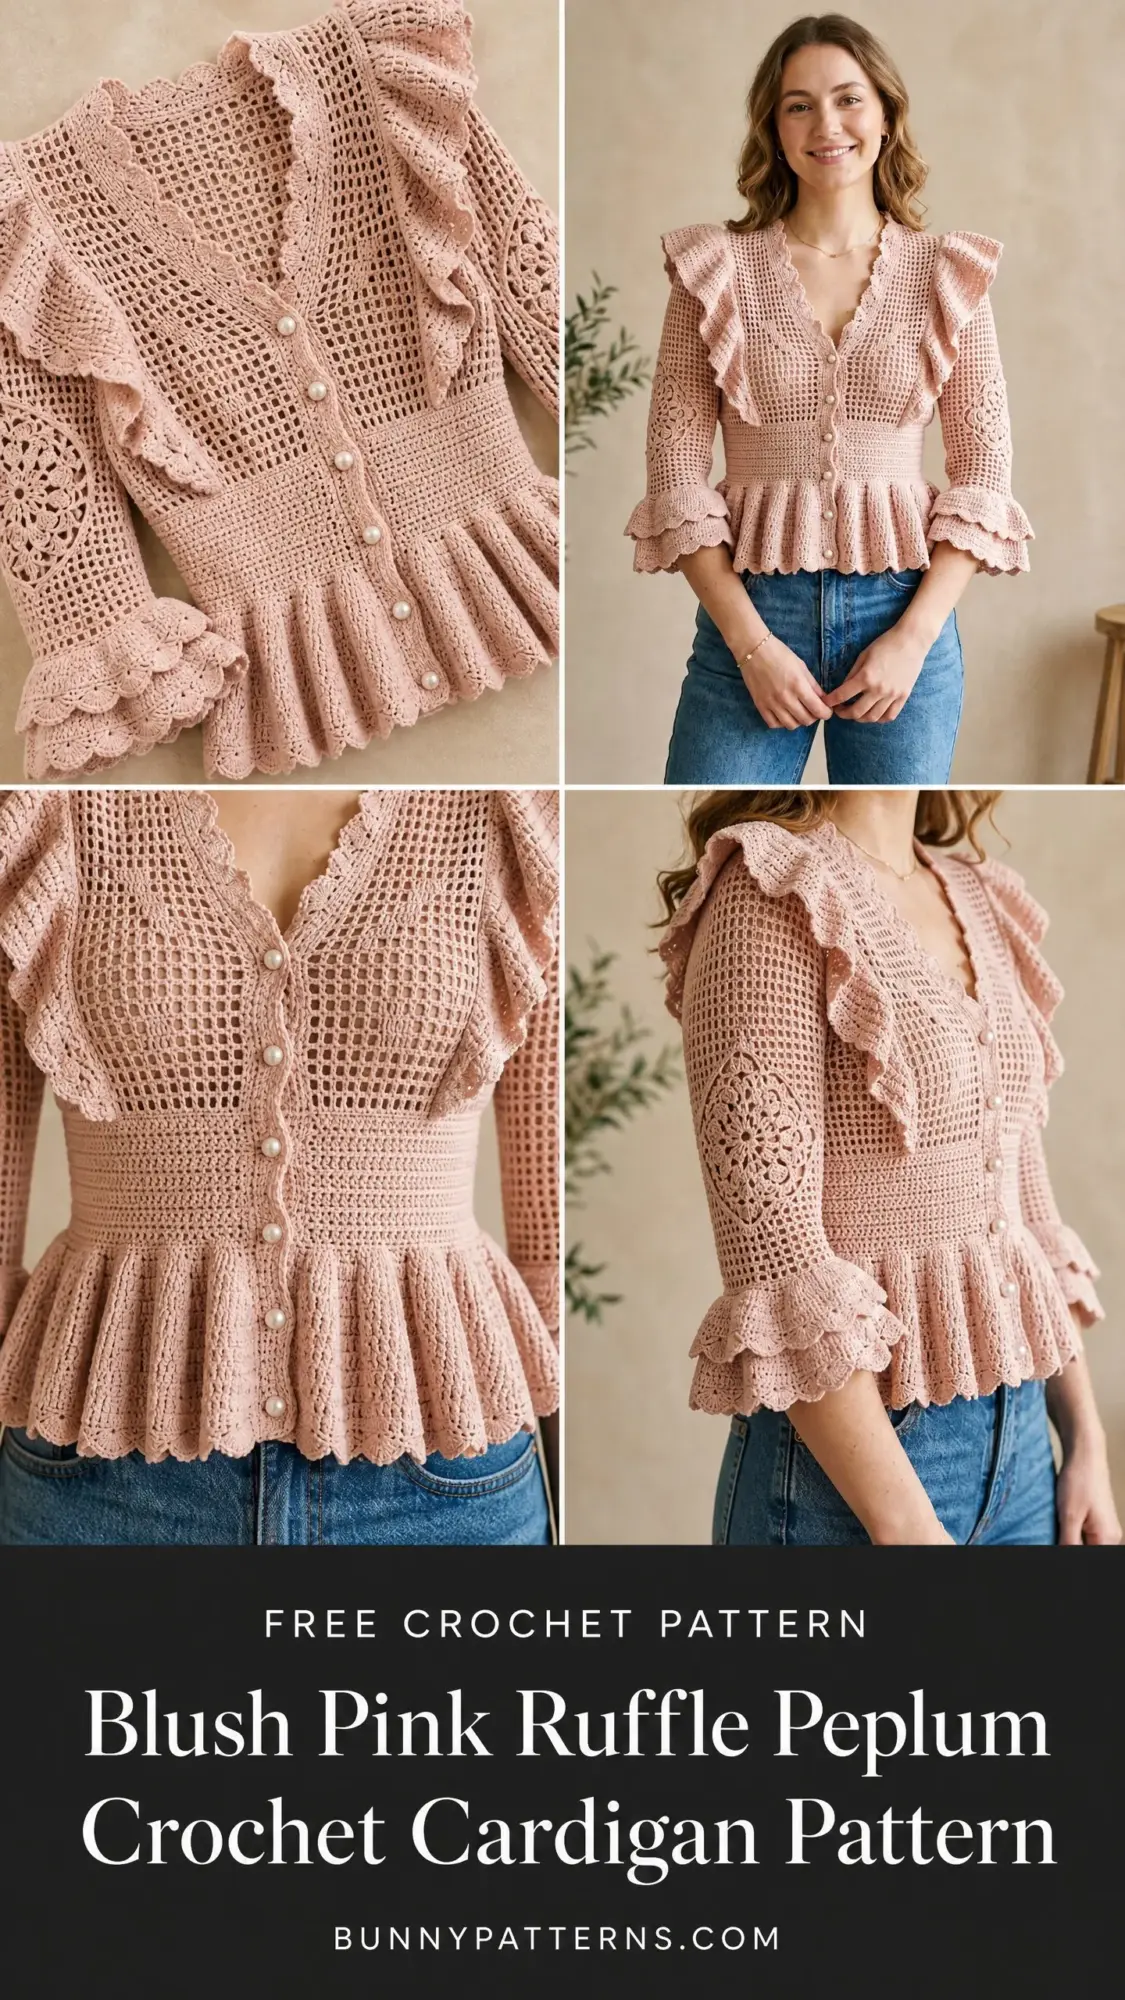
This romantic peplum cardigan combines mesh grid construction, layered ruffles, and handcrafted floral motifs into one stunning piece. The fitted bodice flows into a cinched waistband, then blooms into a double-tiered peplum that moves beautifully with every step.
I won’t sugarcoat it. This is an advanced intermediate to advanced project requiring 60 to 80 hours of dedicated work. But if you’ve completed at least two fitted garments and you’re ready for a rewarding challenge, the result is absolutely worth every stitch.
Why This Cardigan Pattern Stands Out
This isn’t your everyday crochet project. The construction method teaches you multiple techniques in one garment. You’ll master mesh grid stitch for the airy bodice fabric, work floral motifs in the round to embellish the sleeves, create a post stitch ribbed waistband with smocked gathering, and build multi-tier ruffles for the peplum, cuffs, and shoulders.
The silhouette is unmistakably vintage-inspired. A deep V-neckline draws the eye downward while scalloped edging softens every edge. The waistband creates a dramatic hourglass shape, and the peplum flares below with feminine movement. Pearl buttons down the center front add the perfect finishing touch.
The blush pink colorway keeps the look soft and romantic, but you could easily adapt this to cream, sage, or even a bold coral for different vibes.
Materials You’ll Need
Yarn: Approximately 1,000 (1,100, 1,250, 1,400) yards of DK weight yarn in blush pink. Choose a smooth yarn with excellent stitch definition. Cotton or cotton-blend yarns work best for structure and drape.
Recommended Yarn Options:
Hooks:
Notions:
Always purchase one extra skein as a safety buffer. Running out of yarn from the same dye lot mid-project is heartbreaking.
Finished Measurements
This pattern includes sizes Small, Medium, Large, and Extra-Large. All measurements are written as S (M, L, XL).
Bust circumference: 34 (37, 40, 43) inches / 86.5 (94, 101.5, 109) cm
Waist circumference at ribbed band: 27 (30, 33, 36) inches / 68.5 (76, 84, 91.5) cm
Total length from shoulder to peplum hem: 22 (22.5, 23, 23.5) inches / 56 (57, 58.5, 59.5) cm
Sleeve length from underarm to cuff edge: 15 (15.5, 16, 16) inches / 38 (39.5, 40.5, 40.5) cm
Peplum depth: 6 inches / 15 cm for all sizes
Gauge (Do Not Skip This)
Gauge is mandatory for a fitted garment. Seriously, do not skip this step.
Using US size E-4 / 3.5 mm hook and mesh grid stitch:
20 stitches and 20 rows = 4 inches / 10 cm, measured after blocking
Using US size D-3 / 3.25 mm hook and post stitch ribbing:
20 stitches and 16 rows = 4 inches / 10 cm, lightly stretched
Make a swatch at least 5 inches / 12.5 cm square. Block it. Let it dry completely. Then measure. If your gauge is off, adjust your hook size up or down until you match.
Abbreviations and Stitch Definitions
ch: chain. Wrap yarn over hook, pull through loop on hook.
sl st: slip stitch. Insert hook, yarn over, pull through both the stitch and loop on hook in one motion.
sc: single crochet. Insert hook, yarn over, pull up a loop (2 loops on hook), yarn over, pull through both loops.
dc: double crochet. Yarn over, insert hook, yarn over, pull up a loop (3 loops on hook), yarn over, pull through 2 loops, yarn over, pull through remaining 2 loops.
hdc: half double crochet. Yarn over, insert hook, yarn over, pull up a loop (3 loops on hook), yarn over, pull through all 3 loops at once.
sc2tog: single crochet two together. A decrease that joins 2 stitches into 1.
dc2tog: double crochet two together. A decrease that joins 2 stitches into 1.
FPdc: front post double crochet. Yarn over, insert hook from front to back to front around the post of the indicated stitch, complete as a regular dc.
BPdc: back post double crochet. Yarn over, insert hook from back to front to back around the post of the indicated stitch, complete as a regular dc.
sk: skip
st(s): stitch(es)
sp: space
ch-sp: chain space
RS: right side
WS: wrong side
BLO: back loop only
FLO: front loop only
rep: repeat
rem: remaining
beg: beginning
rnd: round
Special Stitches
Mesh Grid Stitch
This creates the open, airy texture for the bodice. Think of it as a simple grid pattern.
Row 1 (RS): Ch 1 (counts as first sc), sk 1 st, (sc in next st, ch 1, sk 1 st) across, end sc in last st. Turn.
Row 2: Ch 1, sc in first sc, (ch 1, sc in next sc) across. Turn.
Repeat Row 2 for pattern.
When counting stitches in mesh fabric, each sc and each ch-1 space counts as one stitch unit.
Scallop Edging
This decorative edge appears along the neckline, shoulder ruffles, and peplum hem.
Step 1: Join yarn with a sl st to the first stitch.
Step 2: Ch 1, sc in same st, sk 2 sts, 5 dc in next st (shell made), sk 2 sts, sc in next st.
Step 3: Repeat Step 2 across.
Each scallop repeat uses 6 stitches. Your total stitch count must be divisible by 6 before beginning.
Floral Motif (Make 2)
These six-petal flowers decorate the sleeves.
Foundation ring: Ch 6, sl st to first ch to form a ring.
Rnd 1: Ch 1, 12 sc into ring, sl st to first sc to join. (12 sc)
Rnd 2: Ch 1, sc in same st, ch 3, sk 1 sc, (sc in next sc, ch 3, sk 1 sc) 5 times, sl st to first sc. (6 ch-3 loops)
Rnd 3: Sl st into first ch-3 loop, ch 1, (sc, hdc, 3 dc, hdc, sc) in each ch-3 loop around, sl st to first sc. (6 petals, 42 sts total)
Rnd 4: Working behind petals, sl st into the back of the next skipped sc from Rnd 1, ch 4, (sl st in back of next skipped sc from Rnd 1, ch 4) 5 times, sl st to first sl st. (6 ch-4 loops)
Rnd 5: Sl st into first ch-4 loop, ch 1, (sc, hdc, 5 dc, hdc, sc) in each ch-4 loop around, sl st to first sc. (6 outer petals, 54 sts total)
Fasten off, leaving a 12 inch / 30 cm tail for seaming.
Ribbing Stitch
Used for the waistband to create stretch and texture.
Row 1: Ch 1, FPdc around next st, BPdc around next st, rep across. Turn.
Repeat Row 1 for ribbing pattern.
Ruffle Stitch
Used for peplum, cuffs, and shoulder ruffles.
Row/Rnd 1: Work 2 dc in each stitch across or around. (stitch count doubles)
Row/Rnd 2: Ch 3 (counts as dc), dc in same st, (dc in next st, 2 dc in next st) across or around, sl st to top of ch-3. (stitch count increases by approximately 50 percent)
Row/Rnd 3 (outer scallop row): Work Scallop Edging across or around.
Construction Overview
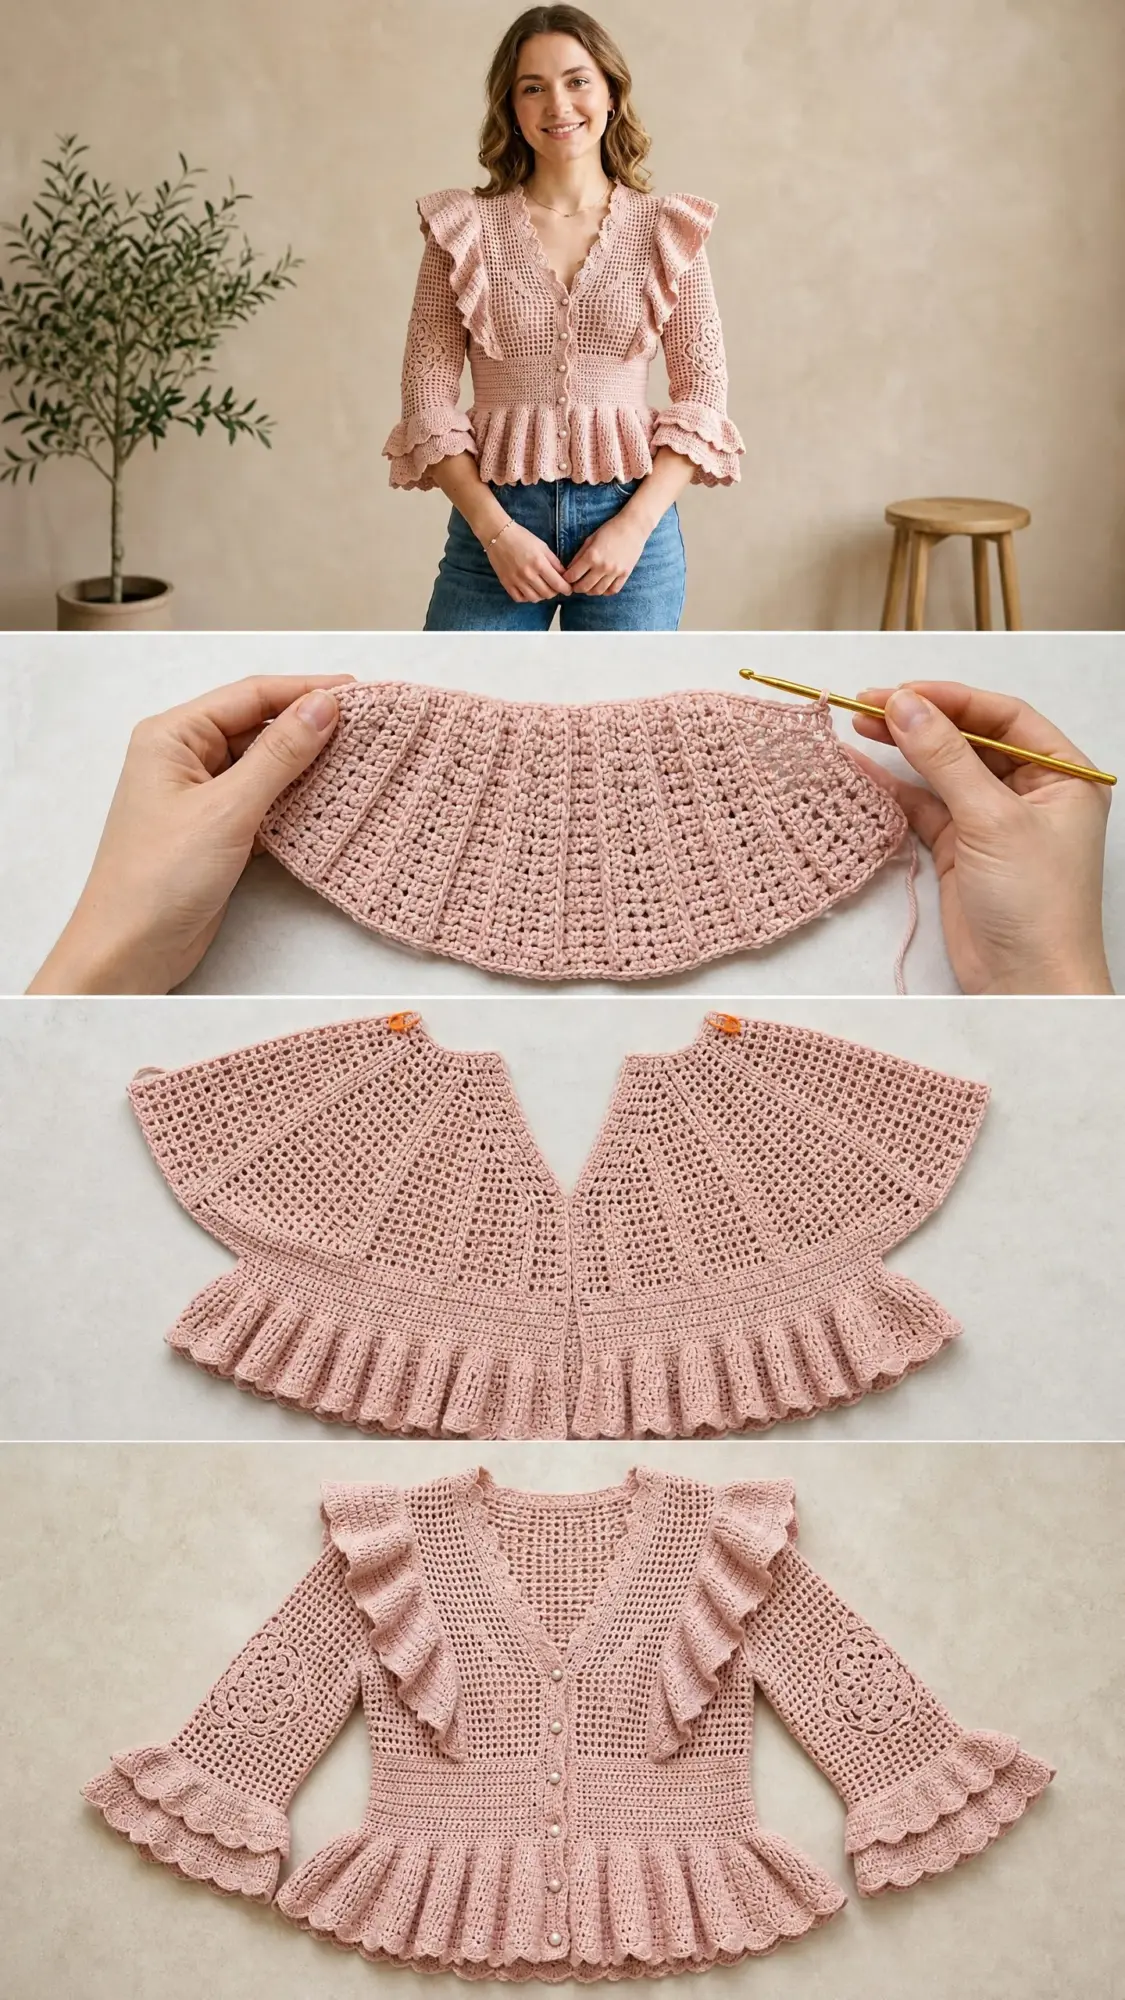
Before diving into the row-by-row instructions, here’s how this cardigan comes together:
1. Work the back bodice flat in mesh grid stitch
2. Work the right front bodice with V-neck shaping
3. Work the left front bodice as a mirror image
4. Work two sleeves with shaping and floral motif placement
5. Seam shoulders, sides, and set in sleeves
6. Work the waistband in ribbing with smocked gathering
7. Work the double-tier peplum in the round
8. Add shoulder ruffles
9. Add double ruffle cuffs
10. Work neckline edging and sew on buttons
Take your time with each section. This is not a weekend project, and rushing will show in the finished piece.
Back Bodice Instructions
Using US E-4 / 3.5 mm hook, ch 91 (99, 107, 115).
Row 1 (RS): Sc in 3rd ch from hook (counts as first sc and ch-1 sp), (ch 1, sk 1 ch, sc in next ch) across, end sc in last ch. Turn. (44, 48, 52, 56 mesh units)
Row 2: Ch 1, sc in first sc, (ch 1, sc in next sc) across. Turn. (44, 48, 52, 56 mesh units)
Repeat Row 2 for mesh grid stitch until back bodice measures 13 (13.5, 14, 14.5) inches / 33 (34.5, 35.5, 37) cm from foundation, ending with a WS row.
Armhole Shaping for Back
Row 1 (RS): Sl st across first 4 (4, 5, 5) mesh units, ch 1, sc in same sp, continue in mesh pattern across to last 4 (4, 5, 5) mesh units, leave remaining sts unworked. Turn. (36, 40, 42, 46 mesh units)
Row 2: Ch 1, sc2tog across first mesh unit to decrease 1 mesh unit, continue in mesh pattern across to last mesh unit, sc2tog. Turn. (34, 38, 40, 44 mesh units)
Row 3: Repeat Row 2. (32, 36, 38, 42 mesh units)
Row 4: Repeat Row 2. (30, 34, 36, 40 mesh units)
Continue even in mesh pattern on 30 (34, 36, 40) mesh units until armhole measures 7 (7.5, 8, 8.5) inches / 18 (19, 20.5, 21.5) cm.
Shoulder Shaping for Back
Row 1: Sl st across first 7 (8, 9, 10) mesh units, work in mesh pattern to last 7 (8, 9, 10) mesh units, leave remaining sts unworked. Turn. (16, 18, 18, 20 mesh units remain for back neck)
Fasten off. Mark center 16 (18, 18, 20) mesh units as back neck. Mark outer 7 (8, 9, 10) mesh units each side as shoulders.
Right Front Bodice Instructions
Using US E-4 / 3.5 mm hook, ch 47 (51, 55, 59).
Row 1 (RS): Sc in 3rd ch from hook, (ch 1, sk 1 ch, sc in next ch) across. Turn. (23, 25, 27, 29 mesh units)
Row 2: Ch 1, sc in first sc, (ch 1, sc in next sc) across. Turn. (23, 25, 27, 29 mesh units)
Repeat Row 2 until piece measures 6 (6, 6.5, 6.5) inches / 15 (15, 16.5, 16.5) cm from foundation. End on a WS row.
V-Neck Shaping for Right Front
Decrease row (RS): Work in mesh pattern to last 2 mesh units, sc2tog over last 2 mesh units. Turn. (22, 24, 26, 28 mesh units)
Continue working even for 3 rows, then work one decrease row. Repeat this sequence until 15 (17, 18, 20) mesh units remain.
Continue even until piece matches back armhole shaping point (total bodice length 13, 13.5, 14, 14.5 inches).
Armhole Shaping for Right Front
Row 1 (RS, armhole side): Sl st across 4 (4, 5, 5) mesh units from armhole edge, work in mesh to end. Turn. (11, 13, 13, 15 mesh units, minus ongoing neck decreases)
Continue neck shaping every 4th row while working even at armhole edge until 7 (8, 9, 10) mesh units remain.
Work even until armhole depth matches back (7, 7.5, 8, 8.5 inches).
Fasten off, leaving a 12 inch / 30 cm tail for shoulder seaming.
Left Front Bodice Instructions
Work as Right Front Bodice, reversing all shaping. The armhole shaping will be at the left side (beginning of RS rows), and the V-neck shaping decrease will be at the beginning of RS rows: ch 1, sc2tog over first 2 mesh units.
Sleeve Instructions (Make 2)
Using US E-4 / 3.5 mm hook, ch 39 (43, 47, 51).
Row 1 (RS): Sc in 3rd ch from hook, (ch 1, sk 1 ch, sc in next ch) across. Turn. (19, 21, 23, 25 mesh units)
Row 2: Work even in mesh. Turn. (19, 21, 23, 25 mesh units)
Sleeve Shaping
Increase row (RS): Ch 1, (sc, ch 1, sc) in first sc (1 mesh unit increased at beginning), work in mesh pattern across to last sc, (sc, ch 1, sc) in last sc (1 mesh unit increased at end). Turn.
Work increase row every 4th row 5 (5, 5, 6) times total. (29, 31, 33, 37 mesh units after all increases)
Work even in mesh until sleeve (not including cuff) measures 11 (11.5, 12, 12) inches / 28 (29, 30.5, 30.5) cm.
Floral Motif Placement
The floral motif is seamed to the outer sleeve panel, centered between the sleeve cap shaping and the cuff, approximately 4 to 5 inches / 10 to 12.5 cm above the cuff row. Using yarn needle and long tail from motif, whipstitch the motif to the sleeve mesh fabric, aligning center of motif with center width of sleeve.
Sleeve Cap Shaping
Row 1 (RS): Sl st across 3 (3, 4, 4) mesh units, work in mesh to last 3 (3, 4, 4) mesh units. Turn. (23, 25, 25, 29 mesh units)
Row 2: Sc2tog at each end to decrease 1 mesh unit per end. Turn. (21, 23, 23, 27 mesh units)
Rows 3 through 10: Repeat Row 2 every row. (5, 7, 7, 11 mesh units after Row 10)
Fasten off.
Double Ruffle Cuffs
With RS facing and US E-4 hook, join yarn at lower edge of sleeve.
Rnd 1: Work sc evenly around lower sleeve edge, working 1 sc per row end. Join with sl st. Do not turn. (38, 42, 46, 50 sc)
Rnd 2 (First ruffle tier): Ch 3 (counts as dc), dc in same st, 2 dc in each sc around. Join with sl st to top of ch-3. (76, 84, 92, 100 dc)
Rnd 3: Ch 3, dc in same st, (dc in next dc, 2 dc in next dc) around. Join with sl st. (114, 126, 138, 150 dc)
Rnd 4 (Scallop): Work Scallop Edging around. Fasten off.
Second Ruffle Tier
Working in the sc round from Rnd 1 (BLO if needed), attach yarn and work a second smaller ruffle.
Rnd A: With US D-3 hook, join yarn to Rnd 1 sts. Work 1 sc in each st around. Join. (38, 42, 46, 50 sc)
Rnd B: Ch 3, (2 dc in first sc, dc in next sc) around for a 50 percent increase. Join. Adjust to nearest multiple of 6: S = 54, M = 60, L = 66, XL = 72 dc.
Rnd C: Scallop Edging around. Fasten off. Weave in ends.
Assembling the Body
Seam shoulders: Hold right front bodice and back bodice with RS together. Using yarn needle and blush pink yarn, whipstitch across 7 (8, 9, 10) mesh units at each shoulder. Repeat for left front and back. Turn RS out.
Seam sleeves: Fold each sleeve lengthwise with RS together, aligning edges. Whipstitch from cuff end upward approximately 9 (9.5, 10, 10) inches, leaving the sleeve cap free.
Set in sleeves: With RS together, pin sleeve cap into armhole opening, matching center of cap to shoulder seam. Ease any extra fabric evenly. Whipstitch around armhole. Repeat for second sleeve.
Seam sides: With RS together, align side edges of front and back bodice. Whipstitch from armhole downward to lower bodice edge, leaving lower edge open for waistband.
Waistband Instructions
The waistband cinches the waist and creates the smocked-look silhouette.
Setup round: With RS facing and US D-3 hook, join yarn at right side seam at lower bodice edge. Ch 1, work 1 sc in each mesh stitch and ch-sp around entire lower edge. Place marker at beginning of round. Adjust to reach a multiple of 4 for ribbing: S = 136, M = 148, L = 160, XL = 172 sc. Join with sl st to first sc.
Row 1 (Ribbing, worked back and forth): Ch 2 (does not count as st). Turn to work WS. FPdc around first sc, (BPdc around next sc, FPdc around next sc) across. Turn. (136, 148, 160, 172 sts)
Row 2: Ch 2. FPdc around first FPdc, (BPdc around next BPdc, FPdc around next FPdc) across. Turn. (136, 148, 160, 172 sts)
Repeat Row 2 for 14 (14, 16, 16) total rows of ribbing, producing a waistband approximately 3.5 (3.5, 4, 4) inches deep.
Smocking
On the WS, thread a 24 inch length of yarn onto yarn needle. Working across the center of the waistband height (around Row 7), use the needle to gather every 4th rib together by stitching a small horizontal stitch through two rib posts at a time, then pulling gently to gather. Secure each gather with a knot on the WS. Repeat every 4 ribs across.
Do not join waistband into a round. The two ends will remain at the center front openings.
Peplum Instructions
Setup: With RS facing and US E-4 hook, join yarn at right side seam of lower waistband edge. Ch 1, work 1 sc in each stitch across lower waistband edge around. Join with sl st. (136, 148, 160, 172 sc)
Rnd 1 (Volume increase): Ch 3 (counts as dc), dc in same st, 2 dc in each sc around. Join with sl st to top of ch-3. (272, 296, 320, 344 dc)
Rnds 2 through 4: Ch 3, dc in each dc around. Join. (272, 296, 320, 344 dc)
Rnd 5 (Second volume increase): Ch 3, dc in same st, (2 dc in next dc, dc in next 2 dc) around. Distribute increases evenly to achieve totals divisible by 6: S = 360, M = 396, L = 426, XL = 456 dc.
Rnds 6 and 7: Work even in dc. Join each round. (360, 396, 426, 456 dc)
First Peplum Tier Scallop: Work Scallop Edging around. S = 60 scallops, M = 66 scallops, L = 71 scallops, XL = 76 scallops. Fasten off.
Second Peplum Tier
Working in the FLO of Rnd 4 of the peplum, attach yarn.
Rnd A: Join yarn. Ch 3, dc in each dc around in FLO. Join. (272, 296, 320, 344 dc)
Rnd B: Ch 3, 2 dc in each dc around. Join. Round down to nearest 6: S = 540, M = 588, L = 636, XL = 684 dc.
Rnd C: Scallop Edging around. S = 90 scallops, M = 98 scallops, L = 106 scallops, XL = 114 scallops. Fasten off.
Shoulder Ruffles
The shoulder ruffles provide the dramatic epaulette effect. With RS facing and US E-4 hook, join yarn at the shoulder seam. Pick up stitches along the shoulder seam and upper armhole area. Work 2 dc in each stitch to create volume, then finish with scallop edging. Work one ruffle per shoulder, shaping to cascade from shoulder toward the upper arm.
Finishing Touches
Neckline Edging
With RS facing and US D-3 hook, join yarn at lower right front edge. Work sc evenly up the right front edge, around the V-neck, and down the left front edge. Ensure your stitch count is divisible by 6 for scallop edging. Work one row of Scallop Edging around the neckline only (not the front button bands).
Button Placement
Mark placement for 7 buttons evenly spaced along the left front band. Sew pearl shank buttons to left front. The mesh grid fabric creates natural buttonholes on the right front band.
Blocking
Wet block the finished cardigan by soaking in lukewarm water for 15 to 20 minutes. Gently squeeze out excess water (do not wring). Pin to measurements on a blocking mat, paying special attention to the peplum ruffles and shoulder ruffles. Allow to dry completely before removing pins.
Tips for Success
Take breaks. This is a 60 to 80 hour project. Working in sessions prevents fatigue mistakes.
Count religiously. Mesh grid stitch is easy to lose count in. Count every few rows.
Block as you go. Blocking each piece before seaming makes assembly much easier.
Try it on. If possible, baste the bodice pieces together and try on before final seaming to check fit.
Keep notes. Write down any modifications you make for future reference.
This crochet cardigan pattern creates a truly special garment. The combination of techniques, from the delicate mesh bodice to the dramatic layered ruffles, results in a piece you’ll treasure wearing again and again. Take your time, trust the process, and enjoy watching this beautiful cardigan come to life in your hands.
If you’re as excited about this blush pink ruffle peplum crochet cardigan as I am, save this pattern to your Pinterest boards so you can find it when you’re ready to start. And please, leave a comment below if you make one. I would love to see your finished cardigans and hear how the project went for you!
You Might Also Like
- Sage Green Boho Crochet Backpack Free Pattern
- Blush Pink Shell Stitch Halter Dress Free Crochet Pattern
- Blush Pink Tiered Baby Dress Free Crochet Pattern
- Pastel Daisy Crochet Hoodie Free Crochet Pattern