
This is your sign to dive into that rainbow stash you have been building. You know the one. Those bright skeins you bought because they made you happy, but you have been waiting for the perfect project. This baby romper is that project.
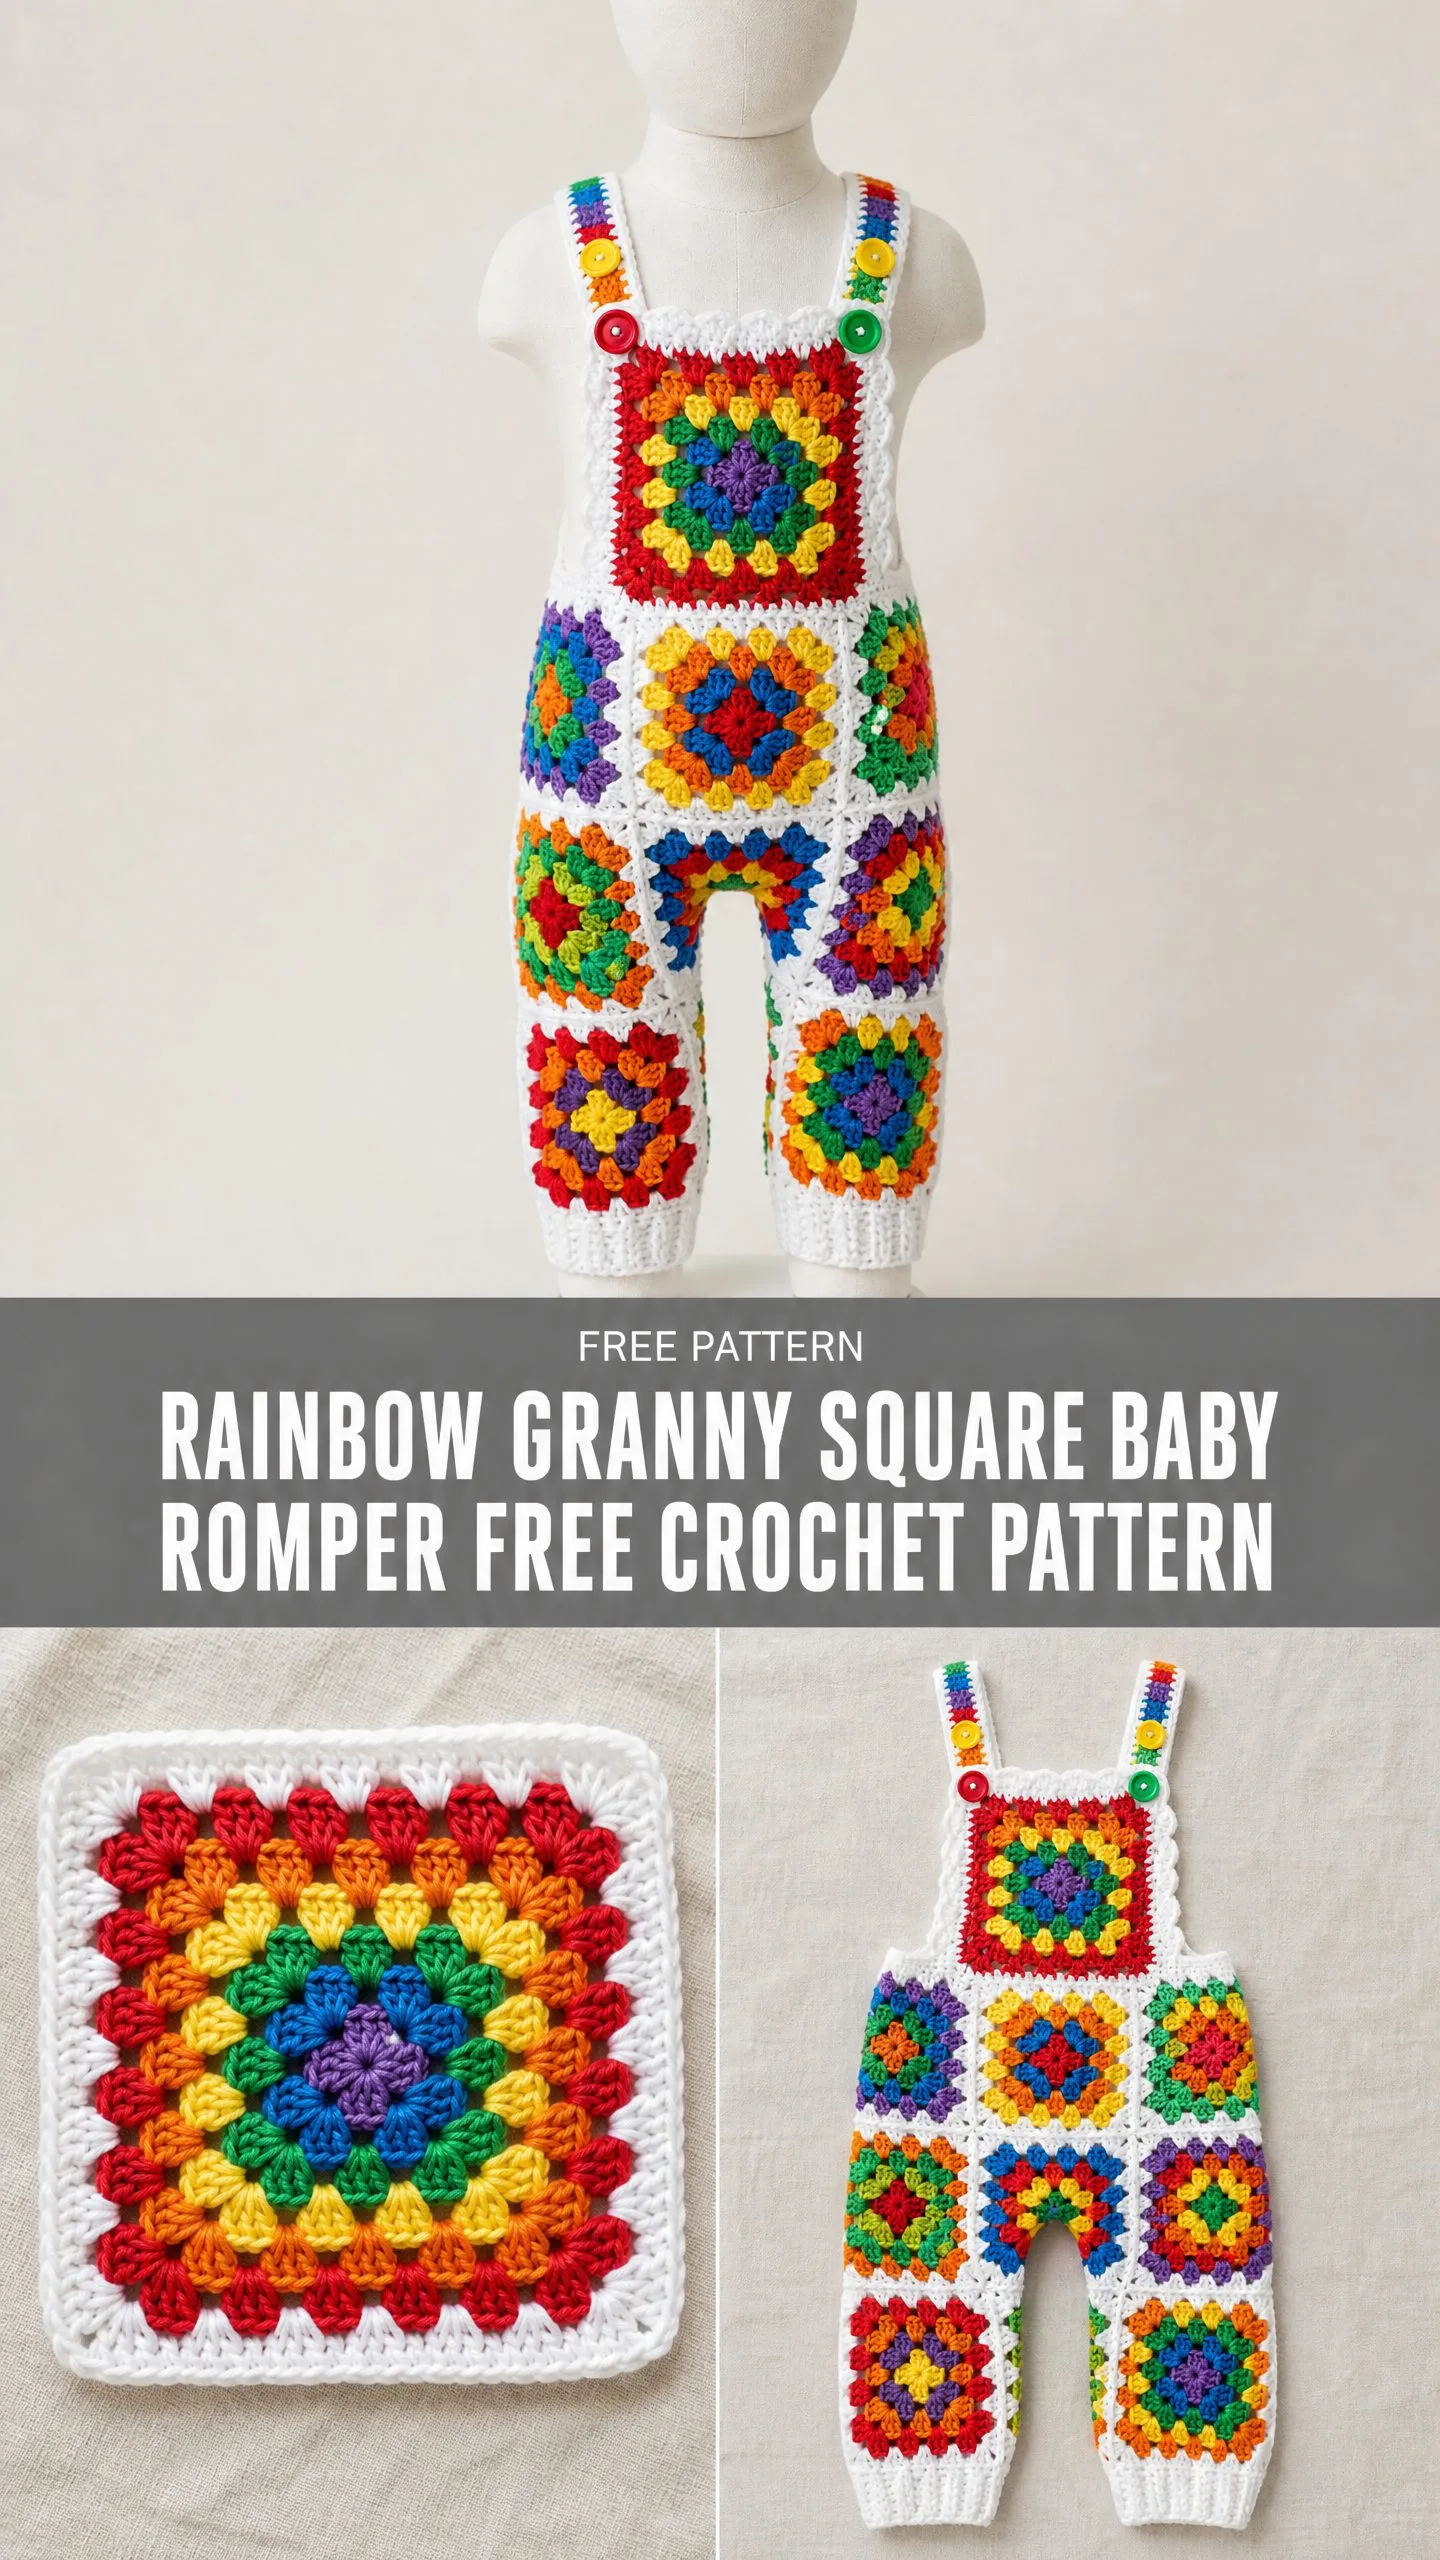
The construction is surprisingly straightforward once you understand the flow. You make 14 classic granny squares, join them into panels, and assemble everything into the cutest little overalls you have ever seen. Each square uses the same four-round pattern, so once you nail the first one, you are golden.
I will be honest about the skill level here. This pattern is intermediate, not because any single technique is difficult, but because you are managing multiple pieces and keeping track of assembly order. If you have made granny squares before and feel comfortable seaming, you can absolutely do this. The reward is a one-of-a-kind handmade romper that looks far more complicated than it actually is.
Why This Pattern Works So Well
The genius of this design is its modular construction. Every single piece starts the same way. You make a granny square. That is it. The magic happens in how those squares come together to form a wearable garment.
The white border on every square creates visual unity while letting all your rainbow colors pop. Red, orange, yellow, green, blue, purple. They all get their moment to shine without the finished piece looking chaotic.
Sizing flexibility is built right in. The pattern is written for 6 to 12 months, but you can easily go smaller by switching to DK weight yarn or larger by adding a fifth round to each square. The math is simple because everything scales with your square size.
Materials You Will Need
Yarn: Worsted weight (CYCA 4), 100% acrylic or cotton-acrylic blend
| Color | Name | Approximate Yardage |
|---|---|---|
| A | White (main background) | 200 yards / 183 m |
| B | Red | 60 yards / 55 m |
| C | Orange | 40 yards / 37 m |
| D | Yellow | 60 yards / 55 m |
| E | Green | 60 yards / 55 m |
| F | Blue | 60 yards / 55 m |
| G | Purple | 40 yards / 37 m |
Total yarn needed: approximately 520 yards / 476 m
Hook: US Size J / 6.0 mm
Notions: Yarn needle, scissors, 4 large buttons (approximately 1 inch / 25 mm diameter) in assorted bright colors, stitch markers, rust-proof pins for blocking
Yarn Recommendations
Lion Brand Pound of Love works beautifully here. It is 100% premium acrylic, machine washable, and comes in all the colors you need. The stitch definition is excellent for granny squares.
Paintbox Yarns Simply DK held double gives a slightly softer hand if that matters to you. The color range is extensive with gorgeous saturated solids.
Paintbox Yarns Cotton DK held double is great for warm weather or babies with sensitive skin. Just know that cotton has less stretch than acrylic, so check your gauge carefully. You might need to go up half a hook size.
Avoid heavily textured or variegated yarns for the colored rounds. The granny square design relies on each color reading as a distinct solid ring.
Gauge
One completed 4-round granny square measures 4.5 in x 4.5 in / 11.5 cm x 11.5 cm blocked.
This gauge is critical. The entire garment is sized by the dimensions of your squares. Make one full square through Round 4, block it gently, and measure. If your square is larger than 4.5 inches, try a smaller hook. If it is smaller, try a larger hook.
Finished Measurements
Size: 6 to 12 months
Abbreviations and Stitch Definitions
ch = chain: Yarn over, pull through loop on hook
sl st = slip stitch: Insert hook, yarn over, pull through stitch and loop on hook in one motion
sc = single crochet: Insert hook, yarn over, pull up loop, yarn over, pull through both loops
dc = double crochet: Yarn over, insert hook, yarn over, pull up loop, yarn over, pull through 2 loops, yarn over, pull through remaining 2 loops
sk = skip: Pass over the indicated stitch without working into it
sp = space: The gap created by chain stitches
ch-sp = chain space: The space under a chain or chains from the previous row
RS = right side: The side of the fabric that faces outward when worn
WS = wrong side: The side of the fabric that faces inward when worn
BLO = back loop only: Work into only the back loop of the stitch, leaving the front loop unworked
Special Techniques
Granny Cluster
This is the building block of every square. Yarn over, insert hook into the indicated chain space, yarn over and pull up a loop, yarn over and draw through 2 loops. Repeat this two more times in the same space. You now have 4 loops on your hook. Yarn over and draw through all 4 loops. That creates one 3-dc cluster.
Every time this pattern mentions a "cluster," it means this 3-dc cluster.
Join-As-You-Go (JAYG) Seam
When joining squares on the final round, replace the chain space with a slip stitch into the corresponding chain space of the adjacent square. Instead of making a ch-2 corner or ch-1 side space independently, you slip stitch into the matching spot on the neighboring square, then continue working your current square.
Slip Stitch Seam
Hold two squares with right sides facing. Insert your hook through both layers in the outermost loops, yarn over, and draw through both layers and the loop on your hook. Continue across. This creates a nearly invisible seam on the right side.
BLO Ribbing
Work single crochet into the back loop only of every stitch. This creates a stretchy, ridged fabric that works perfectly for leg cuffs.
Granny Square Pattern (Make 14 Total)
Each square uses the same construction. The colors change based on the placement chart below, but Round 4 is always white for every square.
Foundation: Using your Round 1 color, make a magic ring. (Or ch 4, sl st to first ch to form ring.)
Round 1: Ch 3 (counts as first dc throughout), work 2 dc into ring, ch 2, [3 dc into ring, ch 2] 3 times, sl st to top of beginning ch-3 to join. Fasten off. (4 clusters, 4 ch-2 corner spaces)
Round 2: Join Round 2 color with sl st into any ch-2 corner sp. Ch 3, work 2 dc into same sp, ch 2, 3 dc into same sp (first corner made), ch 1, [3 dc into next ch-2 corner sp, ch 2, 3 dc into same sp, ch 1] 3 times, sl st to top of beginning ch-3 to join. Fasten off. (8 clusters, 4 ch-2 corner spaces, 4 ch-1 side spaces)
Round 3: Join Round 3 color with sl st into any ch-2 corner sp. Ch 3, work 2 dc into same sp, ch 2, 3 dc into same sp (first corner made), ch 1, 3 dc into next ch-1 side sp, ch 1, [3 dc into next ch-2 corner sp, ch 2, 3 dc into same sp, ch 1, 3 dc into next ch-1 side sp, ch 1] 3 times, sl st to top of beginning ch-3 to join. Fasten off. (12 clusters, 4 ch-2 corner spaces, 8 ch-1 side spaces)
Round 4: Join Color A (white) with sl st into any ch-2 corner sp. Ch 3, work 2 dc into same sp, ch 2, 3 dc into same sp (first corner made), ch 1, [3 dc into next ch-1 side sp, ch 1] twice, [3 dc into next ch-2 corner sp, ch 2, 3 dc into same sp, ch 1, (3 dc into next ch-1 side sp, ch 1) twice] 3 times, sl st to top of beginning ch-3 to join. Fasten off. (16 clusters, 4 ch-2 corner spaces, 12 ch-1 side spaces)
Weave in all ends. Block to 4.5 in x 4.5 in / 11.5 cm x 11.5 cm.
Color Placement Chart
Here is which colors go in each round for all 14 squares. Remember, Round 4 is always white.
| Square ID | Location | Round 1 | Round 2 | Round 3 |
|---|---|---|---|---|
| BIB-F | Front bib | Purple | Blue | Red |
| BIB-B | Back bib | Blue | Green | Red |
| FB1 | Front body top-left | Blue | Yellow | Green |
| FB2 | Front body top-right | Red | Orange | Yellow |
| FB3 | Front body bottom-left | Yellow | Red | Purple |
| FB4 | Front body bottom-right | Green | Blue | Orange |
| BB1 | Back body top-left | Orange | Red | Green |
| BB2 | Back body top-right | Purple | Yellow | Blue |
| BB3 | Back body bottom-left | Red | Green | Yellow |
| BB4 | Back body bottom-right | Yellow | Purple | Red |
| FL1-left | Front left lower leg | Blue | Orange | Red |
| FL1-right | Front right lower leg | Red | Yellow | Green |
| BL1-left | Back left lower leg | Purple | Red | Orange |
| BL1-right | Back right lower leg | Green | Blue | Yellow |
The only rule is that no two adjacent squares should share the same color in Round 3. Feel free to swap colors creatively as long as you maintain that contrast.
Assembly Instructions
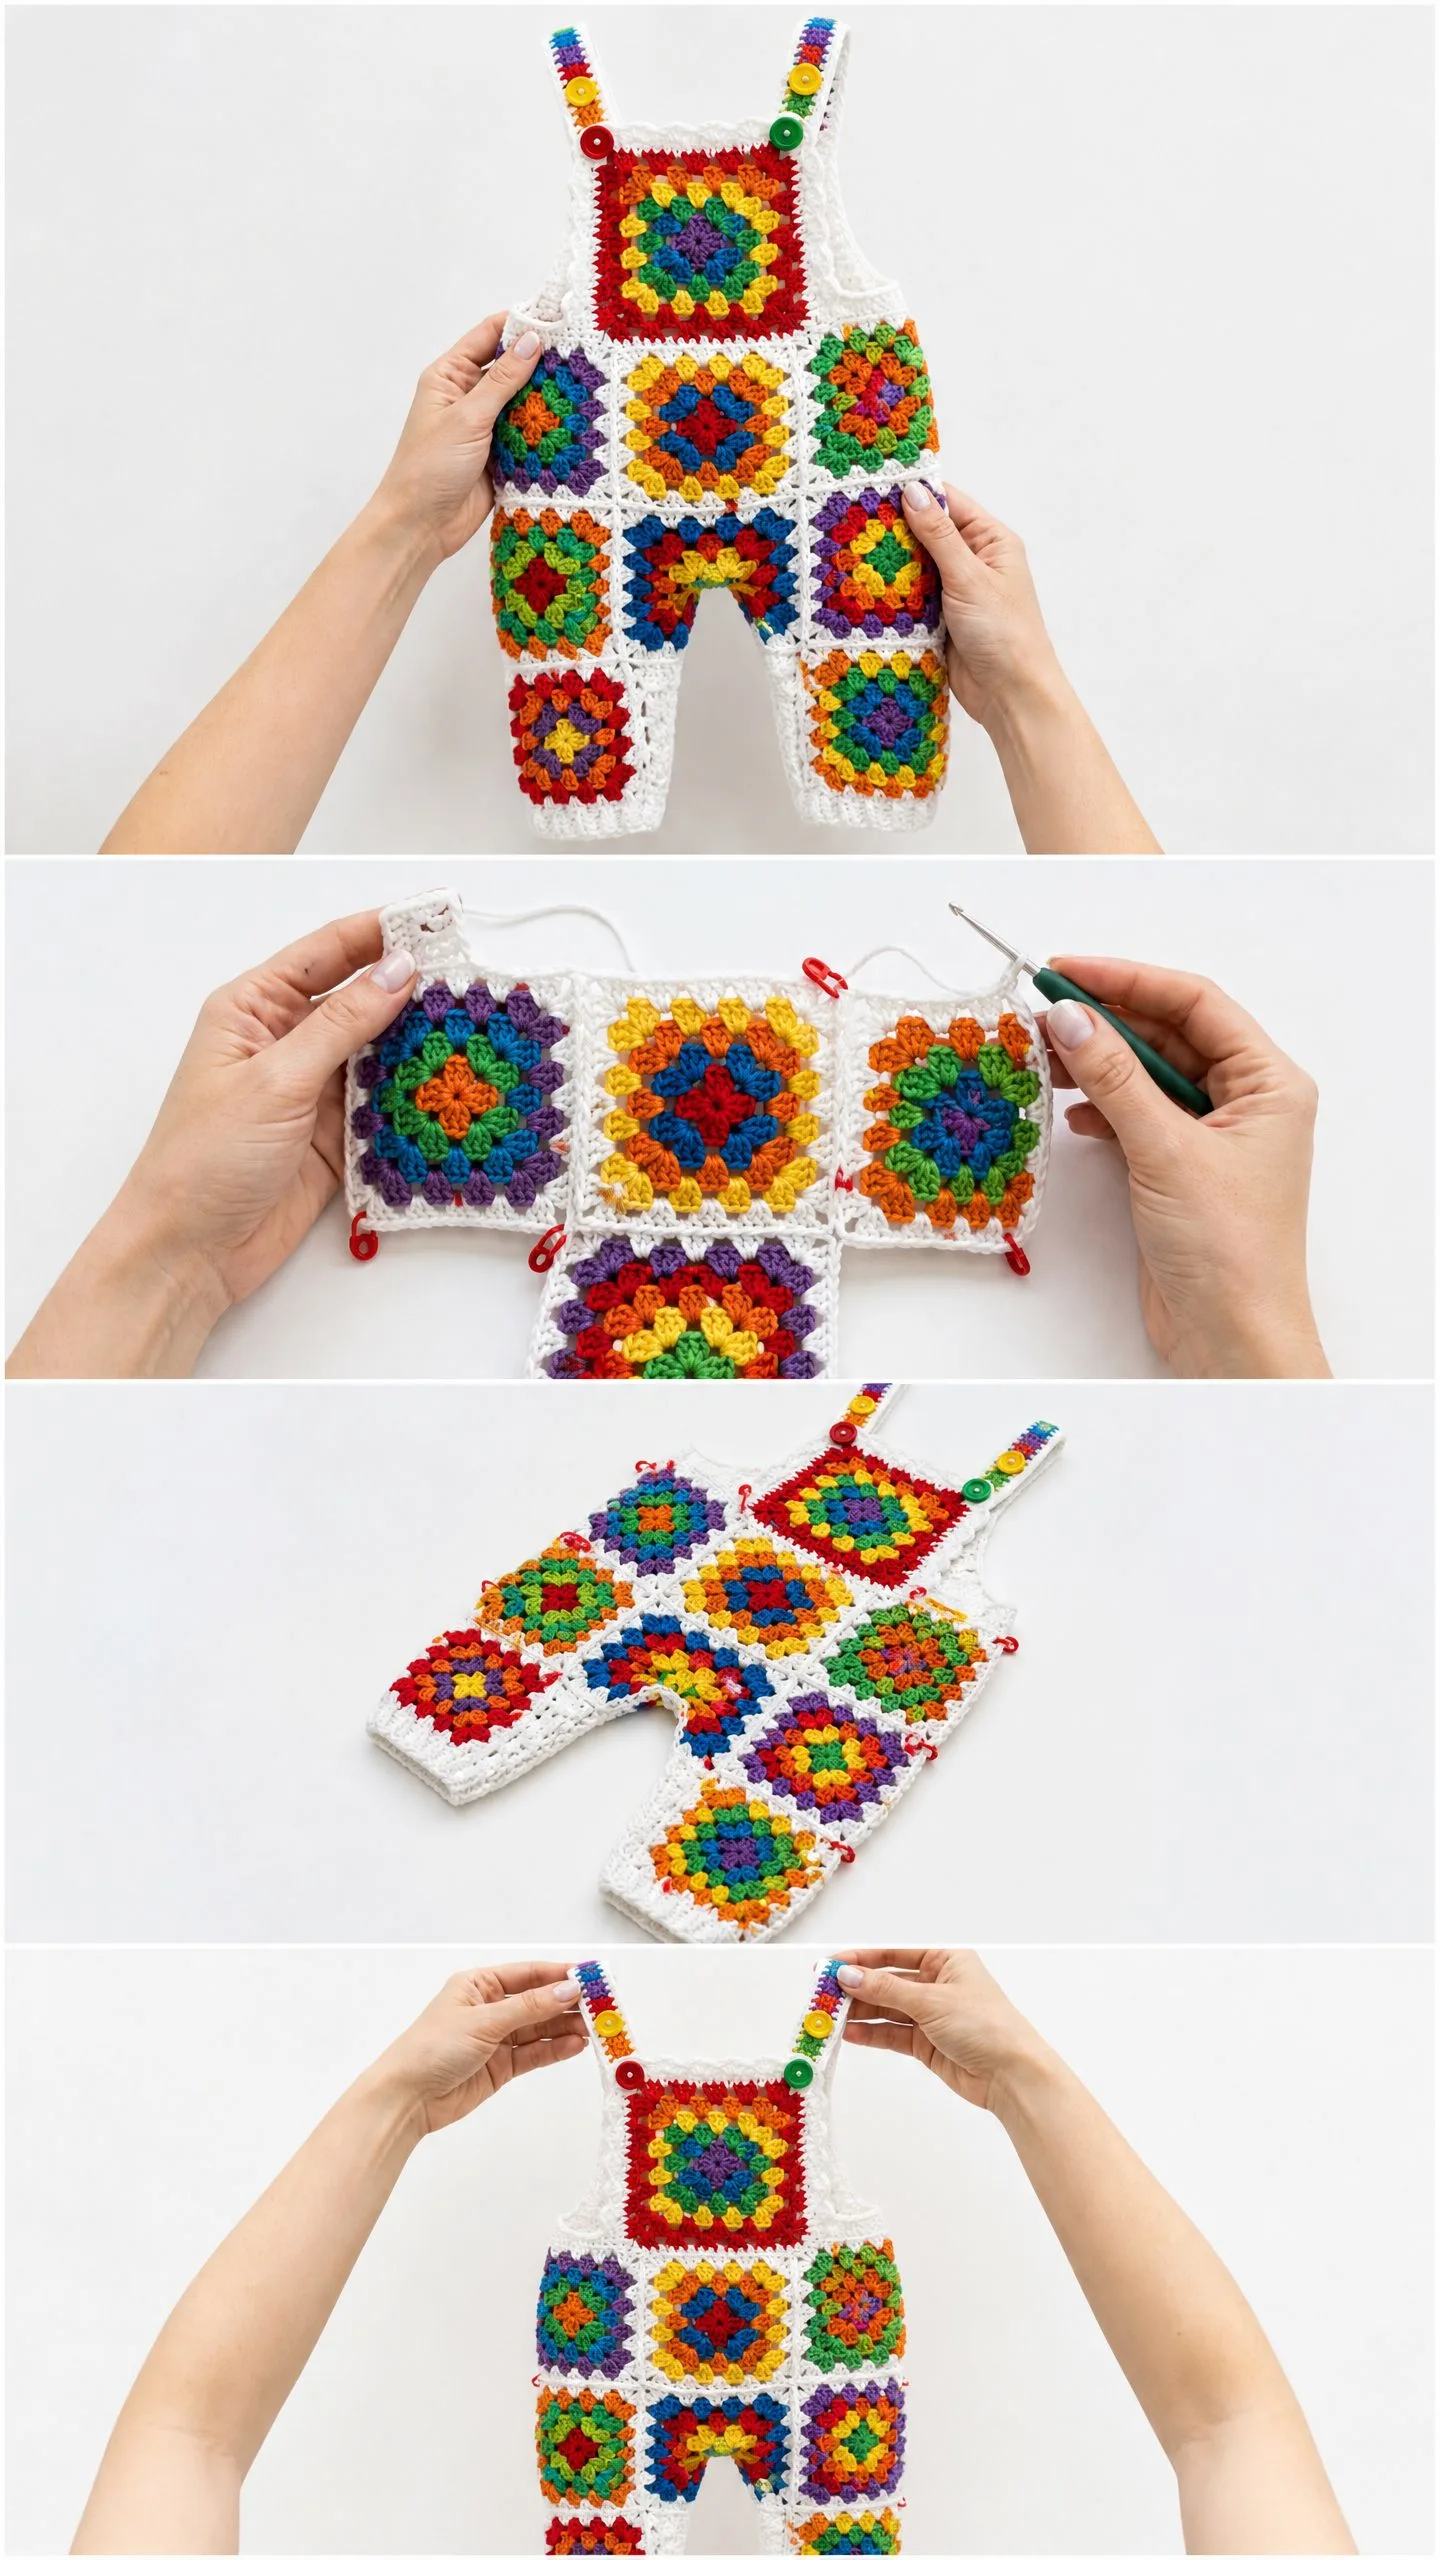
Step 1: Front Body Panel
Arrange FB1 (top-left), FB2 (top-right), FB3 (bottom-left), and FB4 (bottom-right) in a 2×2 grid with right sides facing up.
Using Color A and the slip stitch seam method, join FB1 to FB2 along their shared vertical edge. Then join FB3 to FB4 along their shared vertical edge. Finally, join the FB1-FB2 row to the FB3-FB4 row along their shared horizontal edge.
You now have one rectangular panel measuring 9 in wide x 9 in tall / 23 cm x 23 cm.
Step 2: Back Body Panel
Repeat Step 1 with BB1, BB2, BB3, and BB4 in the same arrangement. You will have another panel measuring 9 in wide x 9 in tall / 23 cm x 23 cm.
Step 3: Side Seams
Hold front and back body panels with right sides together. Using Color A, slip stitch seam both side edges (left and right). Each side seam runs the full 9 in height.
After seaming both sides, you have a tube measuring 18 in circumference x 9 in tall. The top is open for the bib and straps. The bottom is open for the legs.
Turn right side out.
Step 4: Leg Squares and Tubes
The bottom edge of your body tube has four squares: FB3 and FB4 across the front, BB3 and BB4 across the back.
Create the crotch seam: With right sides facing, bring FB3 and BB3 together. Slip stitch seam along the bottom 4.5 in edge. This closes the inner edge of the left leg opening. Repeat with FB4 and BB4 for the right leg.
Attach lower leg squares: With right side facing, slip stitch seam FL1-left to the bottom edge of the FB3+BB3 leg tube. Then seam BL1-left to the back of this same opening. Slip stitch the side seams of FL1-left and BL1-left together on both sides to close the lower leg into a tube.
Repeat with FL1-right and BL1-right for the right leg.
Each leg tube should now measure 9 in in circumference and 4.5 in tall.
Step 5: Bib Squares
Front bib: The front top edge is 9 in wide. Center BIB-F over the vertical seam between FB1 and FB2. With right side facing, slip stitch seam the bottom edge of BIB-F to the top center of the front body panel.
Back bib: Repeat for the back, centering BIB-B over the seam between BB1 and BB2.
Armhole edging: The portions of the front and back top edges not covered by the bib become armhole openings. Join Color A and work 1 round of sc evenly around each armhole opening. Slip stitch to join and fasten off.
Step 6: Straps
Using Color A, ch 7.
Row 1: Sc in 2nd ch from hook and in each ch across. (6 sc)
Row 2 and all following rows: Ch 1, turn, sc in BLO of each sc across. (6 sc)
Repeat Row 2 until strap measures 10 in / 25 cm from beginning. Fasten off, leaving a long tail for seaming.
Make 2 straps total.
Attach straps: Sew the back of each strap securely to the top corners of BIB-B using the long tail and a yarn needle.
Button loops: At the front end of each strap, join Color A, ch 5, and sl st to the same point to form a loop. Fasten off.
Rainbow accent (optional): Use a yarn needle to work a row of surface slip stitch down the center of each strap in this color sequence: Red, Orange, Yellow, Green, Blue, Purple. Change colors every 1.5 inches. This creates the rainbow stripe visible in the finished garment.
Step 7: Leg Cuffs
Join Color A to any stitch at the bottom edge of a leg tube opening.
Round 1 (foundation): Work 1 sc into each dc and 1 sc into each ch-sp around the bottom edge of the leg. Sl st to first sc to join. (28 sc)
Round 2: Ch 1, sc in BLO of each sc around, sl st to join. (28 sc)
Rounds 3 through 5: Repeat Round 2. (28 sc each round)
Fasten off and weave in ends. Repeat for the second leg.
Step 8: Final Bib Edging
Work 1 round of sc evenly around the entire outer perimeter of BIB-F, including the two side edges and top edge. Join Color A to a corner, work 3 sc into each ch-2 corner sp, 1 sc into each ch-1 sp, and 1 sc into each dc post. Fasten off.
Repeat for BIB-B.
Button placement: Sew 2 buttons to the front face of BIB-F, one near each top corner, positioned to align with the strap button loops. Sew 2 additional buttons to the top corners of BIB-B on the outside for decoration.
Finishing Your Rainbow Romper
Weave in all remaining ends using a yarn needle. Work each tail through multiple stitches in different directions so nothing can pull out.
Blocking: Soak the completed garment in cool water for 10 minutes. Gently press out excess water in a towel without wringing. Pin flat to finished measurements and allow to dry completely, about 12 to 24 hours.
Attach buttons firmly using a double strand of thread or yarn in a matching color.
Size Customization
For 3 to 6 months: Use DK weight yarn (CYCA 3) with a US size G / 4.0 mm hook. Your 4-round square will measure approximately 3.5 in / 9 cm. Chest circumference becomes 14 in / 36 cm. Reduce strap length accordingly.
For 12 to 18 months: Add a 5th round to each square using the same pattern progression. Each 5-round square will measure approximately 5.5 in / 14 cm. Total chest circumference becomes 22 in / 56 cm. Increase strap length to approximately 12 in / 30 cm.
For 18 to 24 months: Use the 5-round square and replace each single-square bib with a joined 1×2 bib panel (2 squares stacked vertically) for more coverage.
Care Instructions
Machine wash on a gentle cycle in cool water. Lay flat to dry. Do not tumble dry or hang, as hanging can stretch the joined squares out of shape. Store folded, not hung.
Final Checkpoint
Your assembled romper should measure approximately 18 in / 46 cm in chest circumference. The center front from underarm to bottom of bib should be approximately 5 in / 13 cm. The torso from the bottom of the bib to the crotch should be approximately 9 in / 23 cm. Each leg should hang approximately 5.25 in / 13 cm from crotch to bottom of cuff.
If any measurement is significantly off, check whether your squares were blocked to exactly 4.5 in x 4.5 in.
Thank you so much for choosing this pattern. I genuinely hope you love making this little romper as much as I loved designing it. There is something incredibly satisfying about watching those colorful squares come together into an actual garment.
If you make this rainbow granny square baby romper, please save this pattern to your Pinterest boards so you can find it again later. And I would absolutely love to see your finished projects, so drop a comment below or tag me on Instagram. Seeing your color combinations always makes my day!
You Might Also Like
- Ocean Wave Candy Bolster Pillow Free Crochet Pattern
- Lavender Daisy Granny Square Backpack Free Crochet Pattern
- Ocean Wave Sunburst Hobo Bag Free Crochet Pattern
- Blush Pink Crochet Mini Backpack Free Pattern