
I don’t know about you, but I am completely smitten with baby clothes that feel like tiny works of art. The kind you almost don’t want to put on an actual wiggly baby because they’re just too pretty. This romper is exactly that.

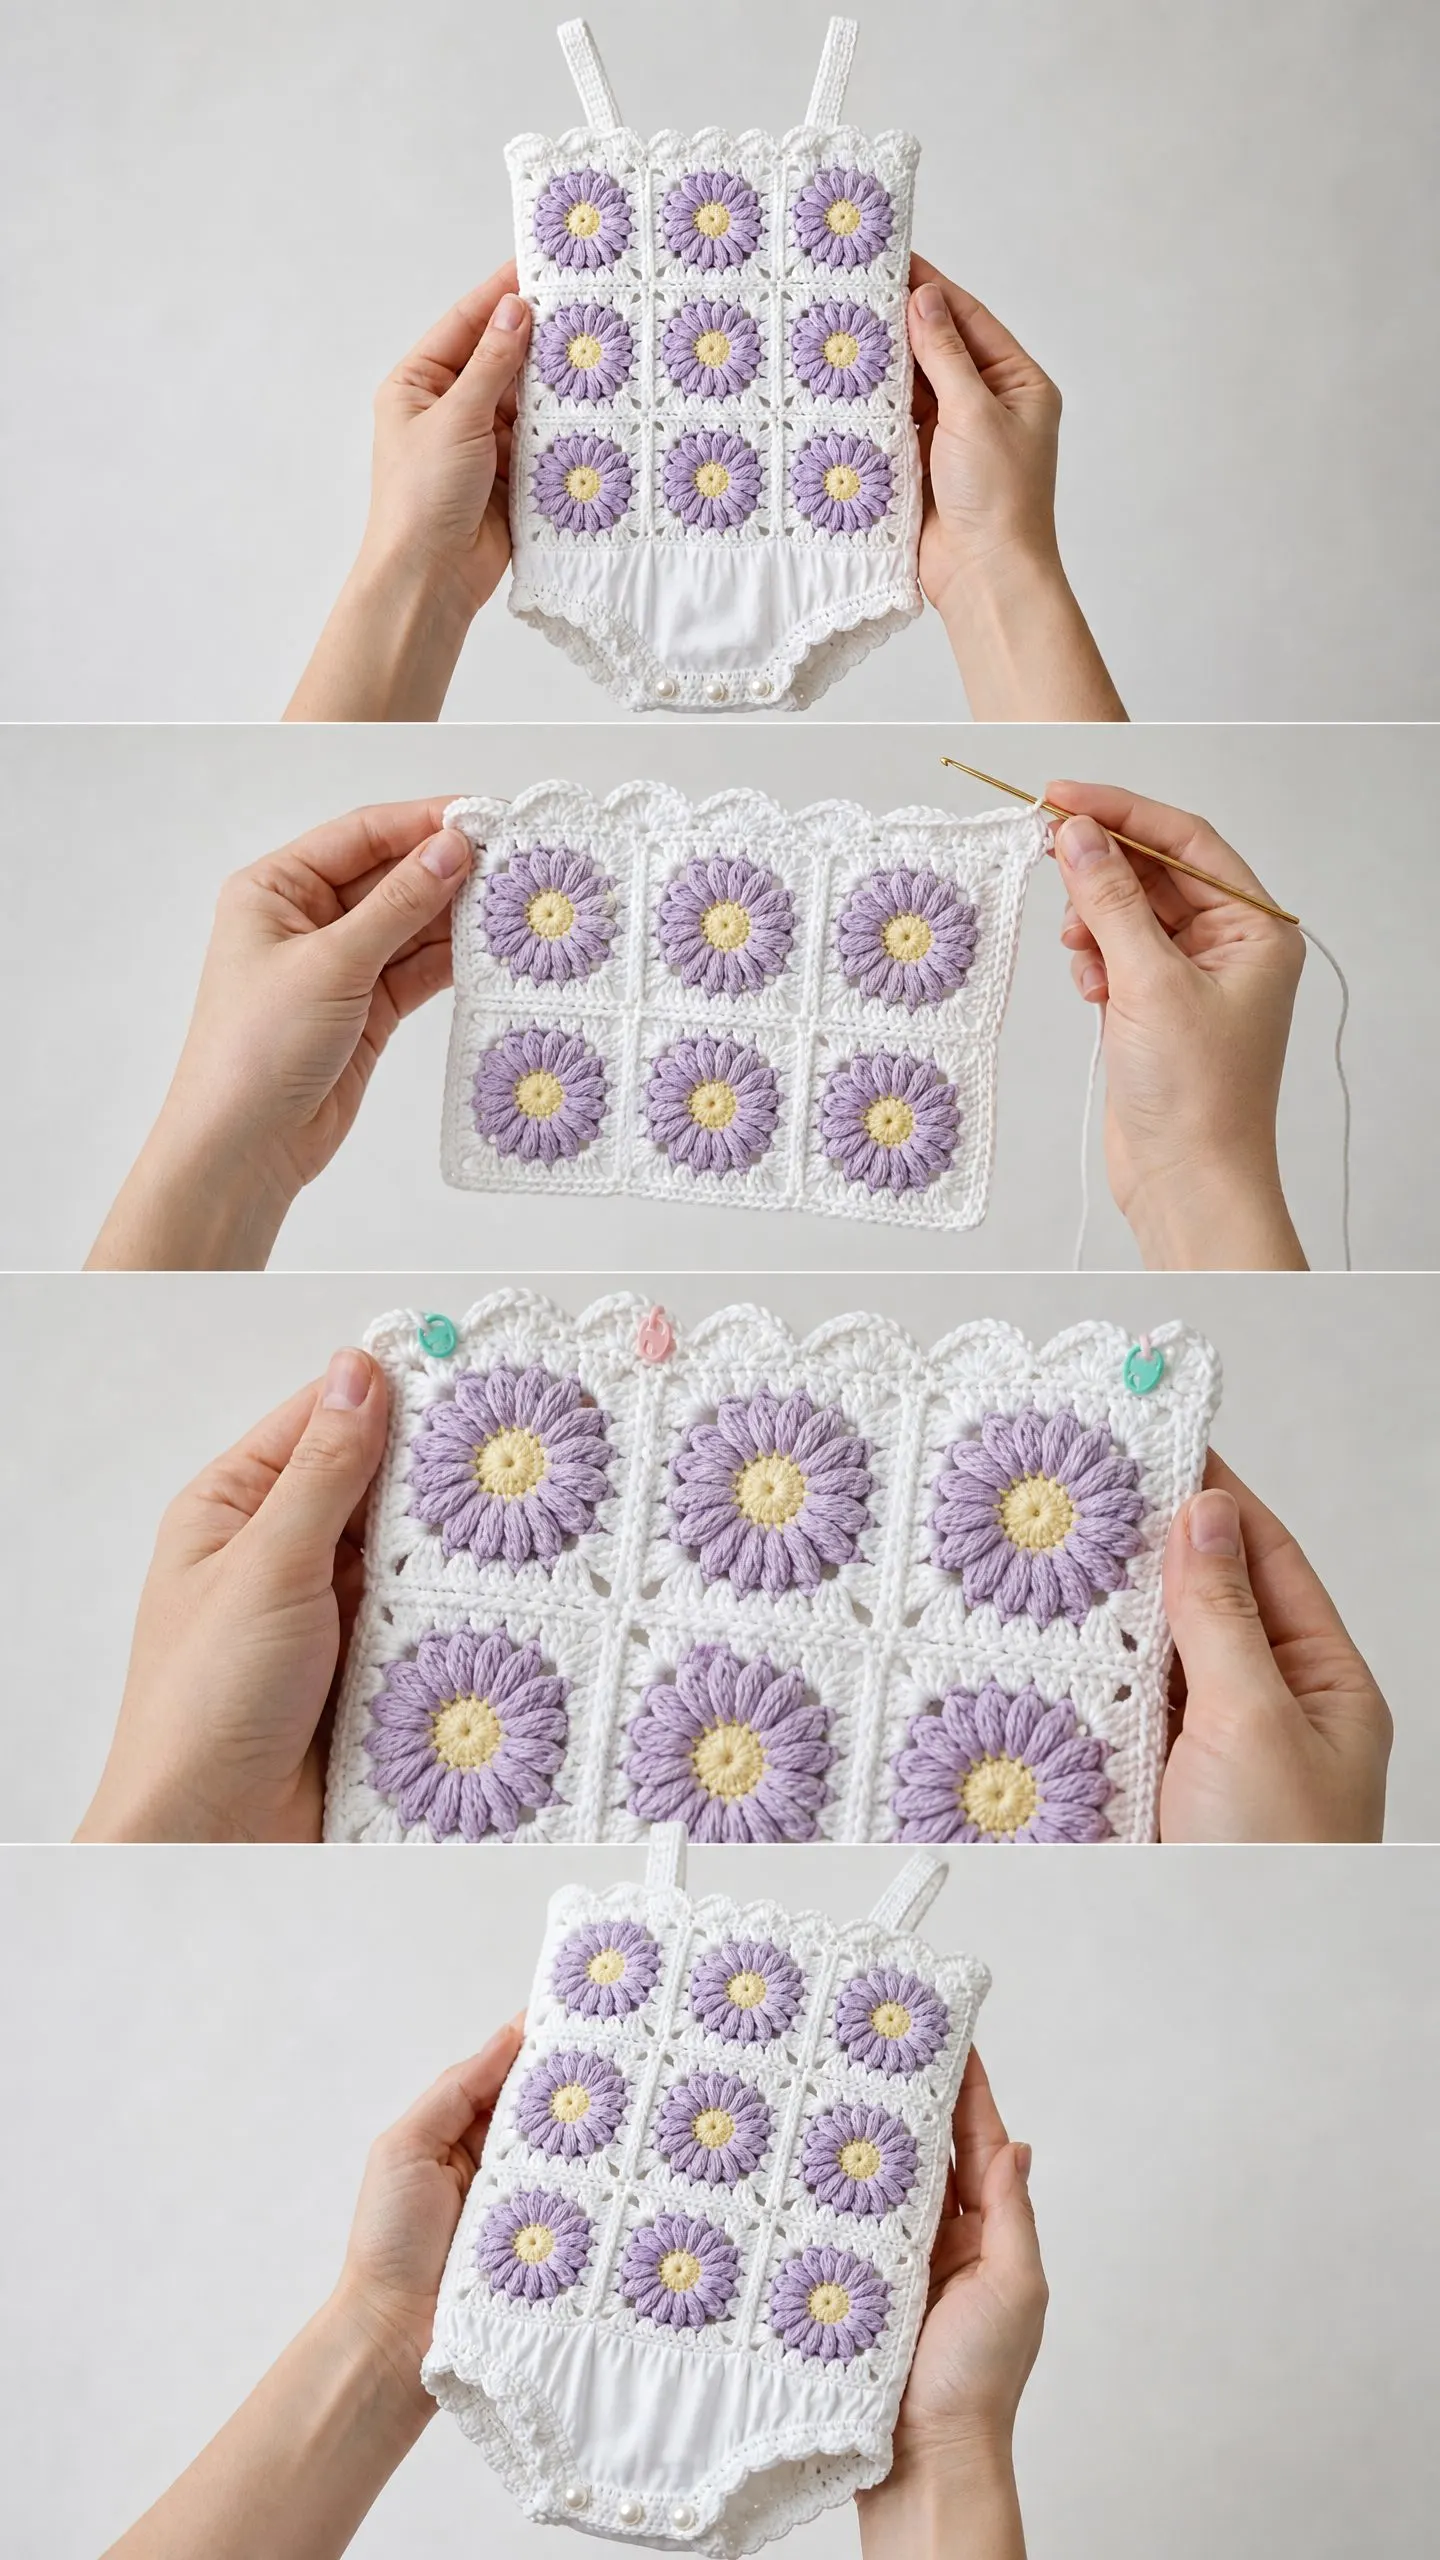
The Lavender Daisy Baby Romper combines everything I love about heirloom-quality crochet with practical, wearable design. Those dimensional daisy granny squares create a stunning bodice that looks far more complicated than it actually is. And the pearl snap closures at the crotch? Pure genius for diaper changes.
If you’ve been wanting to try your hand at motif-based garment construction, this crochet pattern is a beautiful place to start. You’ll work nine individual squares, join them into a grid, and build the bloomer section downward. It’s methodical, satisfying, and the finished piece is absolutely show-stopping.
About This Pattern
This baby romper features a 3×3 grid of crocheted daisy granny squares that form a structured bodice. Each square showcases a dimensional daisy motif worked in lavender with a soft yellow center, all set against a crisp white background.
The bodice connects to a crocheted diaper cover section that you work in joined rows from the waistband down. The entire piece is finished with delicate scallop edging along the neckline and leg openings. Adjustable spaghetti-style crochet straps attach at the front and can cross or tie at the back.
Pearl snap closures at the crotch make diaper changes easy, which any parent will tell you is absolutely essential.
Skill Level
This pattern is rated intermediate. You should be comfortable working in the round, joining granny squares, creating dimensional petal stitches, and reading multi-round motif instructions. Basic garment assembly skills are also needed.
Don’t let that intimidate you though. If you’ve made granny squares before and feel confident following detailed instructions, you can absolutely do this. I’ll walk you through every step.
Time Estimate
Plan for 8 to 14 hours depending on your experience with motif construction and finishing work. The squares themselves work up fairly quickly once you get into a rhythm. The assembly and finishing details take the most time.
Finished Measurements
This pattern includes three size ranges. All sizes use the same square count (3 squares wide by 3 squares tall). You adjust the sizing through your yarn weight and hook size choices.
Size 3 to 6 months: Bodice width approximately 8 inches (20 cm). Bodice height approximately 5.5 inches (14 cm). Diaper cover rise approximately 5 inches (13 cm).
Size 6 to 12 months: Bodice width approximately 9 inches (23 cm). Bodice height approximately 6 inches (15 cm). Diaper cover rise approximately 5.5 inches (14 cm).
Size 12 to 18 months: Bodice width approximately 10 inches (25.5 cm). Bodice height approximately 6.5 inches (16.5 cm). Diaper cover rise approximately 6 inches (15 cm).
Materials Needed
Yarn
Color A (White): Approximately 200 to 280 yards (183 to 256 m) of DK weight or light worsted cotton or cotton-blend yarn
Color B (Lavender): Approximately 80 to 120 yards (73 to 110 m) of the same weight yarn
Color C (Pale Yellow): Approximately 20 to 30 yards (18 to 27 m) of the same weight yarn
Hook
US size E-4 / 3.5 mm for DK weight yarn (sizes 3 to 6 months and 6 to 12 months)
US size F-5 / 3.75 mm for light worsted yarn (size 12 to 18 months)
Notions
Yarn Suggestions
I recommend choosing a smooth, non-fuzzy yarn with excellent stitch definition. Fuzzy or loosely-plied yarns will obscure your beautiful dimensional petals.
Lion Brand 24/7 Cotton in White, Lavender, and Lemon works beautifully. It’s mercerized 100 percent cotton, machine washable, and comes in exactly the colors pictured.
Paintbox Yarns Simply DK in Paper White, Misty Lavender, and Buttercup Yellow is an affordable cotton-acrylic blend with great stitch definition.
Drops Safran in off white, light purple, and light yellow is 100 percent Egyptian cotton with a slight sheen that gives the petals a lovely polished look.
Gauge
For DK weight with E-4 / 3.5 mm hook (sizes 3 to 6 months and 6 to 12 months):
1 completed daisy granny square = 2.75 inches (7 cm) square
For light worsted with F-5 / 3.75 mm hook (size 12 to 18 months):
1 completed daisy granny square = 3.25 inches (8.25 cm) square
Complete one full daisy granny square as your gauge swatch before beginning. Adjust your hook size up or down to achieve the target square size for your desired finished measurements.
Abbreviations (US Terms)
Let me walk you through all the abbreviations you’ll encounter in this crochet tutorial.
ch: chain, the foundation stitch created by pulling yarn through a loop
sl st: slip stitch, a flat joining stitch with no height
sc: single crochet, the shortest standard stitch
hdc: half double crochet, slightly taller than single crochet
dc: double crochet, a medium-height stitch with one yarn over
tr: treble crochet, a tall stitch with two yarn overs
sp: space
ch-sp: chain space, the gap created by chain stitches
sk: skip
st(s): stitch(es)
rep: repeat
pm: place marker
rm: remove marker
RS: right side
WS: wrong side
yo: yarn over
beg: beginning
cont: continue
rem: remaining
tog: together
sc2tog: single crochet 2 together, a decrease that combines two stitches into one
dc2tog: double crochet 2 together, a decrease stitch
MR: magic ring, an adjustable starting loop
rnd: round
prev: previous
Special Stitches
Daisy Petal Stitch
This creates the dimensional petals that make this pattern so special. You’ll work this into each chain-4 loop.
Step 1: Yarn over, insert hook into the ch-4 space.
Step 2: Yarn over, pull up a loop. You now have 3 loops on your hook.
Step 3: Yarn over, pull through 2 loops. You now have 2 loops on your hook. This creates one unfinished double crochet.
Step 4: Repeat steps 1 through 3 four more times in the same ch-4 space, leaving each unfinished dc on the hook. After 5 repetitions, you’ll have 6 loops on your hook total.
Step 5: Yarn over, pull through all 6 loops on hook. Chain 1 to close and form the petal tip.
This creates one raised, puffy petal. The pattern calls this simply "petal."
Scallop Edging
This creates the pretty shell border along the edges.
Step 1: Slip stitch into the first single crochet of the foundation edge.
Step 2: Skip 1 stitch, work 5 double crochet into the next stitch.
Step 3: Skip 1 stitch, slip stitch into the next stitch.
Step 4: Repeat steps 2 and 3 across.
Pattern Notes Before You Begin
Read through these notes carefully. They’ll save you confusion later.
1. The romper bodice is made from 9 individual daisy granny squares joined in a 3 wide by 3 tall configuration.
2. The color sequence for each square is: Round 1 in Color C (yellow center), Round 2 in Color B (lavender petals), Rounds 3 and 4 in Color A (white background).
3. Always join rounds with a slip stitch to the first stitch unless otherwise stated.
4. Chain 2 at the beginning of a double crochet round counts as the first double crochet.
5. Chain 1 at the beginning of a single crochet round does NOT count as a stitch.
6. Fasten off and weave in ends after each color change within the squares before proceeding.
7. Block each square individually before joining for the best results.
Step by Step Instructions
Daisy Granny Square (Make 9)
Use Color C (Pale Yellow). Begin with a magic ring.
Round 1: Ch 4 (counts as first dc plus ch 1), (dc into MR, ch 1) 7 times, sl st to 3rd ch of beg ch-4 to join. Pull MR tight. (8 dc, 8 ch-1 sps)
Fasten off Color C. Join Color B (Lavender) to any ch-1 sp with a sl st.
Round 2 (Petal Round): Working into each ch-1 sp around, work 1 petal in each ch-1 sp, ch 1 after each petal to close. Sl st to first petal to join. (8 petals, 8 ch-1 closing sps)
Each petal is worked by placing 5 unfinished dc into the same ch-1 sp, then completing all together. The ch 1 closing each petal sits between petals.
Fasten off Color B. Join Color A (White) to the ch-1 sp between any two petals.
Round 3: Between each pair of adjacent petals there is a ch-1 sp. Four of these 8 spaces will become corners. The alternating four spaces will become side clusters.
Sl st to join Color A in any ch-1 between-petal sp designated as a corner sp.
Ch 3 (counts as first dc), 2 dc in same corner sp, ch 2, 3 dc in same corner sp (corner 1 made).
3 dc in next ch-1 sp (side cluster).
(3 dc, ch 2, 3 dc) in next ch-1 sp (corner 2).
3 dc in next ch-1 sp (side cluster).
(3 dc, ch 2, 3 dc) in next ch-1 sp (corner 3).
3 dc in next ch-1 sp (side cluster).
(3 dc, ch 2, 3 dc) in next ch-1 sp (corner 4).
3 dc in next ch-1 sp (side cluster).
Sl st to top of beg ch-3 to join. (36 dc total, 4 ch-2 corner sps)
Round 4: Sl st into each of the next 2 dc and into the corner ch-2 sp. Ch 3 (counts as dc), (2 dc, ch 2, 3 dc) in same corner ch-2 sp (corner 1).
Ch 1, 3 dc in the sp between the next two 3-dc groups, ch 1.
(3 dc, ch 2, 3 dc) in next corner ch-2 sp (corner 2).
Ch 1, 3 dc in sp between groups, ch 1.
(3 dc, ch 2, 3 dc) in next corner ch-2 sp (corner 3).
Ch 1, 3 dc in sp between groups, ch 1.
(3 dc, ch 2, 3 dc) in next corner ch-2 sp (corner 4).
Ch 1, 3 dc in sp between groups, ch 1.
Sl st to top of beg ch-3 to join. (48 dc, 8 ch-1 sps, 4 ch-2 sps)
Fasten off and weave in all ends.
Your completed square should measure 2.75 inches (7 cm) for DK gauge or 3.25 inches (8.25 cm) for light worsted gauge.
Make all 9 squares total. Block before joining.
Joining the Squares
Arrange your squares in a 3 column by 3 row layout.
Top row: Square 1 (top left), Square 2 (top center), Square 3 (top right)
Middle row: Square 4 (mid left), Square 5 (mid center), Square 6 (mid right)
Bottom row: Square 7 (bottom left), Square 8 (bottom center), Square 9 (bottom right)
Use a flat whip stitch join on the wrong side with your tapestry needle and Color A.
Hold two squares with wrong sides together, aligning edges. Whip stitch through the back loops only of each corresponding stitch along the joining edge. Work from corner ch-2 sp to corner ch-2 sp.
Join in this sequence:
1. Join Square 1 to Square 2 along their shared vertical edge.
2. Join Square 2 to Square 3 (top row complete).
3. Join Square 4 to Square 5.
4. Join Square 5 to Square 6 (middle row complete).
5. Join Square 7 to Square 8.
6. Join Square 8 to Square 9 (bottom row complete).
7. Join top row to middle row along their shared horizontal edge.
8. Join middle row to bottom row along their shared horizontal edge.
At corner intersections where four squares meet, take one stitch through all four corner ch-2 sps to anchor the center point neatly.
After joining, your panel measures approximately 8.25 inches (21 cm) wide by 8.25 inches (21 cm) tall at DK gauge.
Bodice Top Border (Scallop Edging)
Join Color A to the top-left corner ch-2 sp of Square 1 with a sl st. Work along the top edge of the panel.
Setup Row: Ch 1, work sc evenly across the top edge, working 1 sc in each dc and 1 sc in each ch-1 sp. Work 2 sc in each corner ch-2 sp at the outer corners and 1 sc through joined sps where squares meet. Turn. (41 sc)
Scallop Row: Do not turn. RS facing. Sl st into the first sc, (sk 1 sc, 5 dc into next sc, sk 1 sc, sl st into next sc) across, ending with sl st into last sc. (10 scallop shells)
Fasten off and weave in ends.
Bodice Bottom Border and Waistband Transition
Join Color A to the bottom-left corner ch-2 sp of Square 7 with a sl st.
Foundation Row: Ch 1, work sc evenly across the bottom edge of the panel. (41 sc) Turn.
This row becomes Row 1 of the diaper cover section.
Diaper Cover Section
Work in Color A throughout.
Row 1 (WS): Ch 1, sc in each sc across. (41 sc) Turn.
Row 2 (RS): Ch 1, sc in each sc across. (41 sc) Turn.
Row 3 (WS): Ch 1, sc in each sc across. (41 sc) Turn.
Row 4 (RS): Ch 1, 2 sc in first sc, sc in each sc to last sc, 2 sc in last sc. (43 sc) Turn.
Row 5 (WS): Ch 1, sc in each sc across. (43 sc) Turn.
Row 6 (RS): Ch 1, 2 sc in first sc, sc in each sc to last sc, 2 sc in last sc. (45 sc) Turn.
Row 7 (WS): Ch 1, sc in each sc across. (45 sc) Turn.
Row 8 (RS): Ch 1, 2 sc in first sc, sc in each sc to last sc, 2 sc in last sc. (47 sc) Turn.
Row 9 (WS): Ch 1, sc in each sc across. (47 sc) Turn.
Row 10 (RS): Ch 1, 2 sc in first sc, sc in each sc to last sc, 2 sc in last sc. (49 sc) Turn.
Row 11 (WS): Ch 1, sc in each sc across. (49 sc) Turn.
After Row 11, the diaper cover section measures approximately 3 inches (7.5 cm) from the bottom of the joined panel.
Leg Opening Shaping
Right Side:
Row 12 (RS): Ch 1, sc in first 16 sc only. (16 sc) Turn. Leave remaining 33 sts unworked.
Row 13 (WS): Ch 1, sc2tog, sc in each sc to end. (15 sc) Turn.
Row 14 (RS): Ch 1, sc in each sc to last 2 sc, sc2tog. (14 sc) Turn.
Row 15 (WS): Ch 1, sc2tog, sc in each sc to end. (13 sc) Turn.
Row 16 (RS): Ch 1, sc in each sc to last 2 sc, sc2tog. (12 sc) Turn.
Row 17 (WS): Ch 1, sc in each sc across. (12 sc) Turn.
Fasten off.
Crotch Panel:
Rejoin Color A to stitch 17 of Row 11.
Row 12C (RS): Ch 1, sc in next 17 sc. (17 sc) Turn.
Row 13C (WS): Ch 1, sc in each sc across. (17 sc) Turn.
Row 14C (RS): Ch 1, sc in each sc across. (17 sc) Turn.
Row 15C (WS): Ch 1, sc in each sc across. (17 sc) Turn.
Row 16C (RS): Ch 1, sc in each sc across. (17 sc) Turn.
Fasten off.
Left Side:
Rejoin Color A to stitch 34 of Row 11.
Row 12L (RS): Ch 1, sc in next 16 sc. (16 sc) Turn.
Row 13L (WS): Ch 1, sc in each sc to last 2 sc, sc2tog. (15 sc) Turn.
Row 14L (RS): Ch 1, sc2tog, sc in each sc to end. (14 sc) Turn.
Row 15L (WS): Ch 1, sc in each sc to last 2 sc, sc2tog. (13 sc) Turn.
Row 16L (RS): Ch 1, sc2tog, sc in each sc to end. (12 sc) Turn.
Row 17L (WS): Ch 1, sc in each sc across. (12 sc) Turn.
Fasten off.
Joining the crotch: With wrong sides together, fold the diaper cover at the crotch. Use a tapestry needle and Color A to whip stitch the bottom edge of the crotch panel to the bottom edges of the right and left leg panels.
Leg Opening Edging (Scallop)
Work around each leg opening with Color A.
Setup Rnd: Join Color A to any point along one leg opening with a sl st. Ch 1, work sc evenly around the entire leg opening, picking up stitches along the shaped rows and through the crotch join edges. (33 sc per leg) Sl st to first sc to join.
Scallop Rnd: (Sk 1 sc, 5 dc in next sc, sk 1 sc, sl st in next sc) 8 times, sl st to beg sl st to join. (8 scallop shells)
Fasten off and weave in ends. Repeat for second leg opening.
Optional Ruffle Frill
For the gathered look between the bodice and diaper cover, you have two options.
Crochet ruffle: Join Color A to the foundation row at the base of the bodice panel. Ch 3 (counts as dc), 2 dc in same st, 3 dc in each sc across. (123 dc) This creates a ruffle by tripling the stitch count. Sl st to top of beg ch-3. Fasten off. Tack the bottom edge lightly to the diaper cover top edge.
Fabric frill: Cut a strip of soft white fabric 2 inches tall by 20 inches wide. Fold in half lengthwise, gather, and hand-sew to the waistband seam.
Straps (Make 2)
Work in Color A.
Foundation: Ch 5.
Row 1: Sc in 2nd ch from hook and in each ch across. (4 sc) Turn.
Row 2: Ch 1, sc in each sc across. (4 sc) Turn.
Repeat Row 2 until strap measures:
Fasten off, leaving a 12 inch (30.5 cm) tail for attaching.
Attachment: Sew each strap to the top back corners of the bodice panel, just inside the scallop border. Straps can cross at the back and tie in a bow, or attach straight to corresponding back corners.
Crotch Closures
Attach 3 pearl snaps evenly spaced along the crotch seam area. Space them approximately 1 inch (2.5 cm) apart, centered along the bottom edge.
For snap buttons, use a snap setter tool or hand sew with thread.
For sew-through buttons, work 3 small ch-3 button loops along the opposite crotch edge before sewing buttons on.
Blocking and Finishing
Wet block the entire romper by submerging in cool water, gently squeezing out excess water (do not wring), and laying flat on a blocking mat. Pin each square to its final dimensions. Allow to dry completely before removing pins.
The scallop borders will also benefit from light pinning to define the shell shapes.
Weave in all remaining ends securely, doubling back through several stitches in different directions to prevent unraveling during washing.
Care Instructions
Machine wash cold on gentle cycle, inside out. Lay flat to dry. Do not tumble dry. Do not iron directly over the dimensional petal stitches. If pressing is needed, use a damp pressing cloth and light steam from a distance only.
Size Customization Tips
To increase the finished size beyond 12 to 18 months, increase the hook size by 0.5 mm increments or switch to worsted weight yarn.
To create a wider bodice with a 4×3 grid, make 12 squares instead of 9. Join in a 4-wide by 3-tall configuration and adjust all border stitch counts proportionally.
For a sewn fabric lining instead of crocheting the bloomer section, cut a simple bloomer pattern from soft cotton knit and hand sew the top edge to the wrong side of the joined panel bottom.
Final Thoughts on This Baby Romper Crochet Pattern
This Lavender Daisy Baby Romper is the kind of project that makes you feel like a true crochet artist. Every dimensional petal, every perfectly joined square, every scalloped edge adds up to something genuinely special. Whether you’re making this for your own little one, a baby shower gift, or a grandchild, the recipient is going to treasure it.
The construction is more straightforward than it looks. You’re really just making squares, joining them, and building downward. Take your time with the petal stitches on your first square. Once you have the rhythm down, the rest will fly by.
Thank you so much for choosing this pattern. I hope you love making it as much as I loved designing it. If you finish your romper, I would absolutely love to see it! Tag me on Instagram or share in our Facebook group. Nothing makes my day like seeing your beautiful finished projects.
If this pattern speaks to you, go ahead and save it to your Pinterest boards so you can find it when you’re ready to cast on. And please drop a comment below if you make one. I read every single comment and love hearing about your yarn choices, any modifications you made, and how the little ones look in their finished rompers!
You Might Also Like
- Ocean Blues Beaded Sea Creature Anklet Free Crochet Pattern
- Ocean Wave Baby Hooded Cape Free Crochet Pattern
- Lavender Blossom Baby Romper Set Free Crochet Pattern
- Mint Daisy Spring Barrel Handbag Free Crochet Pattern